-

How to Run PowerShell Scripts with Task Scheduler
Automating PowerShell scripts is a much needed task for Windows Administrators. The Task Scheduler provides a reliable way to execute scripts on a predefined schedule, eliminating the need for manual intervention. This guide covers both the command and GUI methods for how to run PowerShell scripts from Task Scheduler.
Whether you are automating system maintenance, log collection, or other administrative tasks, using Windows Task Scheduler will serve you well. As a SQL Server DBA, I would usually have my PowerShell & SQL scripts running on a schedule using the SQL Agent. However, as I’ve mentioned in my other post, we need to use other methods like the Task Scheduler for achieving automation when on the SQL Server Express Edition.
Topics Covered:
> Create a Scheduled Task using PowerShell
> Create a Scheduled Task for a PowerShell Script (GUI Option)
> More Tips for Automating PowerShell Scripts
Create Scheduled Task using PowerShell
1. Create Your PowerShell Script
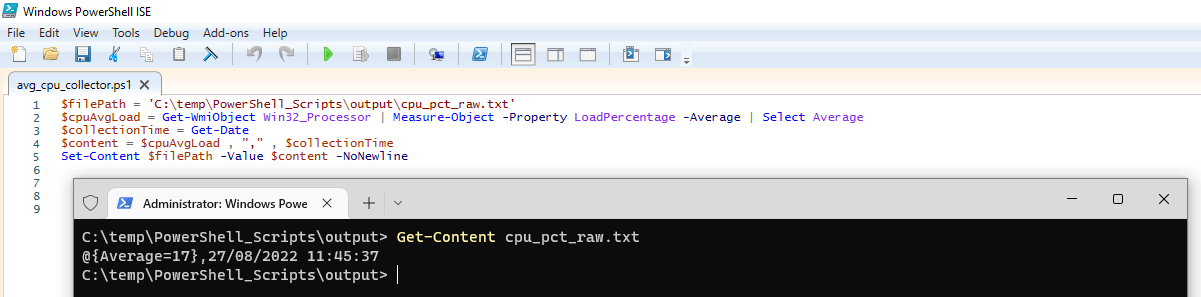
Write the PowerShell script you want to schedule. For this example, the script logs the system’s average CPU usage with a timestamp into a text file. Save your script, e.g.,avg_cpu_collector.ps1, inC:\temp\PowerShell_Scripts.
2. Create the Scheduled Task
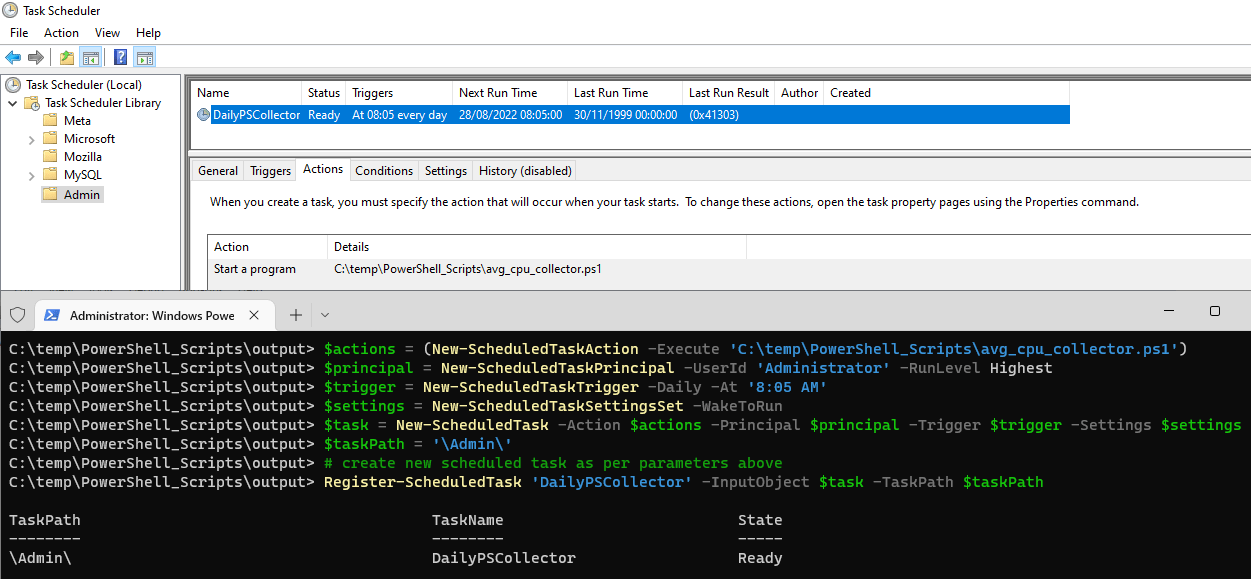
Use the following PowerShell code to create a scheduled task that runs your script daily at 8:05 AM:$actions = (New-ScheduledTaskAction -Execute 'C:\temp\PowerShell_Scripts\avg_cpu_collector.ps1') $principal = New-ScheduledTaskPrincipal -UserId 'Administrator' -RunLevel Highest $trigger = New-ScheduledTaskTrigger -Daily -At '8:05 AM' $settings = New-ScheduledTaskSettingsSet -WakeToRun $task = New-ScheduledTask -Action $actions -Principal $principal -Trigger $trigger -Settings $settings $taskPath = '\Admin\' # create new scheduled task as per parameters above Register-ScheduledTask 'DailyPSCollector' -InputObject $task -TaskPath $taskPath
3. Verify the Task
Open Task Scheduler to confirm the task was created under the specified path (\Admin\).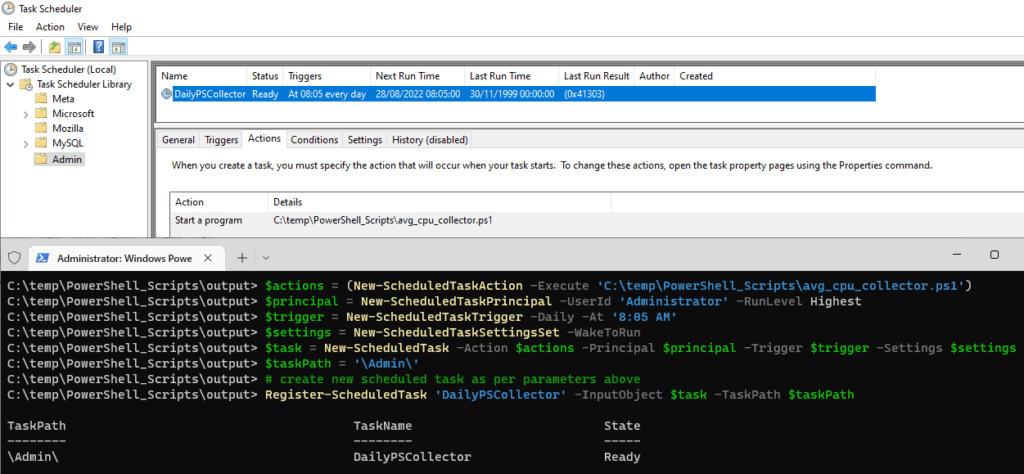
Create a Scheduled Task for a PowerShell Script (GUI)
1. Open Task Scheduler
Open the Task Scheduler application from the Start Menu.2. Create a New Task
> Right-click in the empty area and select Create Task.
> In the General tab, enter a name (e.g.,DailyPSCollector).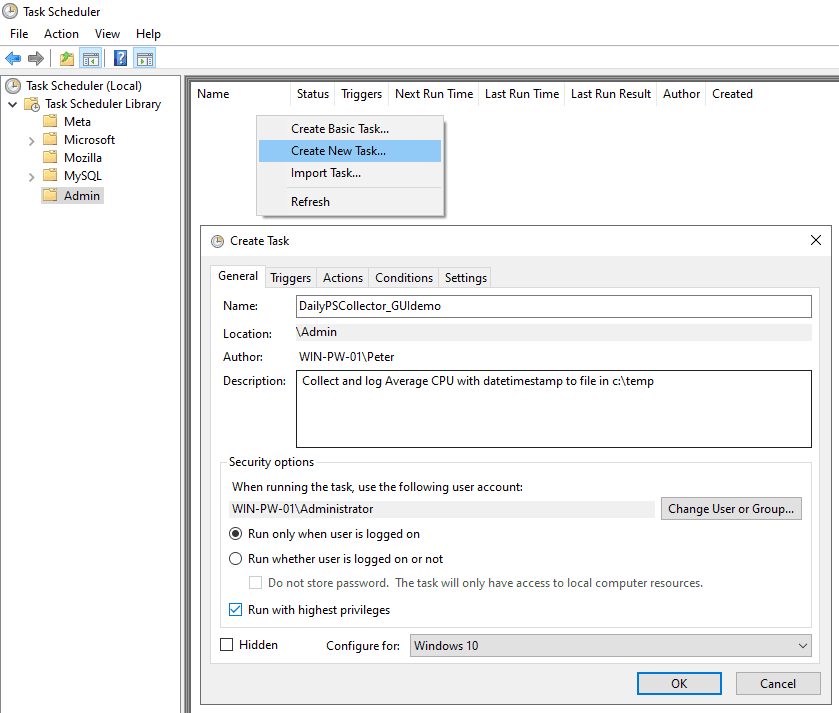
3. Set the Trigger
> Choose Daily and set the time to 8:05 AM (or your preferred schedule).
> Go to the Triggers tab and click New.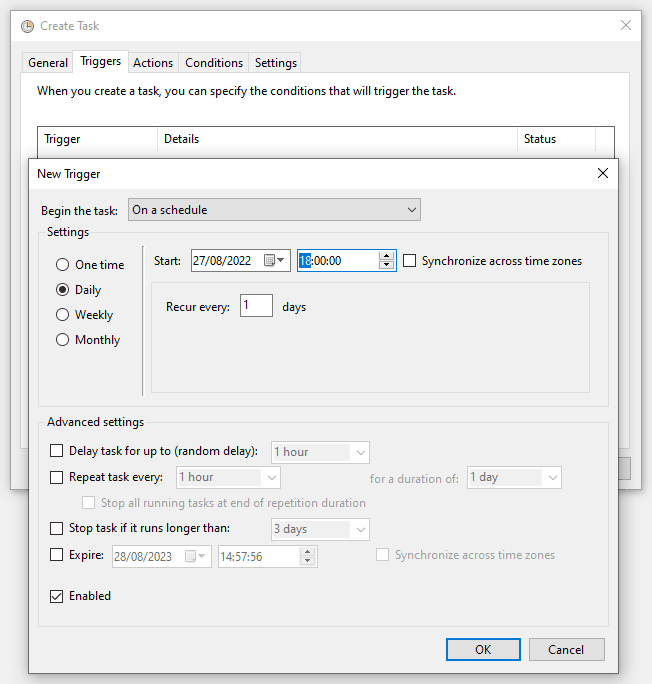
4. Define the Action
> Action: Start a program
> Program/script: powershell
> Arguments: -File “C:\temp\PowerShell_Scripts\avg_cpu_collector.ps1”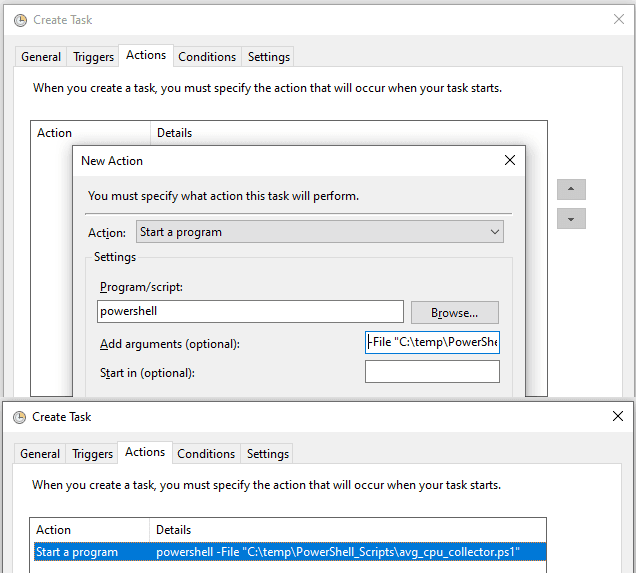
5. Review the Settings
> Click OK to save.
> Check the Settings tab for additional options like allowing the task to run on demand.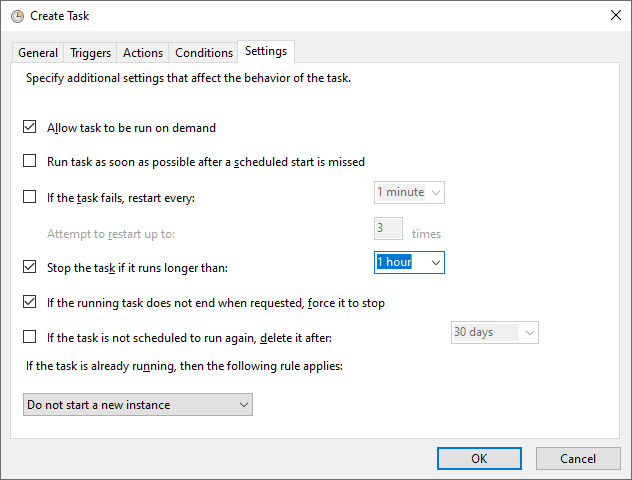
6. Verify Your Task
You’ll now see the task listed in the Task Scheduler main window.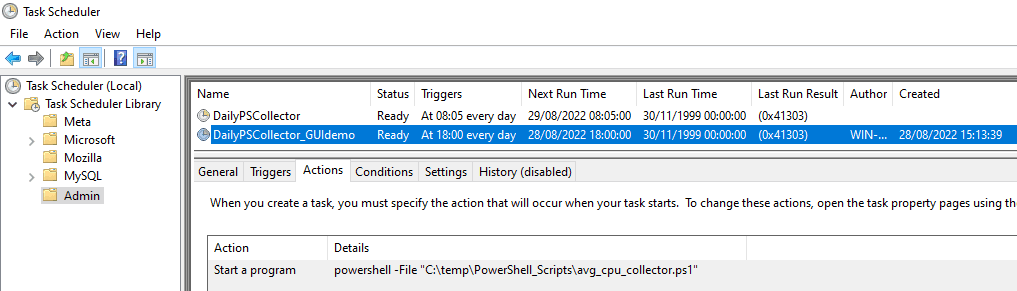
More Tips for Automating PowerShell Scripts
> Use Proper Permissions: Run your scheduled tasks with a user account that has the necessary permissions.
> Test Your Script First: Before scheduling, run your PowerShell script manually to ensure it works as expected.
> Consider Logging: Add logging to your script to track its execution and troubleshoot any issues.
> Backup Your Tasks: Use PowerShell to export your scheduled tasks for backup or migration. -
SQL Server Default Ports
The SQL Server default ports that the SQL Engine runs on is port 1433. This is a useful thing to know if managing SQL Server databases, however SQL Server can be configured to run on a variety of port numbers, which I’m hoping to help explain in this post.
As a SQL DBA, you will often need to open network flow on Firewalls, whether it’s the local Windows Firewall or requesting network changes through a network team. It’s part of our job to ensure proper connectivity happens to and from our SQL Servers. When we are updating network rules, we must know the source and destination IP subnets, along with the port numbers needed.
In my experience, the SQL Server Engine generally runs on port 1433, I’d say about 95% of the time it’s running on this port. The other server configurations are usually running with multiple instances on the same server, or some outliers do use custom ports. In the end though, we need to confirm the running port numbers before we get network line of sight opened.
SQL Server Ports Aren’t Always the Same
SQL Server runs using several ports, each serving specific functions within the database ecosystem. Here’s a breakdown of some essential ports used by SQL Server:
SQL Server Database Engine:
The core SQL Server engine service runs using port port 1433 as described above, however this can be set to any port number depending on who configured it.SQL Server Integration Services (SSIS):
SSIS requires port 135 for various communication tasks related to data integration, ETL (Extract, Transform, Load) processes, and package execution. This port cannot be changed.SQL Server Browser & Dedicated Administrator Connection (DAC):
The SQL Server Browser Service & DAC often run using port 1434. As a DBA, these are not typically used or relied on much.Database Mirroring Endpoints:
If you’re running with Always On Availability Groups (AGs) or Mirroring, the Mirroring Endpoint will usually operate using port 5022, and sometimes can be 7022.Multi-Tenant SQL Servers:
If you have many SQL Server instances running on the same server, for each instance installed you’ll need a unique port assigned. This could be any port number that you and/or team decide.Checkout the Microsoft Docs for a better and more detailed list of ports used by SQL Server.
How to Check Running SQL Server Port Numbers
Get SQL Engine Port Number
To check the port your SQL Server instance is running on, follow these steps:
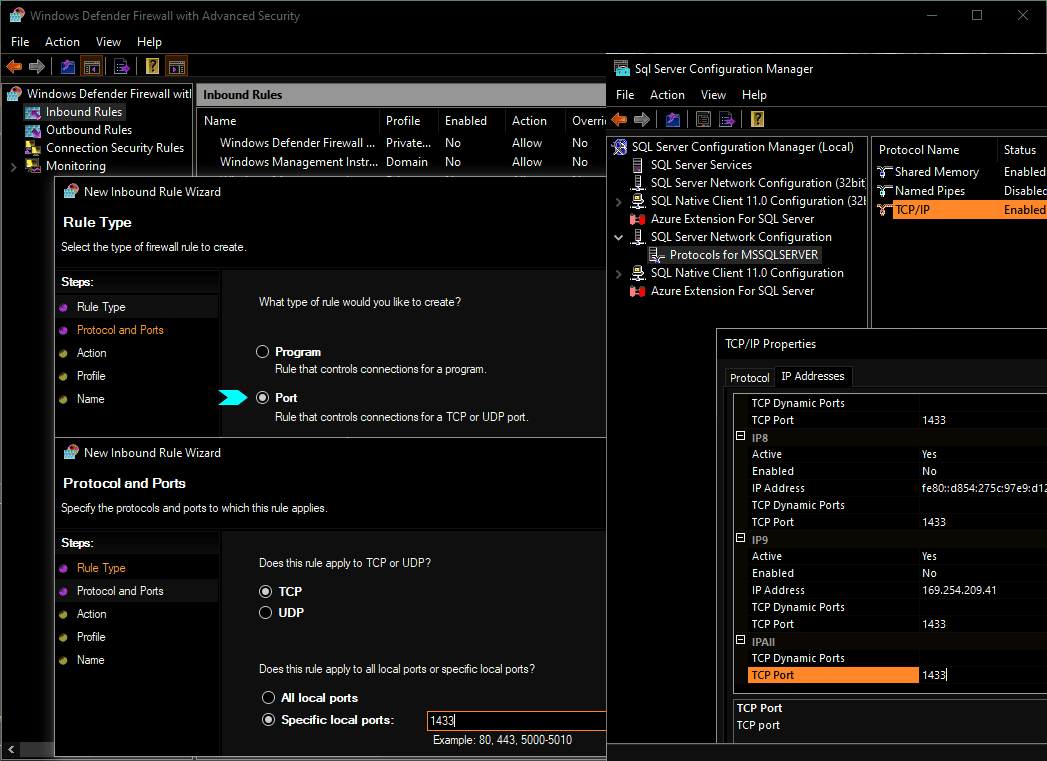
1. Open SQL Server Configuration Manager.
2. Expand SQL Server Network Configuration and click on Protocols for MSSQLSERVER.
3. Right click TCP/IP Properties and select IP Address Tab.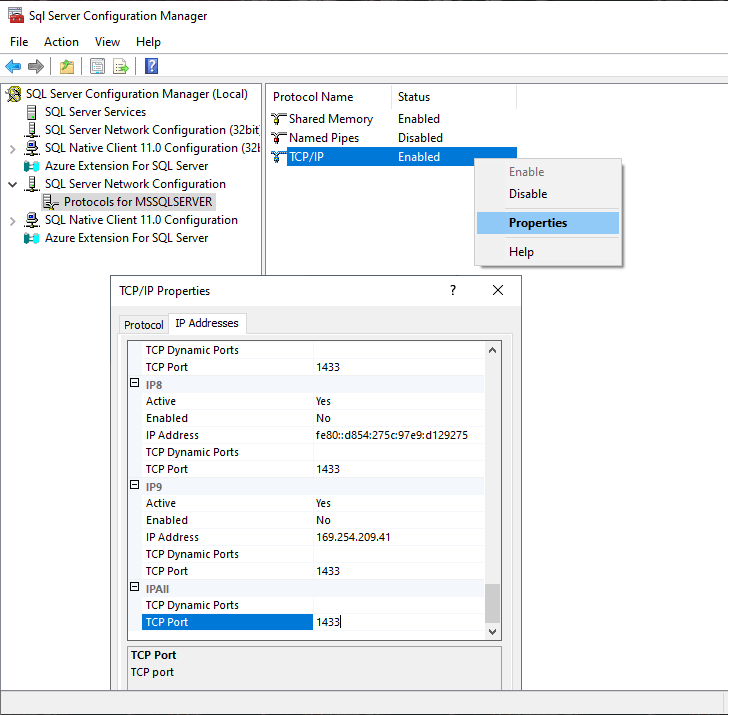
This will show the port number this SQL Server Service is using. If there’s more than one instance installed on this server, you can navigate to the same window for each instance shown in SQL Server Configuration Manager.
Get Mirroring Endpoint Port Number
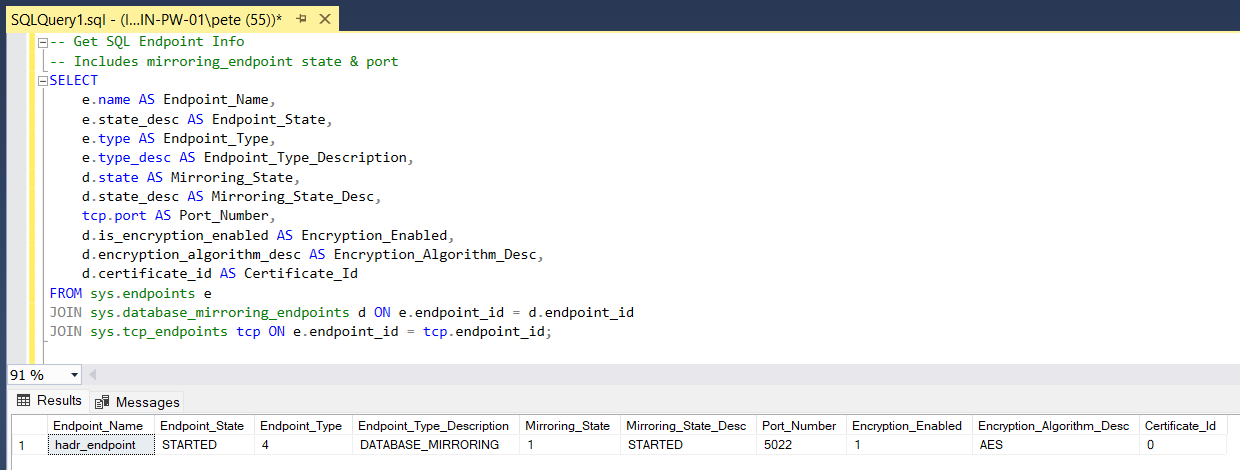
To view the SQL Server HADR (Mirroring) Endpoint port number, run the following command:
-- Get Mirroring Endpoint Info
-- Includes mirroring_endpoint state & port
SELECT
    e.name AS Endpoint_Name,
    e.state_desc AS Endpoint_State,
    e.type AS Endpoint_Type,
    e.type_desc AS Endpoint_Type_Description,
    d.state AS Mirroring_State,
    d.state_desc AS Mirroring_State_Desc,
    tcp.port AS Port_Number,
    d.is_encryption_enabled AS Encryption_Enabled,
    d.encryption_algorithm_desc AS Encryption_Algorithm_Desc,
    d.certificate_id AS Certificate_Id
FROM sys.endpoints e
JOIN sys.database_mirroring_endpoints d ON e.endpoint_id = d.endpoint_id
JOIN sys.tcp_endpoints tcp ON e.endpoint_id = tcp.endpoint_id;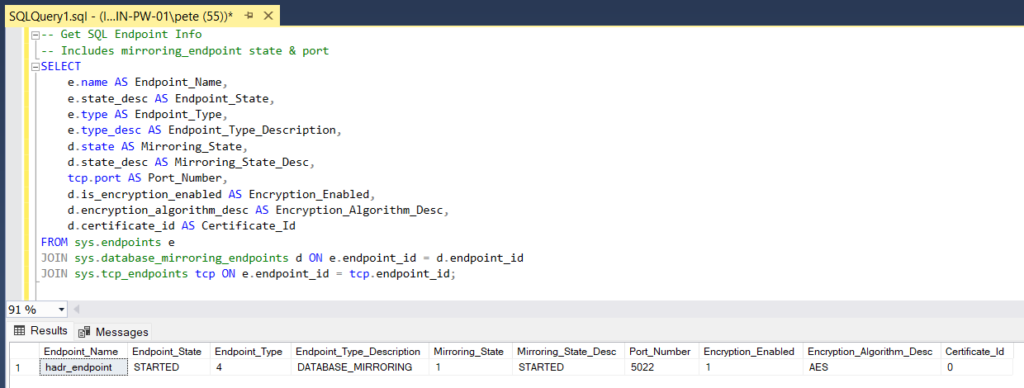
Other Ways of Identifying Running Ports for SQL Server
There are other ways of identifying SQL ports, including the following:
Check Listening Ports on Windows
Checkout my other blog post which shows you how to check Listening Ports on Windows.Review SQL Server Error Logs
SQL Server Error Log records various events and messages, including information about the SQL Server instance’s port number. You can find the port number logged during the SQL Server Service start-up. To view the Error Log:
1. Open SQL Server Management Studio (SSMS).
2. Connect to your SQL Server instance.
3. Navigate to Management > SQL Server Logs and open the current Error Log.Run SQL DMV Queries to Check Port Numbers
We can query DMVs likesys.dm_exec_connectionsto retrieve information about SQL Server network configurations. For example:-- Check SQL Server Engine Port Number SELECT DISTINCT local_tcp_port FROM sys.dm_exec_connections WHERE local_tcp_port IS NOT NULL
Check Registry for Port Number
SQL Server port numbers are also stored in the Windows Registry. The port number can be found under the following registry key:HKEY_LOCAL_MACHINE\SOFTWARE\Microsoft\Microsoft SQL Server\<InstanceName>\MSSQLServer\SuperSocketNetLib\Tcp
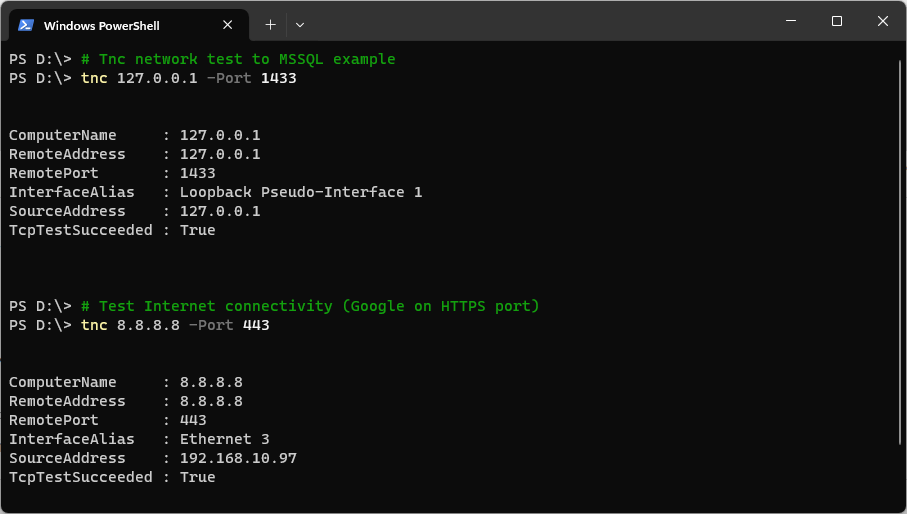
Testing Connectivity to Remote Server Ports with PowerShell
To test if network flow on a port is open between severs on Windows, we can run the following:
# Test remote port is open
Test-NetConnection -ComputerName lab-sql1.whyte.net -Port 1433

# Same as above command using alternative syntax/ip
tnc 172.31.18.100 -port 1433
Checkout my other post for more information on testing connectivity to remote ports using PowerShell.
I hope all this was useful, cheers!
-
Connecting to SQL Server on Another Domain
This post contains a guide on how to connect to SQL Server with Windows Authentication, but using a different Domain User other than your own.
The regular Windows SQL Server User connects & runs their queries via SQL Server Management Studio (SSMS). If you’re in a corporate environment, you’ll likely be logged into your computer with an Active Directory (AD) User. If we open SSMS and connect to SQL Server, it’ll try with our currently logged-in AD User account. This is useful info if in this scenario and you want to connect to an alternative Domain. Also good for when testing permissions on AD Users as a DBA.
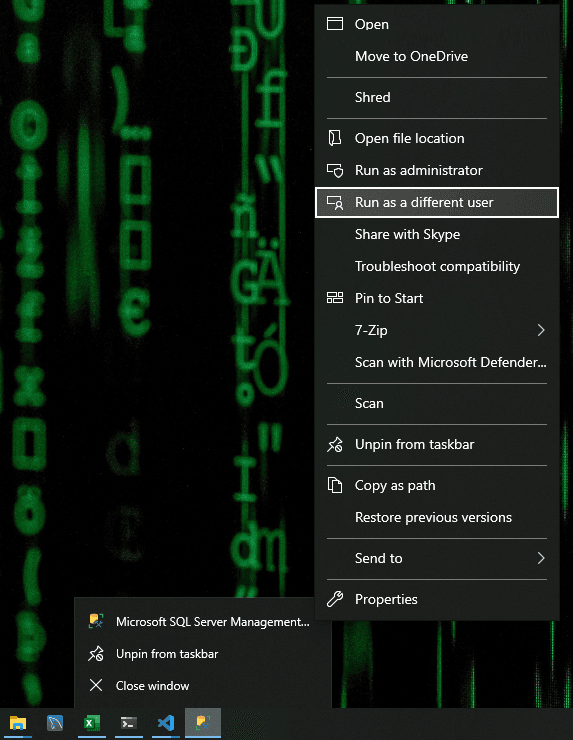
Steps to Connect to SQL Server on Another Domain
1. Right-click the SSMS application icon.
2. Hold CTRL and right-click again.
3. Select Run as a Different User from the menu.
4. Enter the domain credentials for the account you want to use.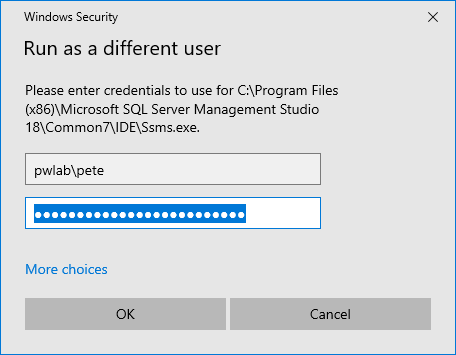
When SSMS opens, it will use the provided credentials to authenticate your connection. Although the connection dialog may show your local domain, the alternate account details are used for authentication.
For those who do this frequently, automating the process with a PowerShell script is a time-saver. A script can directly launch SSMS with the desired credentials, eliminating the need for manual input each time. Check out my latest post on this, Opening SSMS as a Different Domain User for more info.
-
Restart Services on Multiple Hosts using PowerShell
In this post, we’ll walk through a script that restarts services on multiple remote hosts using PowerShell. A single PowerShell command will be run on several computers at the same time.
If you need to run a command on multiple remote machines, the PowerShell Invoke-Command cmdlet is a good option. We use this to send commands for execution on remote computers.
The command being passed in this demo is restarting the SQL Server Agent Service using the Restart-Service PowerShell cmdlet.
Restarting SQL Agent Service using PowerShell
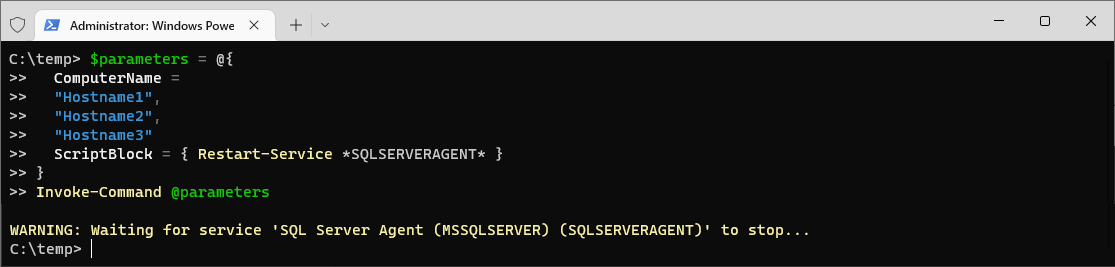
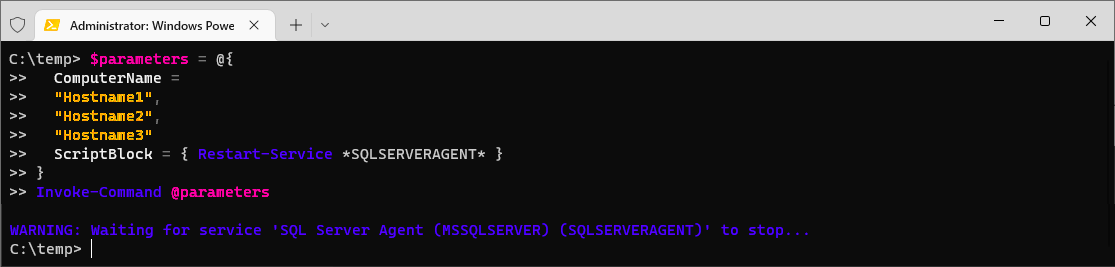
Before running the script below, change the
ComputerNameparam to include your hostnames:# Restart service on multiple hosts $parameters = @{ ComputerName = "Hostname1", "Hostname2", "Hostname3" ScriptBlock = { Restart-Service *SQLSERVERAGENT* } } Invoke-Command @parameters
The
ScriptBlockargument can be amended to run any command you like. You can add error checking if you’re building something that needs that enhanced reliability.Remember that you should always be careful when running scripts that modify services on remote hosts. It’s a good idea to test the script on a single host before running it on multiple hosts to ensure that it works as expected.
-
How to Rename a Computer that Hosts SQL Server
When changing the hostname of a computer that is running SQL Server, we have to update system metadata so that remote connections and applications do not lose connectivity.
This guide provides a clear, step-by-step approach to updating SQL Server metadata after a hostname change. This is more often needed for when you’ve installed SQL before naming the server correctly.
Why You Shouldn’t Change a SQL Server’s Hostname
> Failover Clusters:
The renaming process differs significantly for clusters.
> Replication:
If replication is configured, you should probably evaluate whether renaming is really necessary.
> Database Mirroring:
Disable mirroring before renaming and re-establish it afterwards, this carries inherent risks.
> SSRS:
Configuration changes may be required if SQL Server Reporting Services (SSRS) is running on the host.
> Hardcoded Hostnames:
Update all scripts, applications and DNS configurations referencing the old hostname.Always refer to Microsoft’s Documentation for authoritative guidance and thoroughly test your changes in a non-production environment before applying them in live systems.
Steps to Rename SQL Server Host
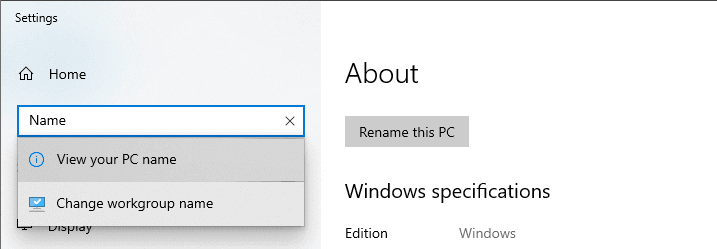
1. Change the Windows Computer Name
To change the hostname, you can use either the graphical user interface (GUI) or PowerShell.
PowerShell Command:
The PowerShell cmdlet for this isRename-Computer, ensure you are running PowerShell as Administrator:# change name of server / computer Rename-Computer -NewName "NewComputerName"

After executing the command, reboot the system to apply the change.
2. Update SQL Server Metadata with the New Hostname
After renaming the computer, attempting to log in to SQL Server with the old hostname will result in an error. You’ll need to connect using
localhostor the new hostname.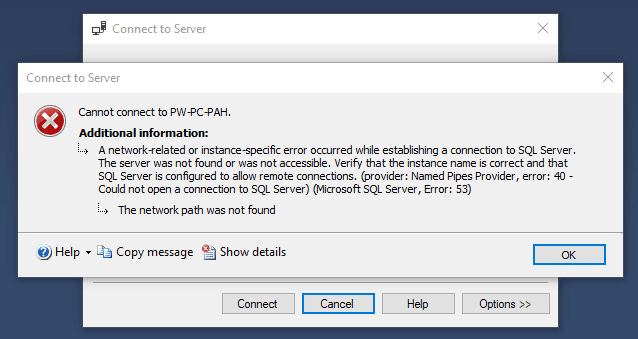
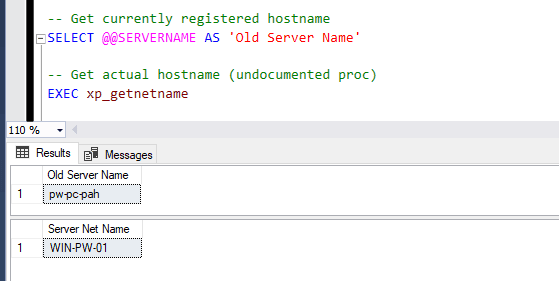
Check the Current and Actual Hostnames:
> The hostname system metadata is stored insys.serversand reported by@@SERVERNAME.
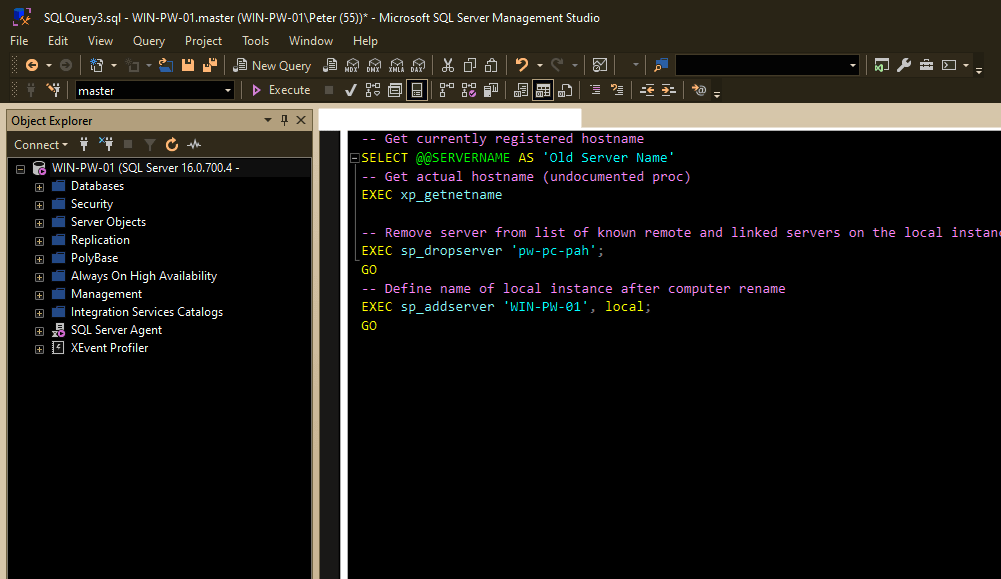
> Run the following query to retrieve the registered and actual hostnames.-- Get currently registered hostname SELECT @@SERVERNAME AS 'Old Server Name' -- Get actual hostname (undocumented proc) EXEC xp_getnetname
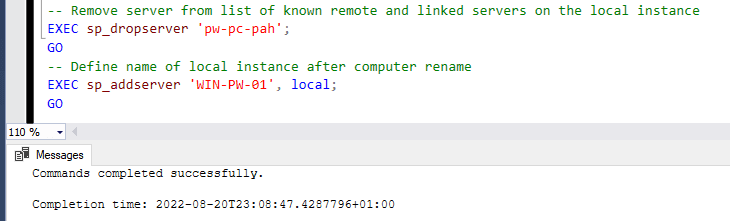
Drop the Old Server Name and Register the New One:
> The SQL commands being used here aresp_dropserverandsp_addserver.
> Execute these commands to update SQL Server with the new hostname.-- Remove server from list of known remote and linked servers EXEC sp_dropserver 'OldServerName'; GO -- Register the new hostname as the local instance EXEC sp_addserver 'NewServerName', local; GO
Replace
'OldServerName'and'NewServerName'with the appropriate values.Restart the SQL Server service for changes to take effect.
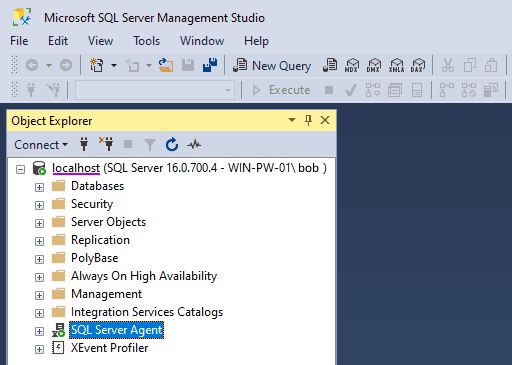
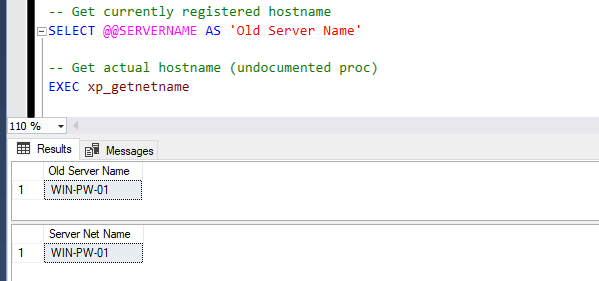
3. Verify the Hostname Change
After restarting the SQL Server service, run the following query to confirm the update:
-- check servername for SQL Server
SELECT @@SERVERNAME AS 'New Server Name';
Verify that all applications and features function correctly, and update any connection strings referencing the old hostname.
If you followed these steps, your system should now reflect the correct hostname without connectivity issues. Feel free to add a comment if any troubles I’ll try help you.