-
How to Install Ubuntu 20.04 on WSL
This guide shows how to install Ubuntu 20.04 on WSL (Windows Subsystem for Linux). Before installing a WSL Linux distribution you should have already enabled WSL on your computer.
All WSL Linux distributions are available for download in the Microsoft Store. This is the easiest way to install a WSL Linux distro. If you are automating WSL installations, you may be looking for the WSL distro download links and PowerShell install command.
This post contains the following methods to get Ubuntu installed on WSL:
> Install WSL Ubuntu 20.04 via Microsoft Store
> Install WSL Ubuntu 20.04 via CommandInstall WSL Ubuntu 20.04 via Microsoft Store
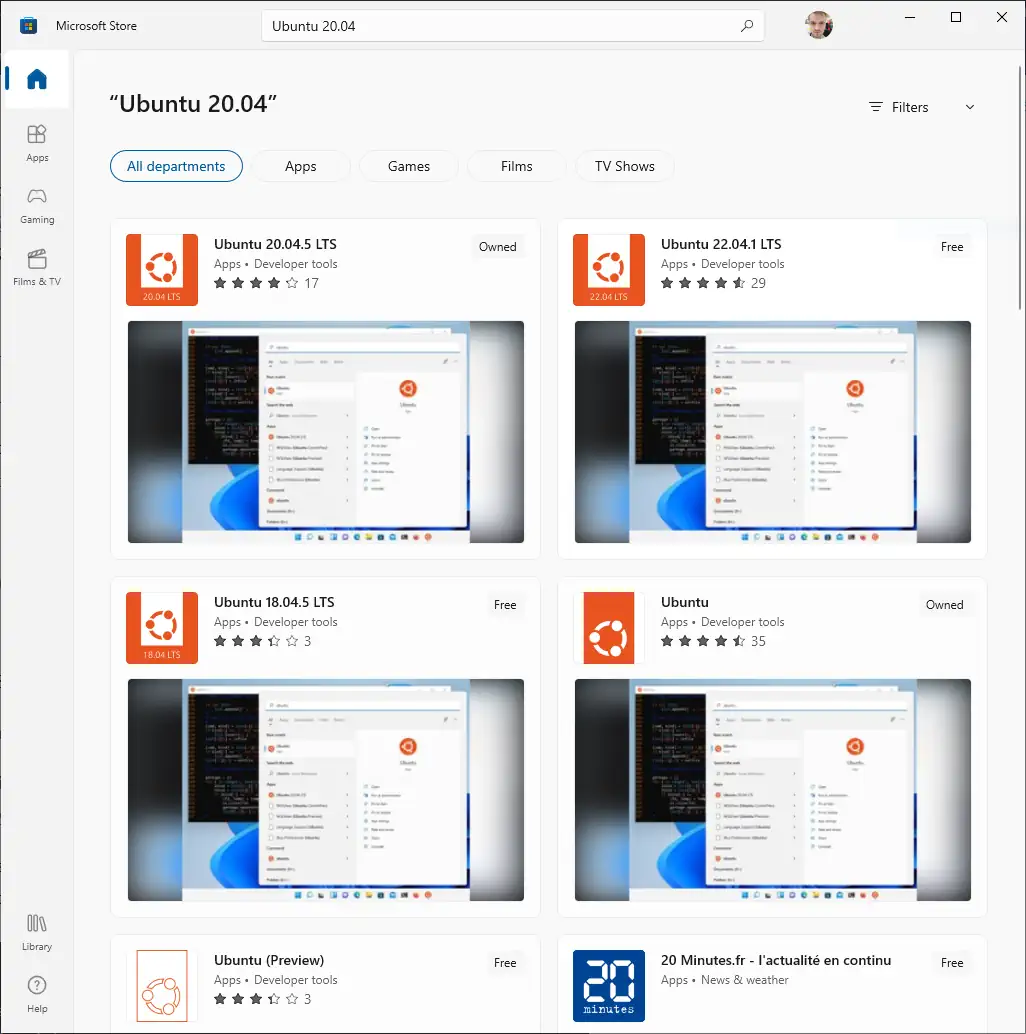
You can find all the available WSL Linux distributions in the Microsoft Store available for download. This may be restricted by Group Policy if you’re on a Domain (a work/corporate computer).
Click Start, open the Microsoft Store and simply search for the Ubuntu distribution version you desire.

Click to download/install Ubuntu WSL, and then go ahead and install Windows Terminal while you’re at it.
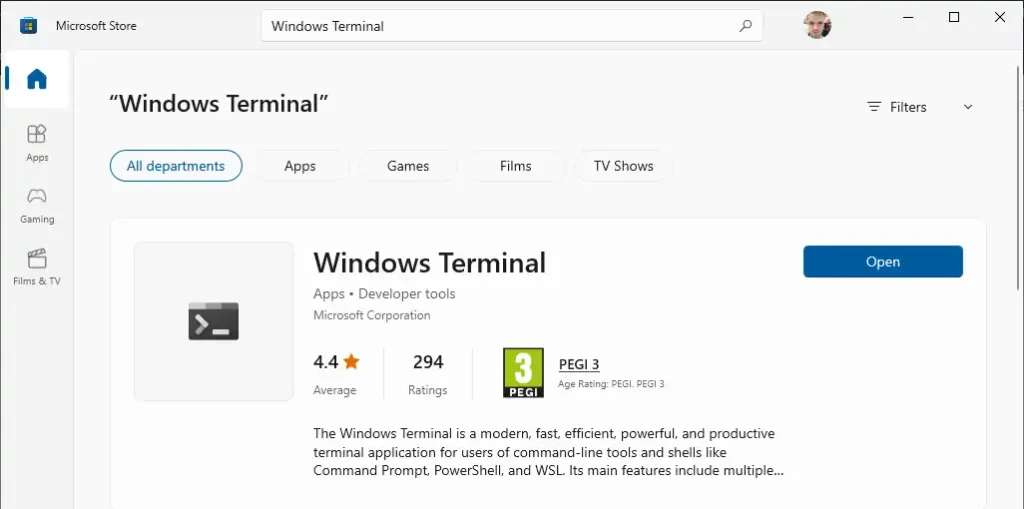
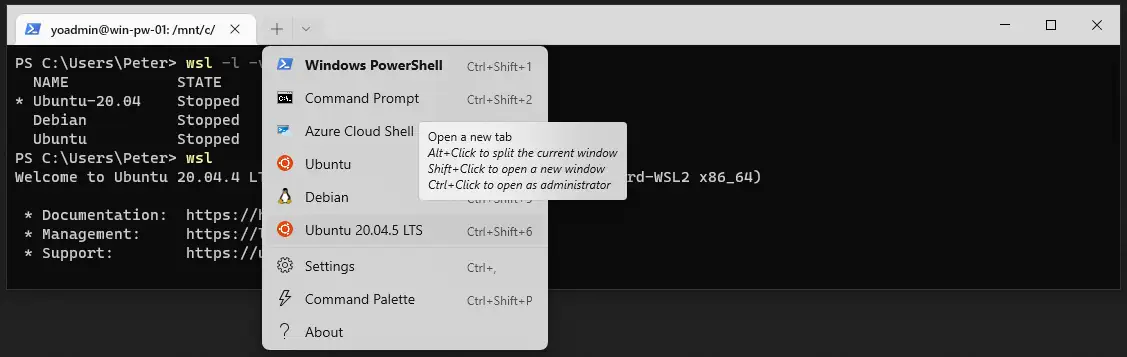
Once both of the above installs are complete, search and run Windows Terminal, then enter Ubuntu by running
wslin the terminal.
Install WSL Ubuntu 20.04 via Command
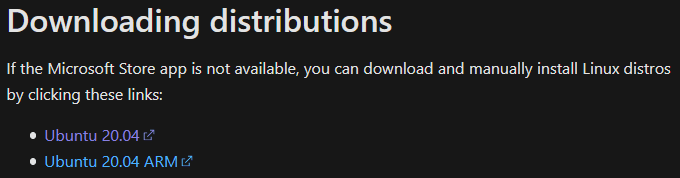
To install WSL via PowerShell script or command, we’d download the WSL Linux distro and then extract/install it.
The Microsoft Documentation contains a full list of WSL download links for each of the available WSL Linux distros:-
– Ubuntu 20.04 (LTS / 18.04 LTS)
– openSUSE Leap 15.1
– SUSE Linux Enterprise Server (15 SP1 / 12 SP5)
– Kali Linux
– Debian GNU/Linux
– Fedora Remix for WSL
– Pengwin (+ Enterprise)
– Alpine WSL
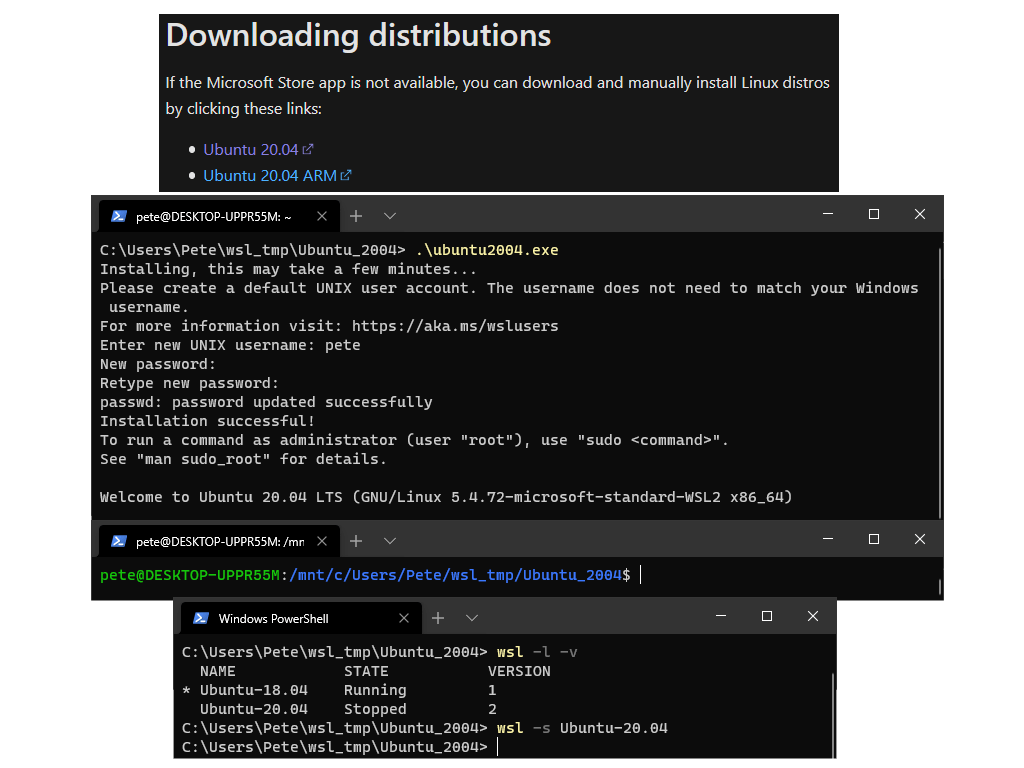
– Raft (Free Trial)We are installing Ubuntu 20.04 in this demo, manually via a web browser rather than PowerShell Invoke-WebRequest or Curl.
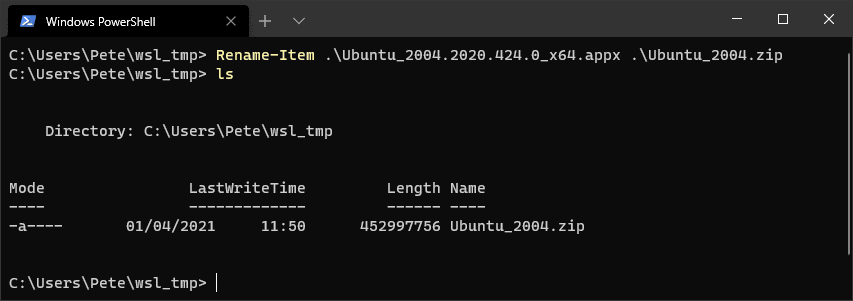
Move the downloaded file into some directory.

Now into the directory within PowerShell, rename the file from .appx to .zip format.
# rename Ubuntu appx file to zip format
# add-appxpackage doesn't always work, extracting the .exe seems better
Rename-Item .\Ubuntu_2004.2020.424.0_x64.appx .\Ubuntu_2004.zip
Extract the zip file into a new directory.
# extract the zip file into a new dir
Expand-Archive .\Ubuntu_2004.zip .\Ubuntu_2004
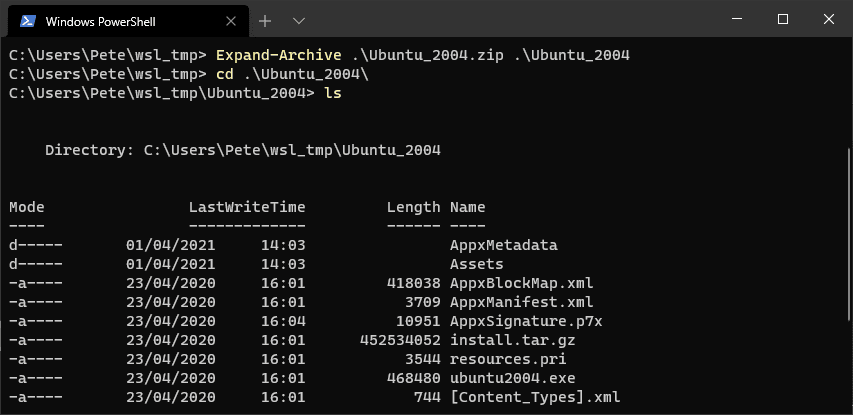
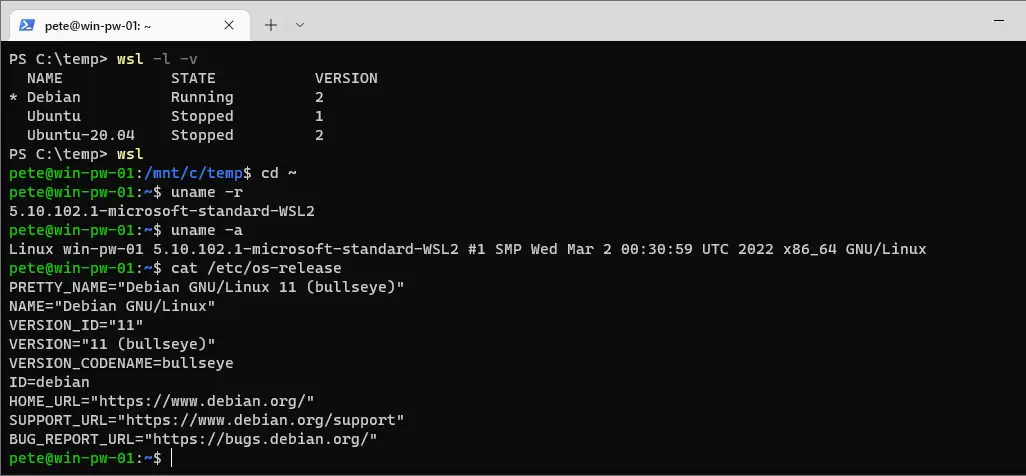
Run the ubuntu2004.exe file within the extracted directory and follow the setup instructions to create a new Linux login.
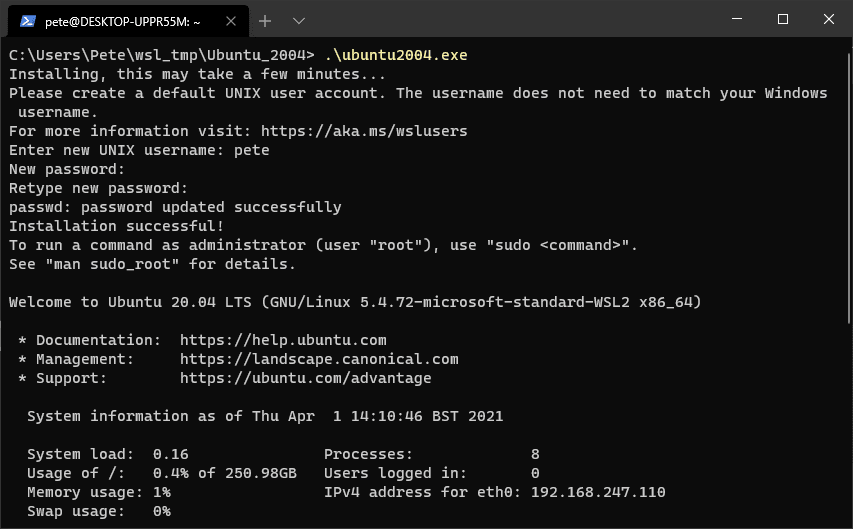
Once done wsl should be waiting for you.

Lastly, I’m now exiting (‘exit’ command) out of WSL, listing out my Linux distros and setting this Ubuntu 20.04 distro as my default.

-
How to Uninstall a Linux Distro in WSL
If you need to remove a Linux distribution in WSL (Windows Subsystem for Linux), it’s easy to do using the
wsl --unregistercommand.Unregistering a distro will permanently delete all data, settings, and installed software associated with it. Make sure you back up any important files before proceeding. You can always reinstall the distro later from the Microsoft Store if needed.
In this post, I’ll demo the steps for how to uninstall a Linux distro in WSL, with some useful tips along the way.
Uninstalling a WSL Distro
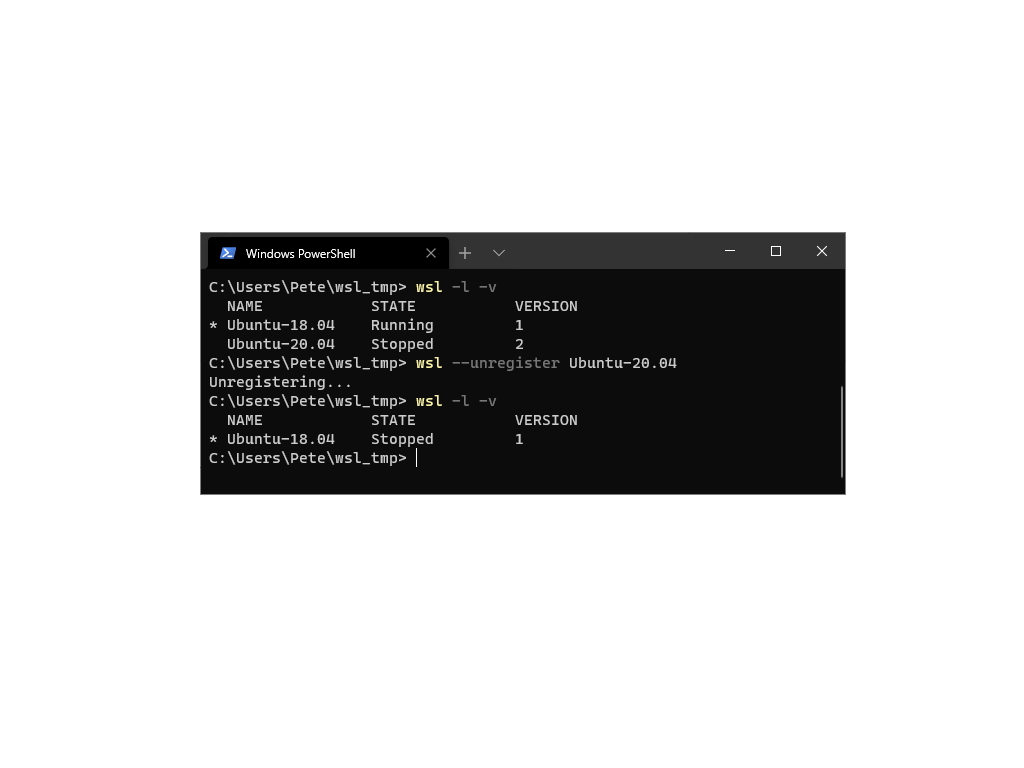
1. Check Installed WSL Distributions
To view all the Linux distributions installed on your system, open PowerShell or Command Prompt and run the following command:
# show list of wsl distros
wsl -l -v
This will list all installed distros, showing their names, running status, and WSL version.
Take the distro name from this to use in the next command
2. Unregister and Uninstall the Distro
To remove the Linux distribution, use the
wsl --unregistercommand with the name of the distro. For example, to uninstall Ubuntu-20.04, run:# unregister a wsl distro wsl --unregister <distro_name>
Note: This action is permanent, and you will not be able to recover the data unless you reinstall the distro. This command will unregister and remove all files, settings, and software associated with the chosen distro.
3. Verify the Distro Has Been Removed
To check that the distro has been successfully uninstalled, run the
wsl -l -vcommand again:# show list of wsl distros wsl -l -v
The distro you uninstalled should no longer appear in the list.
Additional Tips for WSL Users
Uninstalling a Linux distribution from WSL is a simple process using the
wsl --unregistercommand. Just remember that this action permanently deletes the distro and its data, so back up anything you want to keep.If you decide to reinstall a Linux distro, simply go to the Microsoft Store or use the command
wsl --install -d <distro-name>to install it again. You can also check out my other post on how to install WSL for more information. -
How to Set Default WSL Distribution
This guide contains a demo on how to set the default Windows Subsystem for Linux (WSL) distribution on a Windows computer.
This is particularly useful if you have multiple WSL distributions installed and need to manage various Linux environments on Windows.
Contents:
> Check Installed WSL Distros.
> Set Default WSL Distro.Check Installed WSL Distros
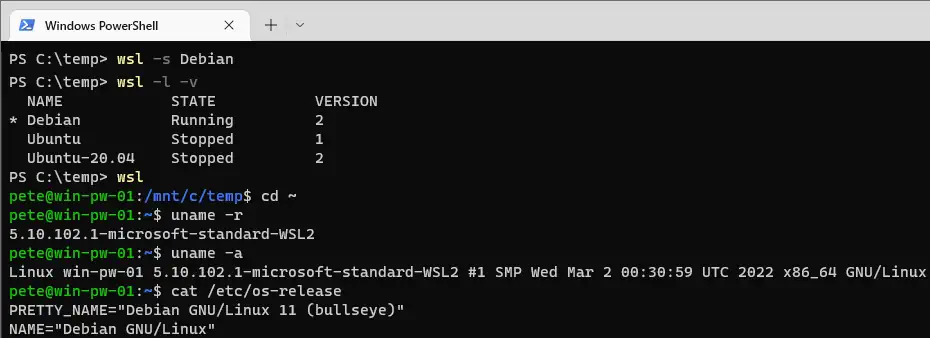
To view the currently installed WSL Linux distributions, run the following command:
# Check installed WSL distros
wsl -l -v
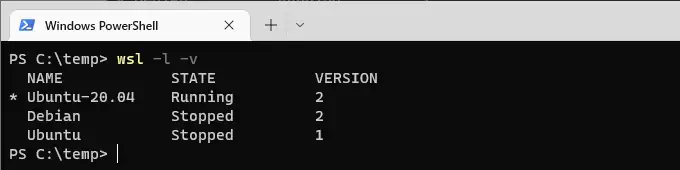
This command will display a list of installed distributions, with the star (*) next to the current default. For example, if Ubuntu 20.04 is marked with a star, it’s the default distro that will open when you run
wslwithout specifying a distro.Change Default WSL Distro
To set a new default distribution, use the
wsl -scommand followed by the desired distribution’s name. Make sure to get the exact distro name from the list displayed in the previous step.# change default linux distro in windows subsystem wsl -s <distro_name>
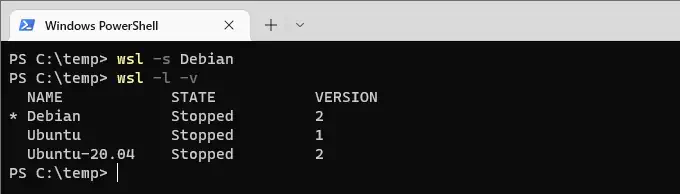
For example, to set Debian as the default, the command would look like this:
This change won’t interrupt any active WSL session you have open. Once set, the new default distribution will open automatically when running
wslfrom the command line. -
Viewing Windows Event Logs with PowerShell
In this post, we will explore how to use PowerShell to view event logs. We will use the
Get-EventLogcommand to accomplish this, listing event types available and then show recent events.1. List Available Event Log Types
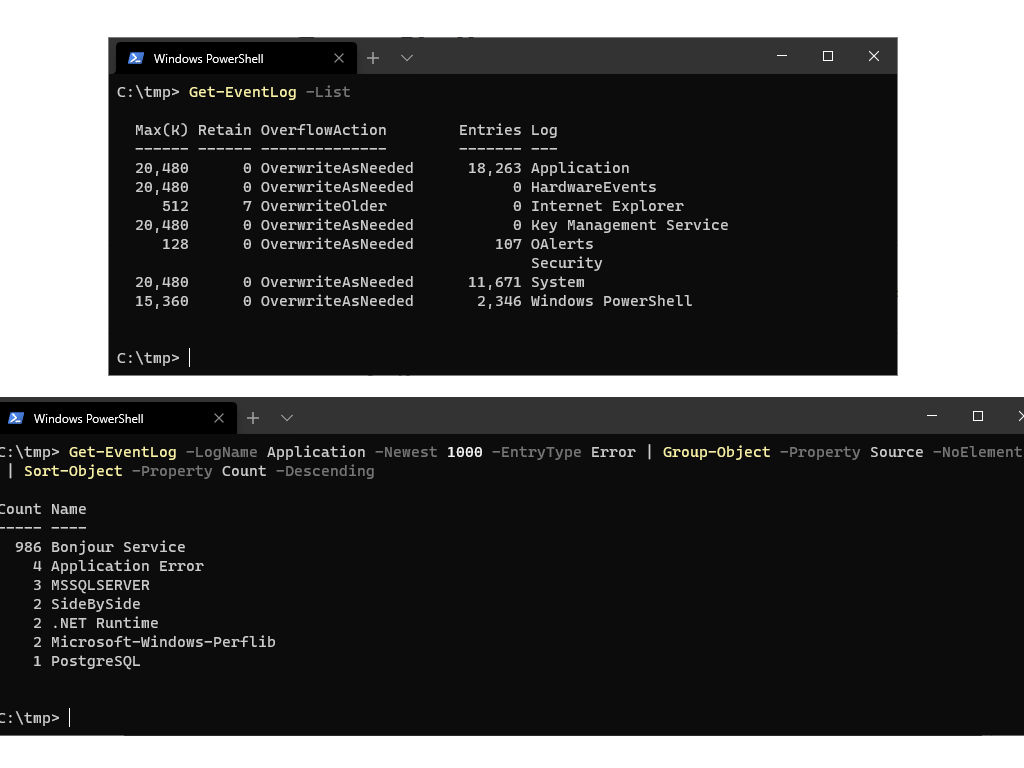
To display all event log types on a system, run
Get-EventLog -Listas shown below:# Get event types PowerShell Get-EventLog -List
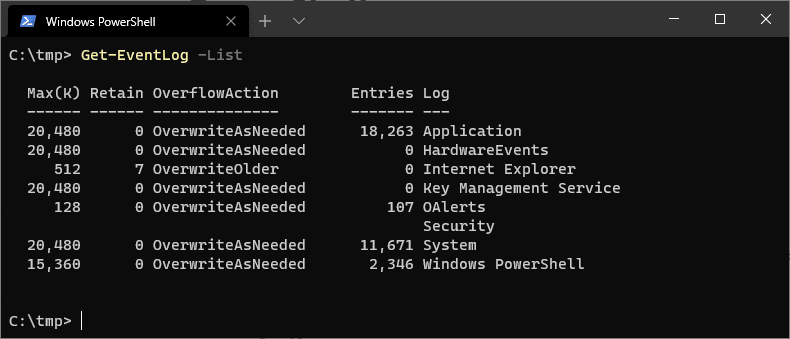
This command returns event categories such as System, Security, and Application. You can then specify a particular log type using the
-LogNameparameter in subsequent commands.2. Get Most Recent Events
To retrieve the 100 most recent events from the System log, run the following:
# Get most recent Windows events PowerShell
Get-EventLog -LogName System -Newest 100
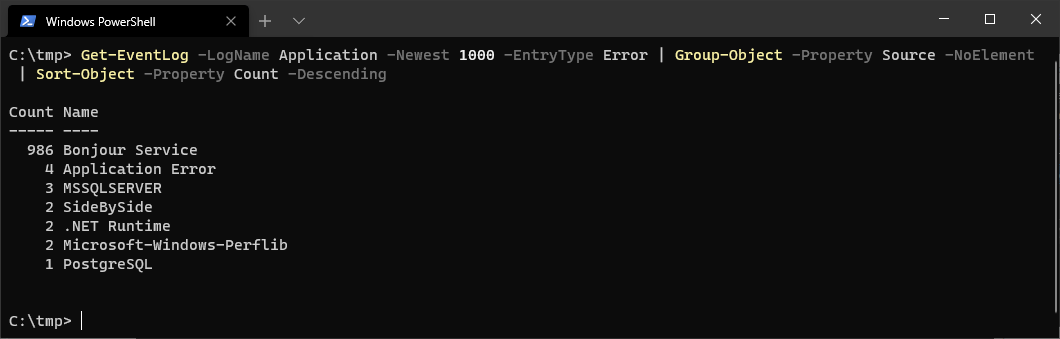
For a high-level view of frequent errors, group and count the newest 1000 error events from the Application log:
# Get most recent application events by count
Get-EventLog -LogName Application -Newest 1000 -EntryType Error |
Group-Object -Property Source -NoElement |
Sort-Object -Property Count -Descending
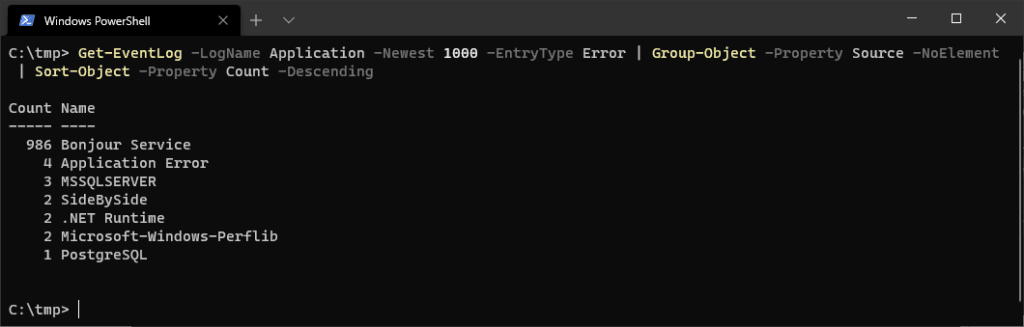
This reveals recurring error sources, helping identify persistent issues.
3. Get Events Between Specific Dates
To retrieve critical and error events within a date range, use the
Get-WinEventcmdlet in a PowerShell script:param( [DateTime]$StartDate, [DateTime]$EndDate ) # Get all critical and error events from the Windows event logs Get-WinEvent -FilterHashtable @{ LogName = 'System, Application'; Level = 1, 2; StartTime = $StartDate; EndTime = $EndDate }Replace
START_DATEandEND_DATEwith your desired date range:.\Get-CriticalAndErrorEvents.ps1 -StartDate '2021-01-01' -EndDate '2021-12-31'
This script filters events by:
– Date Range: Defined by your start and end dates
– Log Name: System and Application logs
– Level: Critical (1) and Error (2) eventsUsing PowerShell to explore and filter event logs offers a powerful way to troubleshoot and monitor system health. These commands and scripts will help you pinpoint issues and understand system behavior more effectively. Hope all this helps!
-

Open Current Folder in PowerShell
When working in a PowerShell terminal session, you might want to open Windows Explorer to view the current directory.
This guide is a simple guide to demo how to open the current working directory directly from PowerShell.
Using
Invoke-Itemto Open the Current FolderThe
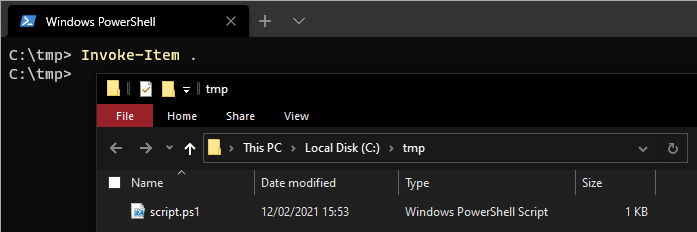
Invoke-Itemcmdlet lets you open files, folders, or other items. To open the current working directory in Windows Explorer, use a single.to reference the current path.# Open current folder in windows explorer Invoke-Item .
You can also use the shorthand
iias an alias forInvoke-Item. This is helpful for quickly opening the current directory or a specified file path.## ps script to open the current folder write-output 'Opening current folder...' ii .
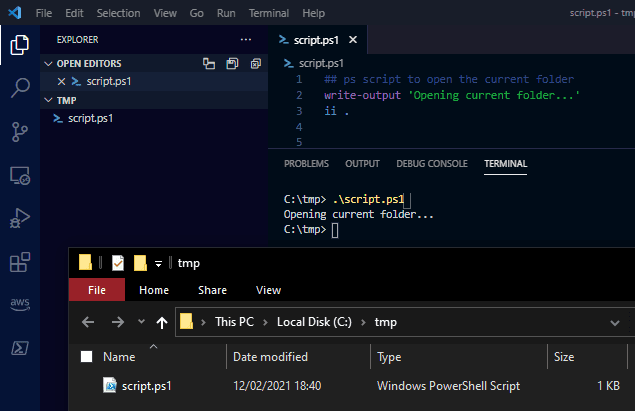
Running this script will open the current directory in Windows Explorer after displaying a message, as shown in the screenshot above.
That’s it for this one, hope it was useful for you, cheers!