-
How to Upgrade WSL from Version 1 to Version 2
This guide explains how to upgrade your Windows Subsystem for Linux (WSL) distribution from Version 1 (WSL 1) to Version 2 (WSL 2).
WSL supports two versions: the original WSL 1 and the more advanced WSL 2. You can install multiple Linux distributions on your system and easily switch their WSL versions. Upgrading to WSL 2 is recommended for most users as it offers better performance and additional features.
If you’re unsure which WSL version your system is using, refer to my guide How to Check Installed WSL Versions. For users looking to downgrade from WSL 2 to WSL 1 instead, see my post How to Downgrade from WSL Version 2 to WSL Version 1.
Steps to Upgrade WSL 1 to WSL 2
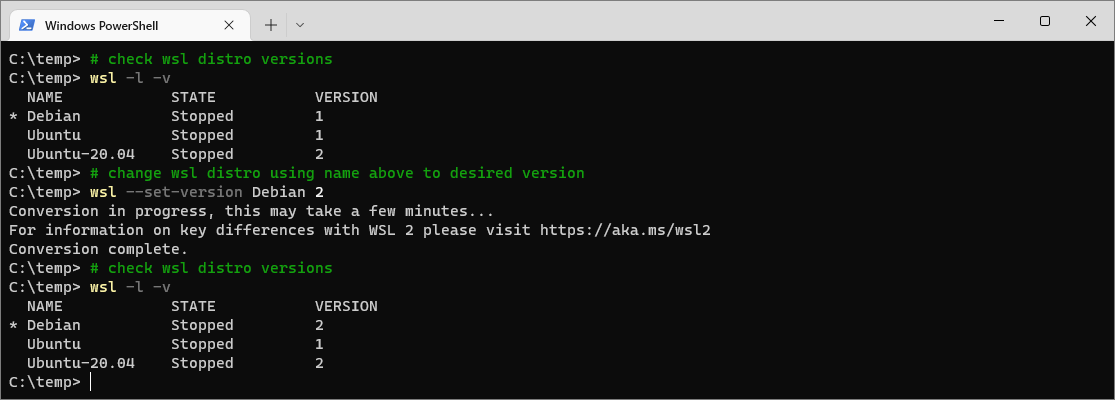
1. Open a terminal and run
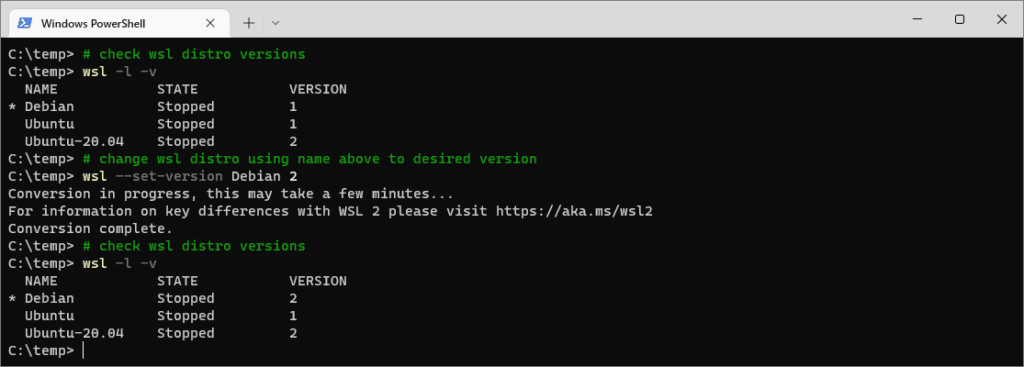
wsl -l -vto list all installed WSL distributions and their versions.2. Identify the distribution you want to upgrade. For example, if the distribution is named
Debian, use the following command to upgrade it to WSL 2:# check wsl distro versions wsl -l -v # change wsl distro using name above to desired version wsl --set-version Debian 2
The upgrade will be applied immediately, and the selected distribution will now run on WSL 2.
If you need to switch back to WSL 1, simply replace the
2with a1in the--set-versioncommand.Hope this guide was what you needed. Feel free to browse around for more tips like this.
-
How to Downgrade from WSL Version 2 to WSL Version 1
In certain development or system administration scenarios, you may need to downgrade your Windows Subsystem for Linux (WSL) distribution from WSL version 2 (WSL 2) to version 1 (WSL 1).
While WSL 2 brings many enhancements, such as a real Linux kernel and better performance, there are times when version 1 is more suited to certain use cases, like simpler file system access or better integration with Windows tools.
In this guide, we’ll walk you through the process of downgrading a WSL distribution from version 2 to version 1. This process can be done with a simple command, and the good news is it’s easy to revert if you change your mind.
Prerequisites
Before you begin, ensure that:
1. You are running Windows 10 or later.
2. You have WSL installed and at least one Linux distribution set up.
3. You know the name of the Linux distribution that you want to downgrade. You can list all installed distributions with the commandwsl -l -v.
Downgrading from WSL 2 to WSL 1
1. Check Your Current WSL Version
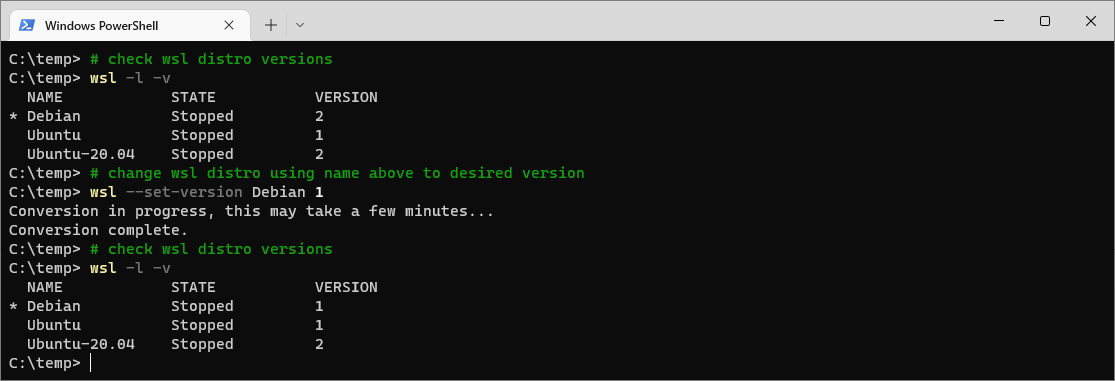
To confirm which version of WSL each distribution is running, open a PowerShell window and run the following command:# check wsl distro versions wsl -l -v
This command ^ will display all your installed WSL distributions and their corresponding versions.
2. Downgrade to WSL 1
To downgrade a distribution, use the following command:# set wsl version example wsl --set-version Debian 1
Replace
<distro-name>with the name of your Linux distribution (e.g.,Debian/Ubuntu).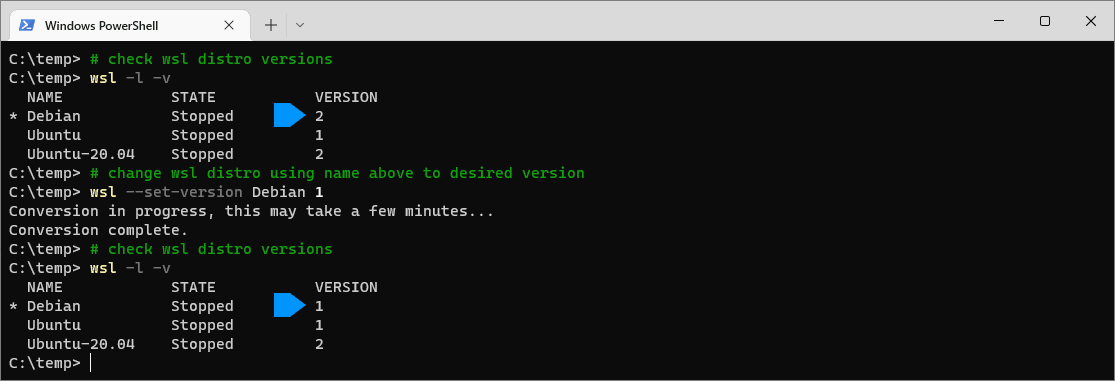
The Debian instance as marked in the screenshot above has now been downgraded from WSL2 to WSL1. It won’t take long.
To upgrade back to version 2, it’s as simple as changing the number from a 1 to a 2 in the command!
3. Verify the Downgrade
After the downgrade completes, you can verify that your distribution is now running on WSL 1 by running thewsl -l -vcommand again.Hope this guide was useful!
-
How to Check Linux Version in Ubuntu
To check the Linux version running on an Ubuntu system, you can use the
lsb_release -aorcat /etc/os-releasecommands. This is especially useful when accessing a host for the first time or verifying the installed Linux distribution and version.In this post, I’ll demo two ways to show the Linux version in Ubuntu:
> Option 1: lsb_release -a
> Option 2: cat /etc/os-releaseThe demo you see here was done on Ubuntu WSL. Note that the
hostnamectlcommand does not work when running Ubuntu on the Windows Subsystem for Linux (WSL).Option 1: Using lsb_release -a
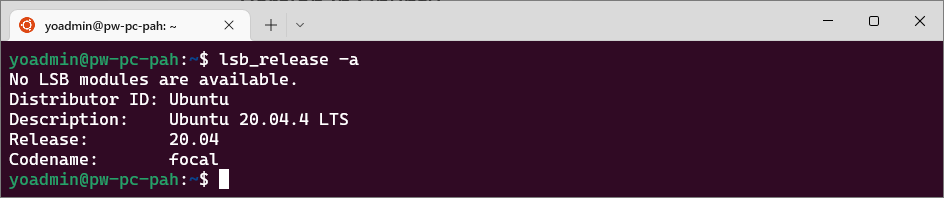
The
lsb_releasecommand provides a quick and simple way to check the version of Linux running on your system:# check linux version on ubuntu lsb_release -a
Option 2: Using cat /etc/os-release
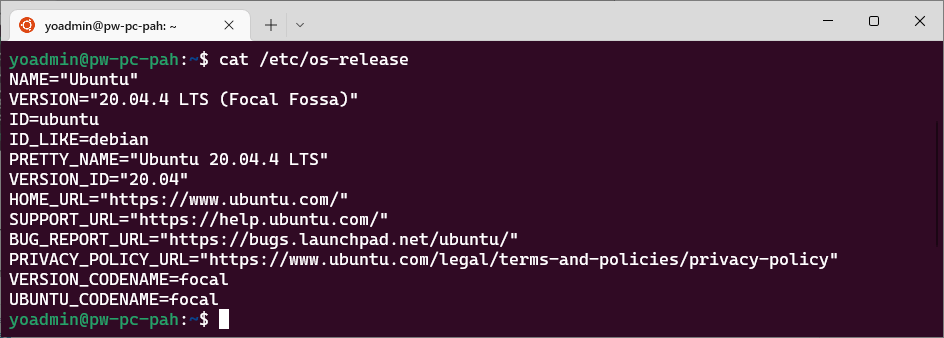
Another way to do this is view the contents of the
/etc/os-releasefile, which contains details about the Linux distribution.# check linux version on ubuntu cat /etc/os-release
When using Ubuntu in Windows Subsystem for Linux (WSL), some commands like
hostnamectlmay not work.For more helpful tips and tricks, check out my WSL tag for random posts on managing and working with WSL.
-
How to Open WSL Projects in Windows File Explorer
If you work with Windows Subsystem for Linux (WSL), you may need to open WSL files in Windows File Explorer for easier file management. This post gives some tips, providing two simple methods to achieve this.
Best Practices for Managing WSL Project Files
For best performance, always store project files on the same operating system as your development tools. If you’re developing an application in Linux using WSL, keep your files inside the Linux file system (e.g.,
/home/user/project) rather than using Windows-mounted directories (/mnt/c/Users/etc).We should always consider using source control (e.g., Git or Bitbucket) to manage your WSL application code instead of manually copying files between Windows and WSL.
Ways to Open WSL Files in Windows File Explorer
1. Quick Command Method (Recommended)
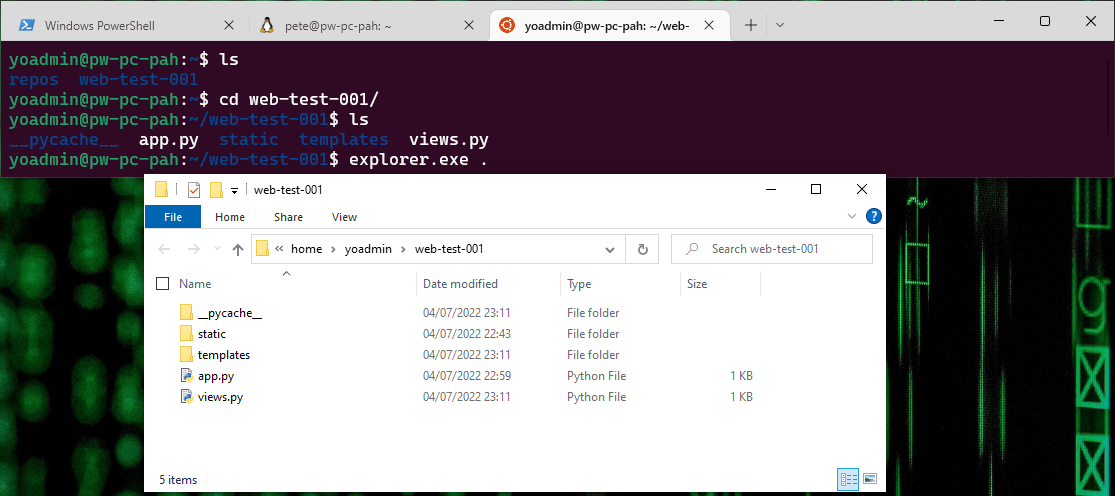
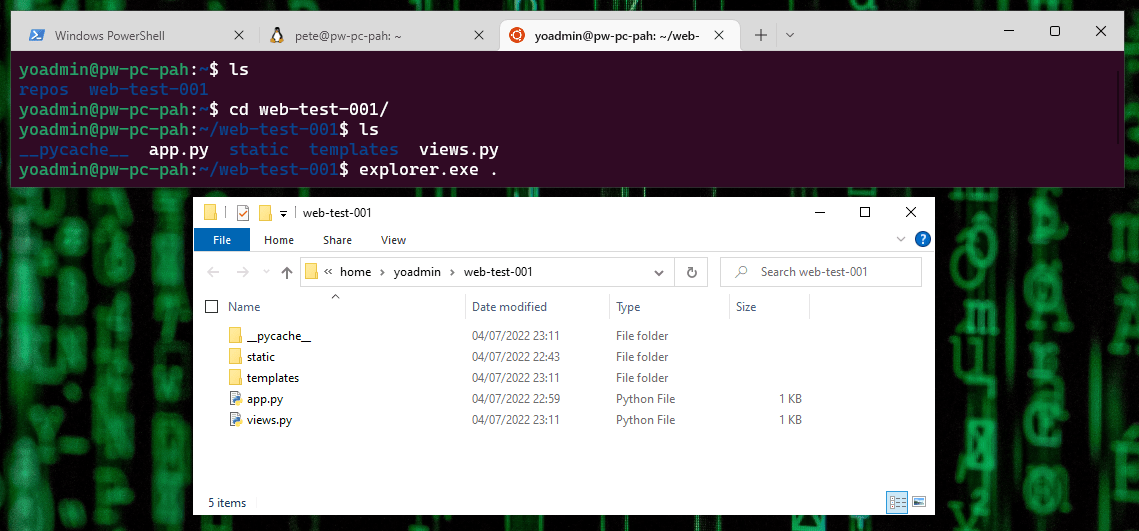
The fastest way to open WSL files in Windows Explorer I’ve found is through the terminal. While inside a WSL session, run the following command:
# open windows explorer from within wsl
explorer.exe .
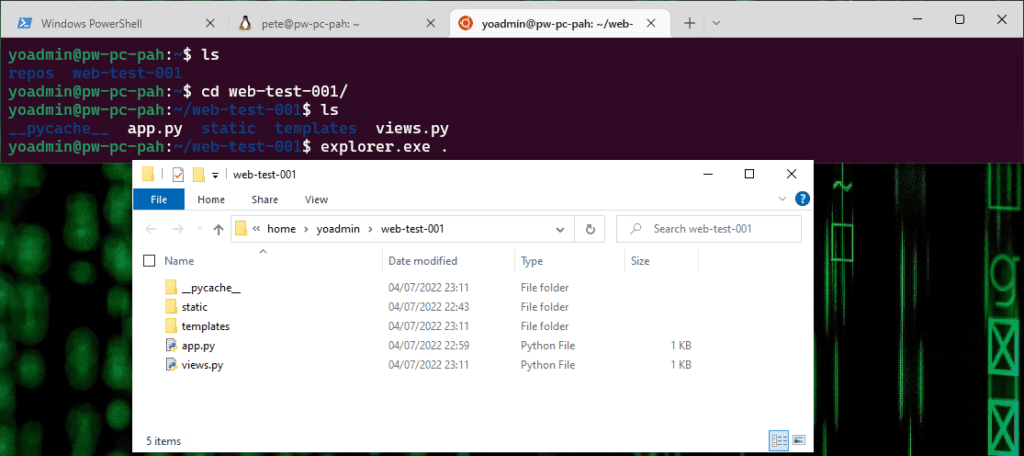
This will launch File Explorer, displaying the current directory inside your WSL environment.
2. Manual Navigation via File Explorer
Alternatively, you can manually access WSL files from Windows Explorer:
1. Open File Explorer.
2. In the address bar, enter\\wsl$\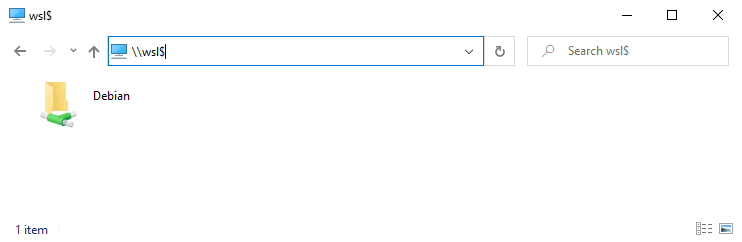
The
\\wsl$\path only displays active WSL distributions. If you have multiple installed distros but only one appears, ensure it’s running by opening a new WSL terminal session.For this demo, I’m going to start the Ubuntu 20.04 distro on my machine by opening a new tab in Windows Terminal:

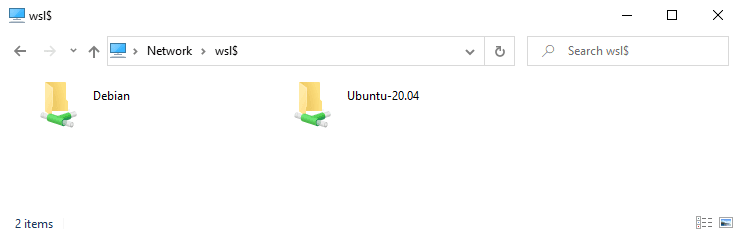
Now I can see both WSL Linux Distribution files in the Windows Explorer:
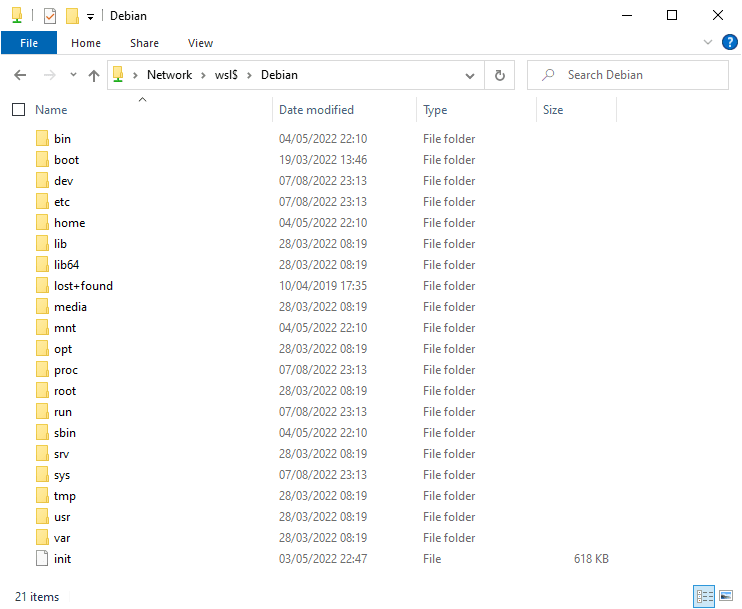
From here we can drill into the folders and navigate into any of the Linux directories:
I hope this was useful for you, cheers!
-
Drop Table if Exists in SQL Server
The
DROP TABLEcommand in SQL Server is used to remove a table from the database permanently. However, attempting to drop a non-existent table can result in execution errors. To prevent this, SQL Server 2016 introduced theDROP TABLE IF EXISTScommand, which makes the process more efficient and error-free.In this post, we’ll explore how to use
DROP TABLE IF EXISTSin SQL Server and discuss alternative methods for older versions.What is DROP TABLE IF EXISTS?
The
DROP TABLE IF EXISTScommand allows you to delete a table only if it exists in the database. It has been support since SQL Server 2016 (13.x), and helps prevent script execution errors and ensures smoother database management.Example: Using Drop Table if Exists
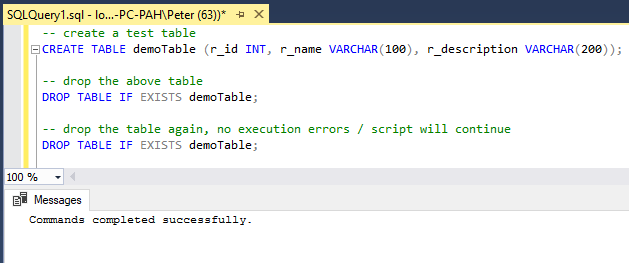
Below is an example demonstrating the use of
DROP TABLE IF EXISTS. The script first creates a table, then drops it using this command, and attempts to drop it again without errors:-- Create a test table in SQL Server CREATE TABLE demoTable ( r_id INT, r_name VARCHAR(100), r_description VARCHAR(200) ); -- Drop the table if it exists DROP TABLE IF EXISTS demoTable; -- Drop the table again (no error will occur) DROP TABLE IF EXISTS demoTable;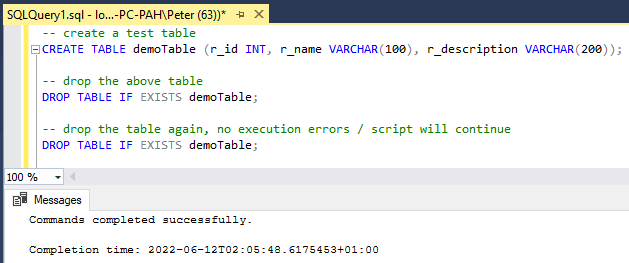
In this example:
1. We create a table nameddemoTable.
2. We executeDROP TABLE IF EXISTS demoTableto remove it.
3. Running the command again does not result in an error, since the table no longer exists.Using DROP TABLE IF EXISTS in SQL Server 2014 or Below
If you are working with SQL Server 2014 or earlier, the
DROP TABLE IF EXISTScommand is not available. Instead, you need to check for the table’s existence using system tables before dropping it:-- Check if the table exists before dropping it IF EXISTS (SELECT 1 FROM sys.tables WHERE name = 'demoTable') BEGIN DROP TABLE demoTable; ENDThis method ensures compatibility with older SQL Server versions while still preventing errors when dropping non-existent tables.
Hope this was a useful guide for you!