-
How to Reboot WSL (Windows Subsystem for Linux)
To restart WSL simply, run
wsl --shutdownto stop your WSL distros, then enter back into WSL distro as normal to start it back up again. This post contains a guide to help explain the process.A WSL reboot might be needed if your WSL instance or app within Linux has thrown an error message, or you are changing the wslconfig file or memory limits, as described in MS Docs for WSL basic commands.
In my demo below, I’m showing 2 methods for restarting your installed WSL Linux distributions. The first and preferred option is using the wsl command, or we can restart LxssManager, or our computer.
Restart WSL
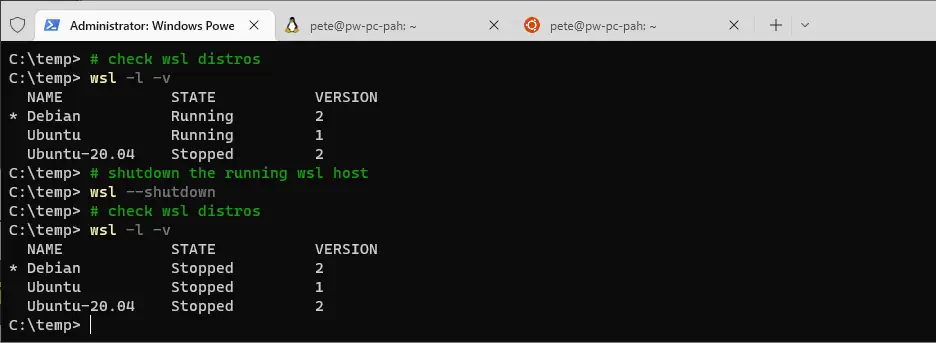
To restart WSL, run
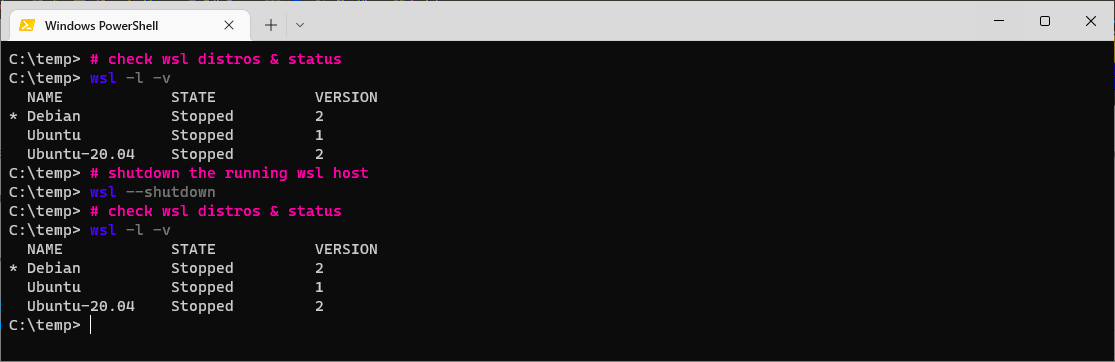
wsl --shutdown, which will stop all running distributions, and we can start it back up again by re-entering the WSL distro.The example below shows us stopping the 2x running distros, using
wsl -l -vto display what’s running:# check wsl distros & status wsl -l -v # shutdown the running wsl host wsl --shutdown # check wsl distros & status wsl -l -v
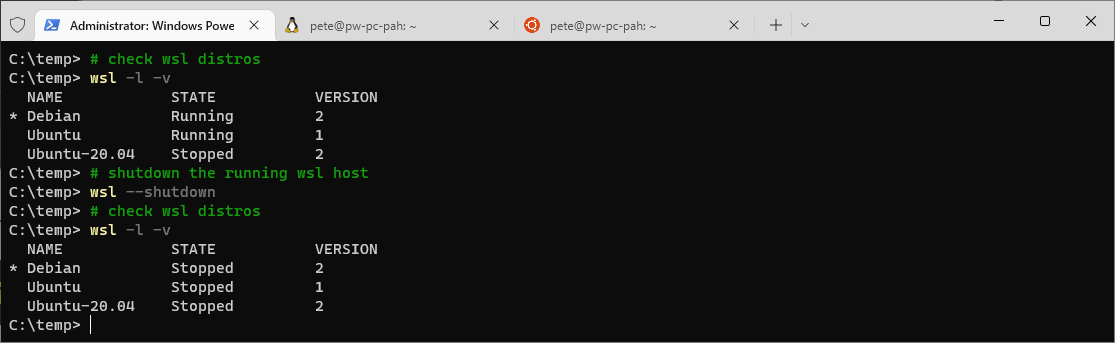
The shut-down command above immediately terminates all running distributions. When we list our WSL distributions again for the second time, we see they are all ‘Stopped’.
To start up your WSL distribution, enter WSL as you would normally. That’ll be done by re-opening the Linux tab in Windows Terminal, or by running
wslto enter a new WSL session:
Restart LxssManager Service Using PowerShell
From what I understand, the
wsl --shutdowncommand was released later, and this LxssManager service restart is the old method.If you’re about to try restart this service, why not just reboot your computer, if you have random issues.
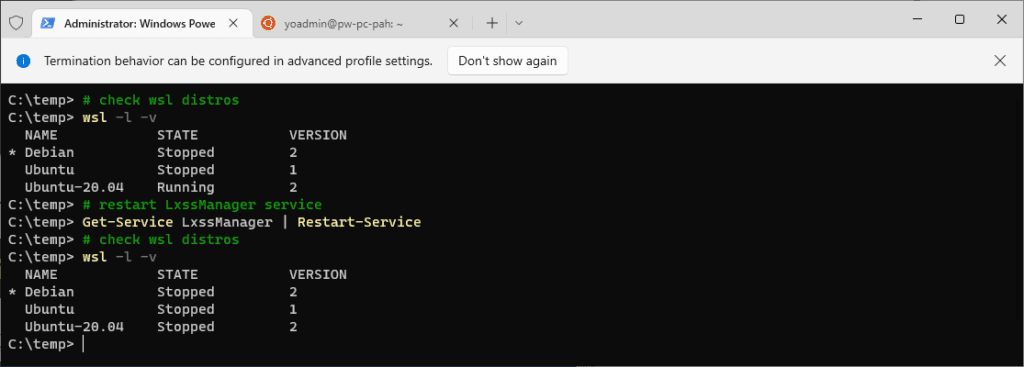
Anyhow, this is the LsxxManager service restart, running PowerShell as Admin:
# restart LxssManager service
Get-Service LxssManager | Restart-Service
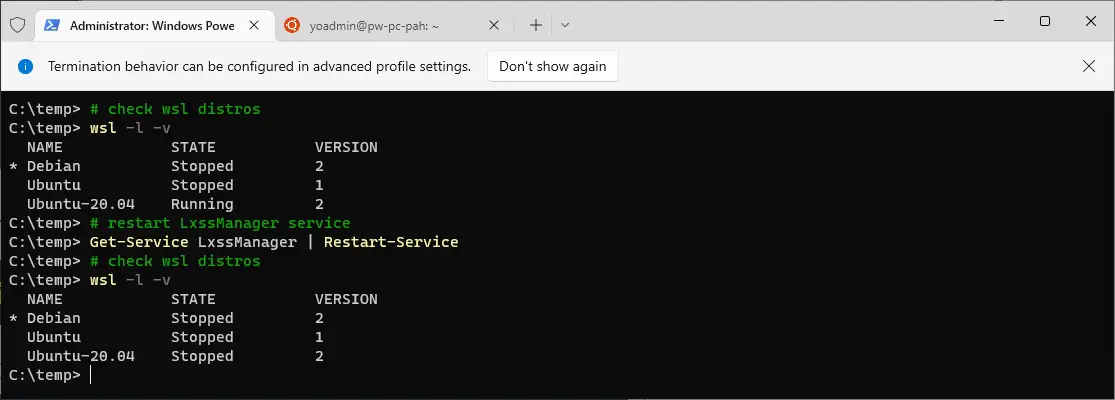
Displaying this all in one screenshot like I done above with the WSL shutdown command. The LsxxManager service restart has stopped the Ubuntu-20.04 distro.
More WSL Tips
Check out my other tips on the Windows Subsystem for Linux (WSL) by clicking the tag below!
-
How to Check Table Sizes in SQL Server
In this post, I’m sharing different ways of checking table sizes in SQL Server. There’s many ways to get this information, and whether you prefer using T-SQL scripts for automation, or SSMS tools for quick checks, these methods offer flexibility for different situations as a SQL Database Administrator.
If you’re working with SQL Server and storing data in tables, monitoring table sizes is important for performance tuning and disk space management. This is a topic all SQL Server users should be thinking about when performing certain changes while dealing with large tables. .
These methods I share will hopefully help you easily manage and track table sizes in SQL Server:
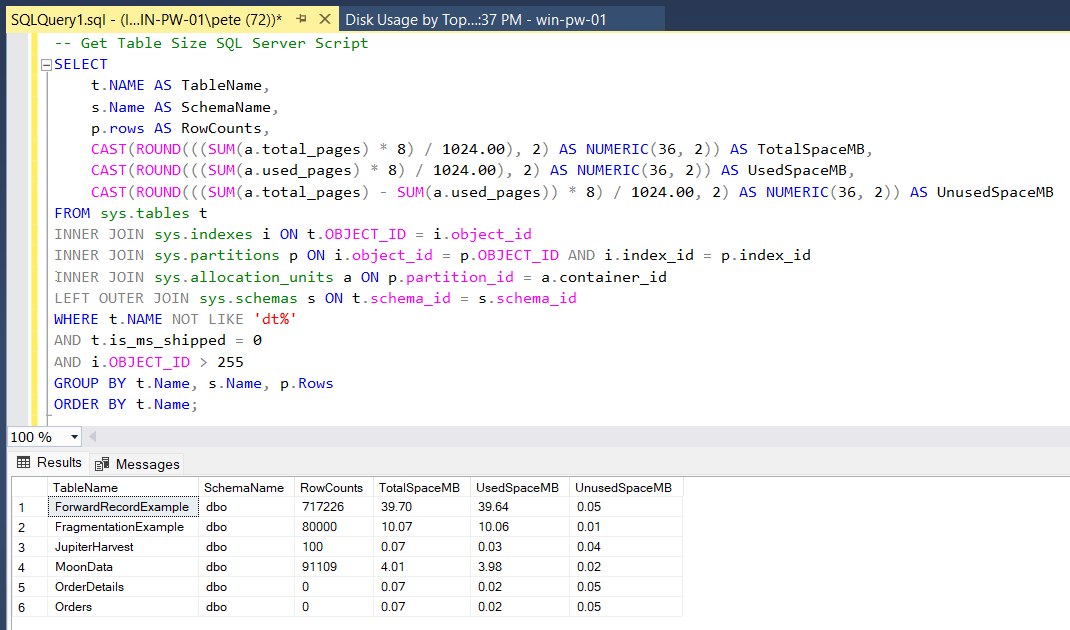
1. T-SQL Script to Get Table Sizes
2. Disk Usage by Top Tables Report
3. sp_spaceused System Stored Procedure
4. Table Properties in SSMSDifferent Ways to Check Tables Sizes
1. T-SQL Script to Get Table Sizes
As a SQL Database Administrator, my preferred approach is using a T-SQL script.
This method provides a detailed view of table sizes, including table name, schema, row count, total space, used space, and unused space. The script is ideal for logging and monitoring table utilization over time.
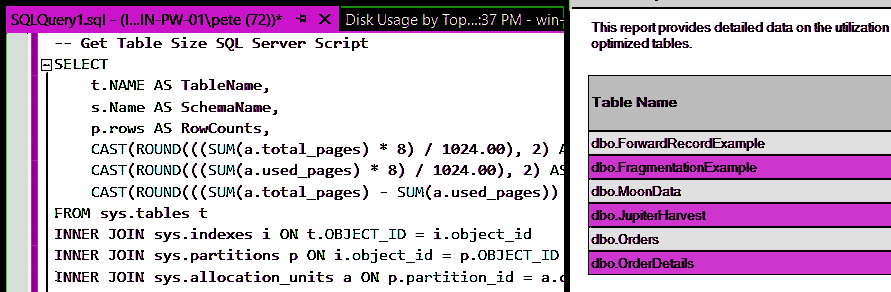
-- Get Table Sizes in SQL Server
SELECT
    t.NAME AS TableName,
    s.Name AS SchemaName,
    p.rows AS RowCounts,
    CAST(ROUND(((SUM(a.total_pages) * 8) / 1024.00), 2) AS NUMERIC(36, 2)) AS TotalSpaceMB,
    CAST(ROUND(((SUM(a.used_pages) * 8) / 1024.00), 2) AS NUMERIC(36, 2)) AS UsedSpaceMB,
    CAST(ROUND(((SUM(a.total_pages) - SUM(a.used_pages)) * 8) / 1024.00, 2) AS NUMERIC(36, 2)) AS UnusedSpaceMB
FROM sys.tables t
INNER JOIN sys.indexes i ON t.OBJECT_ID = i.object_id
INNER JOIN sys.partitions p ON i.object_id = p.OBJECT_ID AND i.index_id = p.index_id
INNER JOIN sys.allocation_units a ON p.partition_id = a.container_id
LEFT OUTER JOIN sys.schemas s ON t.schema_id = s.schema_id
WHERE t.NAME NOT LIKE 'dt%'
AND t.is_ms_shipped = 0
AND i.OBJECT_ID > 255
GROUP BY t.Name, s.Name, p.Rows
ORDER BY t.Name;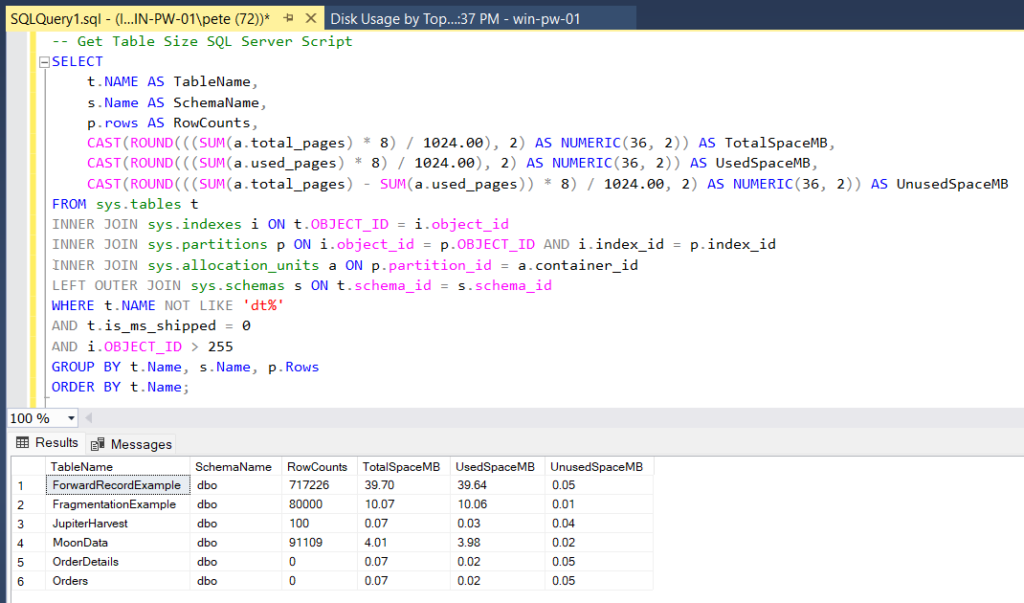
This script is particularly useful for identifying storage bottlenecks, unused space, and tables consuming significant resources.
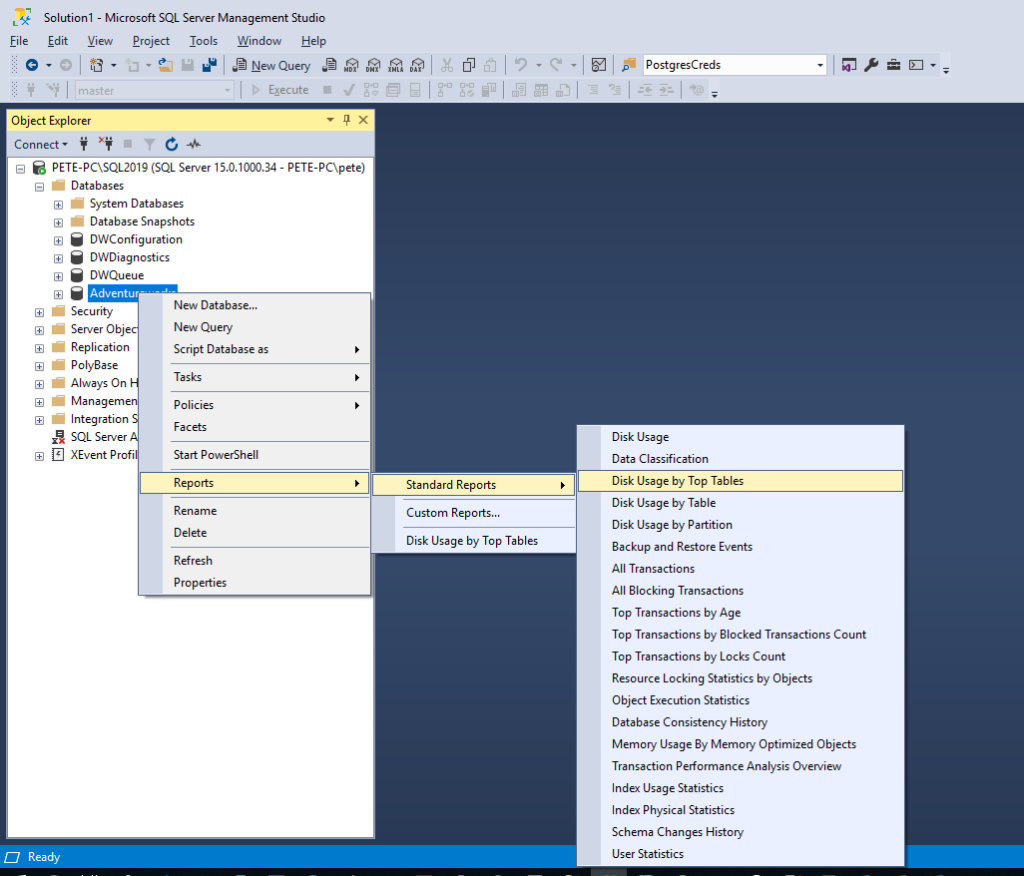
2. Disk Usage by Top Tables Report
For a quick overview of table sizes, SSMS offers the Disk Usage by Top Tables report.
This built-in report provides a snapshot of table sizes, row counts, and index details for all tables in the database:

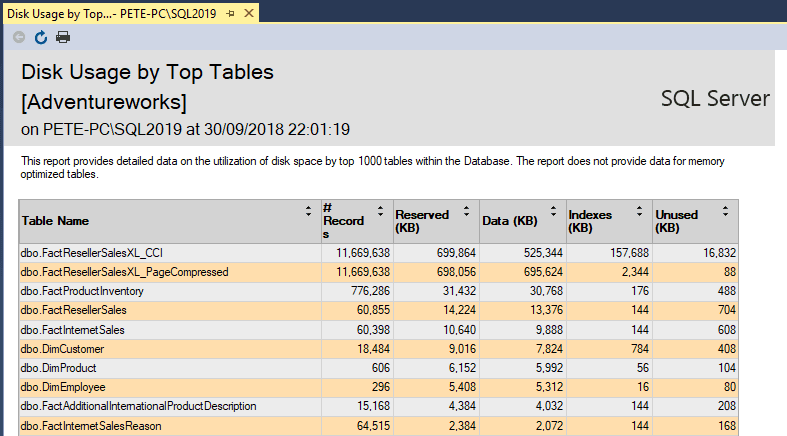
Just yesterday it was when I last used this report ^
I was asked to check table sizes on a Production environment, the developer did not have access and the db_datareader permissions request was awaiting approvals. He needed row counts and table size information for a few tables, and this was the most efficient way to provide him with that info.3. sp_spaceused System Stored Procedure
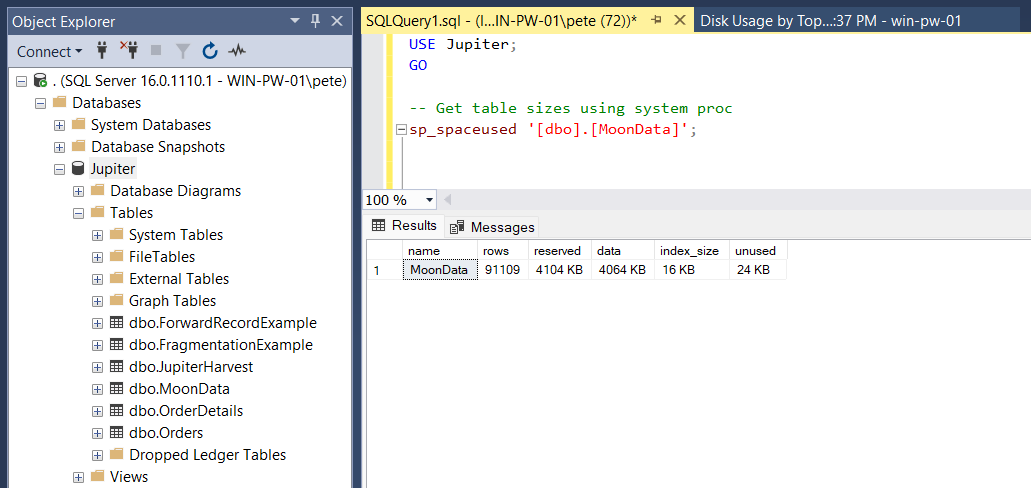
Another quick and effective method is the
sp_spaceusedsystem stored procedure.
This built-in stored procedure returns size information for a specified table, including data space, index space, and reserved space.-- Scope to your database USE Jupiter; GO -- Get table sizes using sp_spaceused EXEC sp_spaceused '[dbo].[MoonData]';

This approach is best for checking specific tables without needing an entire database overview.
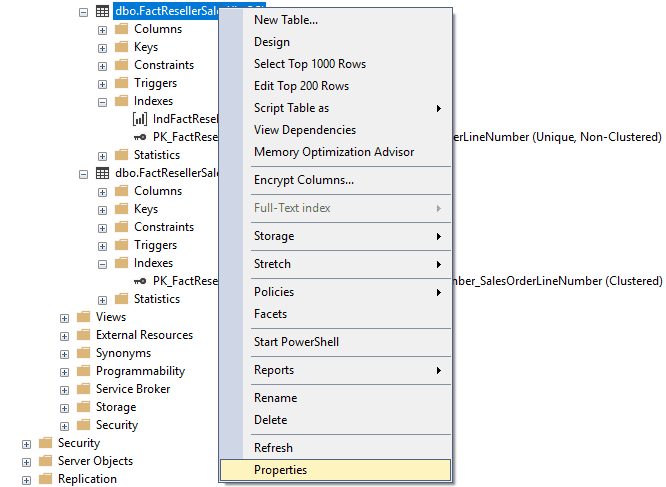
4. Table Properties in SSMS
If you’re investigating a specific table, opening the Table Properties within SSMS Object Explorer can be a useful and quick method.
To do this, expand the database and tables within the SSMS Object Explorer. You may need to add a filter to find your table if you have a lot of them.
Right-click a table and select Properties:
Open the Storage tab on the left-hand sidebar. It may take a second for the window to load, but this will show the index space, data space usage and the table row count:
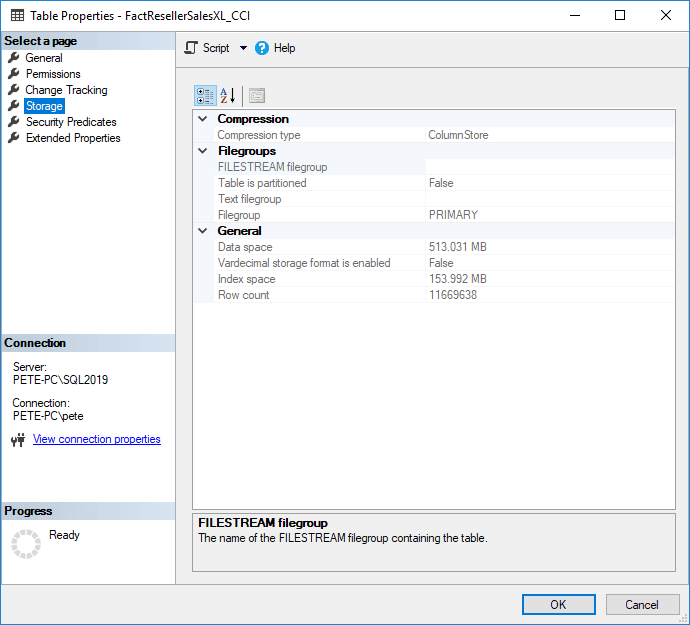
This method is handy for detailed table-specific information but isn’t practical for comparing multiple tables at once.
-
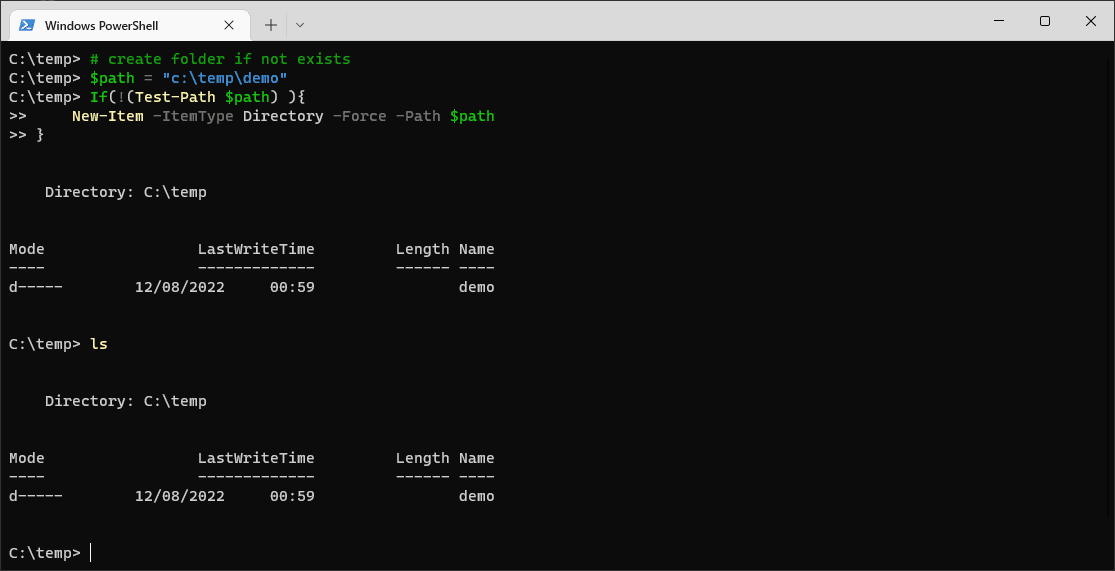
Creating Folders (If Not Exists) with PowerShell
If you need to create folders or subfolders in PowerShell only when they don’t already exist, this quick script will help. The script uses
Test-Pathto check if the folder exists before running theNew-Itemcommand.This snippet is ideal for anyone searching for a fast and reliable way to ensure directories are created without errors.
PowerShell to Create a Folder If Not Exists
Here’s the code to create a folder (e.g.,
C:\temp\demo) which tests if it exists first before creating:# create folder if not exists .ps1 $path = "c:\temp\demo" If(!(Test-Path $path) ){ New-Item -ItemType Directory -Force -Path $path }How It Works
>
$path: Set this to the directory you want to create.
>Test-Path: Checks if the folder exists.
>New-Item: Creates the folder ifTest-Pathreturns false.
>-Force: Ensures the command runs even if parts of the directory (likeC:\temp) don’t exist yet.More Tips
> Nested Directories: PowerShell will create parent directories automatically with the
-Forceparameter. For example, ifC:\tempdoesn’t exist, it will be created alongsideC:\temp\demo.
> Custom Paths: Update the$pathvariable to match the folder you need for your use case.
> Reusable Code: Save this script as a.ps1file for quick reuse.
> Error Handling: Wrap the script in atry-catchblock if you want to handle any potential errors gracefully.Check out my PowerShell Blog Category for more random tips like this one!
-

Advanced File and Folder Creation with PowerShell
This post contains an advanced guide for creating and managing files and folders in PowerShell. It builds on the basics introduced in my previous post, PowerShell Guide: Creating Folders and Files, and includes more techniques useful for a DBA or Sysadmin.
Contents:
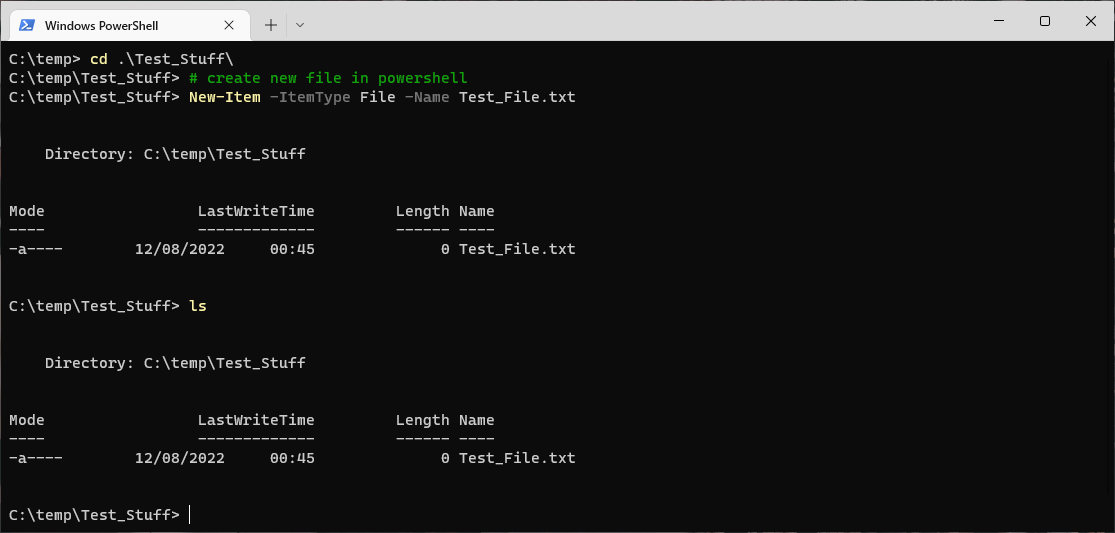
1. Creating New Files and Folders
2. Batch Creation of Files and Folders
3. Creating Files and Folders Conditionally
4. Automating Nested Folder Structures
5. Checking for Files Older Than 30 Days1. Creating New Files and Folders
New-Itemis the PowerShell cmdlet to create the new folder or file, we just need to amend theItemTypeparameter choosing Directory or File whichever is needed:# create new folder New-Item -ItemType Directory -Name Test_Stuff # create new file New-Item -ItemType File -Name Test_File.txt
2. Batch Creation of Files and Folders
When you need to create multiple files or folders in one go, PowerShell’s pipeline and looping capabilities come in handy:
# Create multiple folders
"Folder1", "Folder2", "Folder3" | ForEach-Object {
    New-Item -ItemType Directory -Name $_ -Path C:\Projects
}

# Create multiple files
"File1.txt", "File2.txt", "File3.txt" | ForEach-Object {
    New-Item -ItemType File -Name $_ -Path C:\Logs
}
This approach ensures you can efficiently create multiple resources with minimal effort.
3. Conditional File Creation
Sometimes, you need to check if a file or folder exists before creating it. Use the
Test-Pathcmdlet to conditionally create resources:# Create a folder if it doesn't exist $path = "C:\Projects\Logs" If (!(Test-Path -Path $path)) { New-Item -ItemType Directory -Path $path } # Create a file if it doesn't exist $filePath = "C:\Logs\LogFile.txt" If (!(Test-Path -Path $filePath)) { New-Item -ItemType File -Path $filePath }4. Automating Nested Folder Structures
PowerShell can easily handle the creation of nested folders with the
-Forceparameter, which ensures all intermediate directories are created:# Create nested folder structure New-Item -ItemType Directory -Path C:\Projects\2025\January\Reports -Force
You can combine this with scripting to dynamically generate paths and automate folder creation for various use cases.
5. Checking for Files Older Than 30 Days
For maintenance tasks like cleaning up old files, you can use PowerShell to identify and act on files based on their age:
# Get files older than 30 days
$path = "C:\Logs"
Get-ChildItem -Path $path -File | Where-Object {
    $_.LastWriteTime -lt (Get-Date).AddDays(-30)
} | ForEach-Object {
    Write-Output "Deleting: $($_.FullName)"
    Remove-Item $_.FullName
}
This script locates and deletes all files in the specified directory that haven’t been modified in the last 30 days.
-
How to Restart Windows Subsystem for Linux (WSL)
If your Windows Subsystem for Linux (WSL) instance encounters errors or you’ve updated the
.wslconfigfile (e.g., to modify memory limits), restarting your WSL distributions may be necessary. This guide demonstrates two effective methods for restarting WSL distributions:
> (Preferred Approach) Run theWSL --ShutdownCommand
> (Old Method) Restart LxssManager Service, or your ComputerThis is a guide on how to restart a Windows Subsystem for Linux (WSL) distribution on your local machine.
This might be needed if your WSL instance or app within has thrown an error message, or you are changing the .wslconfig file/memory limits as described in MS Docs.
Run wsl –shutdown Command
It’s a basic WSL command we need to run to shutdown a WSL distro,
wsl --shutdown
In the example below I’m also checking the status before and after running this command.# check wsl distros & status wsl -l -v # shutdown the running wsl host wsl --shutdown # check wsl distros & status wsl -l -v

The shut-down command above immediately terminates all running distributions. When I list the WSL distros again for the second time, we see they are all ‘Stopped’.
To start up your WSL distribution, enter WSL as you would normally.
This’ll be done by re-opening Linux tab in Windows Terminal, or by running ‘wsl‘ to enter a new WSL session.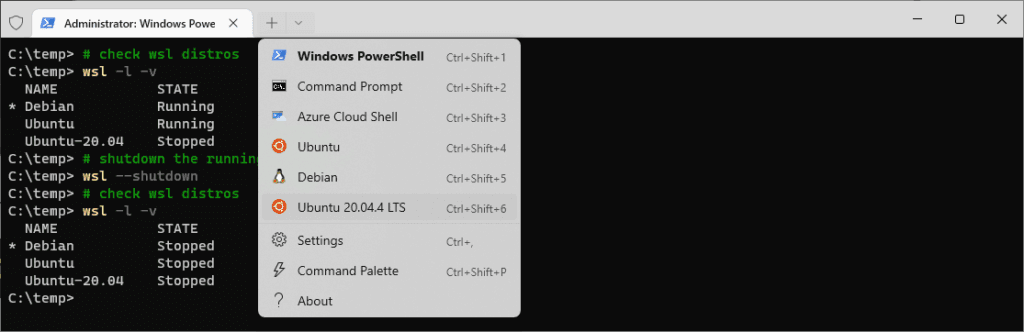
Restart LxssManager Service, or Restart Your Computer
From what I believe, the wsl –shutdown command was released later, and this LxssManager service restart is the old method. Either way, you’re probably getting what you need in the end, a disruptive stop to WSL.
Run the following command in PowerShell as Admin to restart your local LxssManager service:
# restart LxssManager service
Get-Service LxssManager | Restart-Service
The LsxxManager service restart has stopped the Ubuntu-20.04 distro.
If you’ve gone this far, you should be rebooting your computer if you have continued issues with a WSL instance/distro.
Hope this helps, if you do have issues feel free to add a comment below I’d be glad to help if I can.