
-
Get Last Backup Times for all Databases in SQL Server
Ensuring your databases are regularly backed up is critical for data recovery in case of corruption, accidental deletions, or other failures. If you don’t have a backup, recovering lost data may be impossible. As a Database Administrator, it’s your number one Priority along-side ensuring your SQL Service is online and healthy.
In this article, I’ll demonstrate how to query the backup history for all databases in a SQL Server instance, helping you verify your backup schedule and detect potential gaps.
In SQL Server, backups are categorized into three main types:
> Full Backups: Capture the entire database at a specific point in time.
> Differential Backups: Include only changes made since the last full backup.
> Transaction Log (TLog) Backups: Record all transaction log activity since the last log backup.If a backup of a specific type hasn’t been performed, the output for that type will show as
NULLwhen using the SQL queries below.If you discover when running this you have no Full Backup, you should resolve that by backing up all of your databases.
1. Show Most Recent Backups for all Databases
This first script retrieves the most recent Full, Differential, and Transaction Log backup times for all databases in your SQL Server instance. Use this to confirm if all databases have been backed up recently.
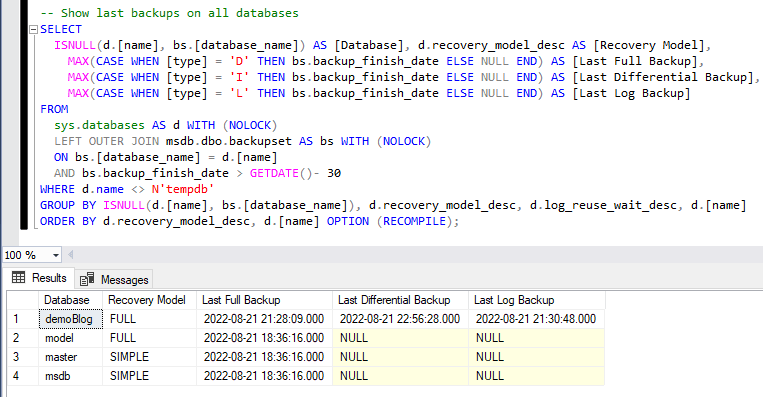
We can see from the above screenshot all databases on this SQL Server Instance have been backed up in the last 30 days. Only the
demoBloghas had recent Differential and TLog Backups.The
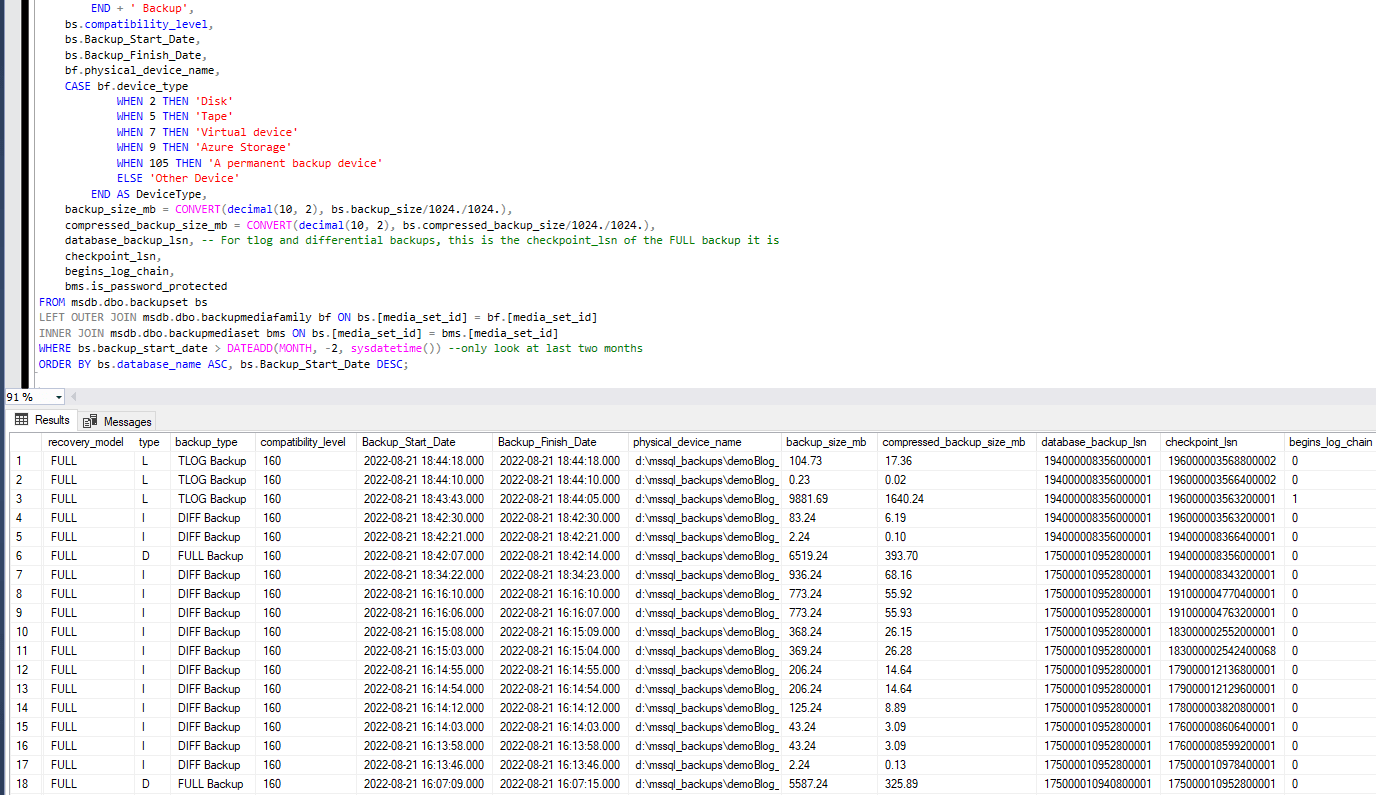
typecolumn within thebackupsetsystem table gives us a way of checking whether the backup was a Full, Differential or Transaction Log.2. Get Database Backup History
The second script provides a detailed history of all backups, including their type, size, and associated metadata for the last two months. This is particularly useful for auditing backup schedules or troubleshooting issues like broken backup chains.
You can simply remove the WHERE Clause to bring back the full history if necessary.
3. Tips for Optimizing Backup Strategies
Test Restores:
Regularly perform restore tests to ensure backups are usable.Automate Backups:
Use SQL Server Agent jobs or third-party tools for consistent scheduling.Monitor Regularly:
Run these scripts periodically to monitor backup status.Enable Alerts:
Configure alerts for missed or failed backups. -
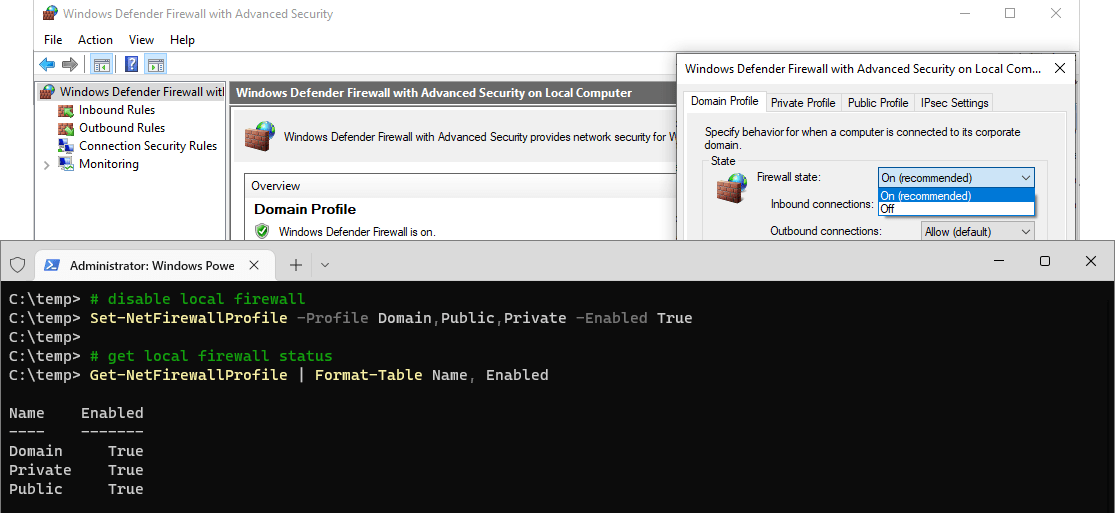
How to Check Windows Firewall Status with PowerShell
Want to quickly check whether your Windows Firewall is enabled or disabled? This guide shows you how to use PowerShell to get the status of your local Windows Firewall for each profile.
PowerShell cmdlets follow a standard format: verb-noun. The verb describes the action, and the noun specifies what the cmdlet acts on. In this case, we’ll use the
Get-NetFirewallProfilecmdlet to show if Windows Firewall is enabled or disabled.Steps:
1. Open PowerShell with administrative privileges.
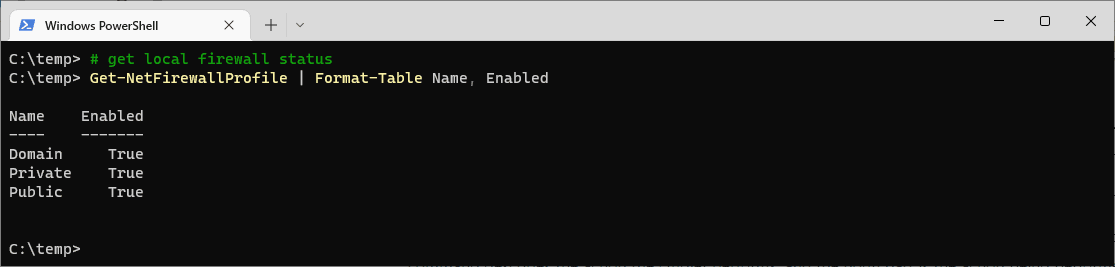
2. Run the following command to check the firewall status for all profiles:# get local firewall status powershell Get-NetFirewallProfile | Format-Table Name, Enabled
This command retrieves the firewall status and formats it into an easy-to-read table showing the profile name and whether it is enabled (
True) or disabled (False).The Windows Firewall on this demo computer is enabled, for all profiles. If you want more info on Windows Firewall Profiles, check out this Microsoft Docs link.
-
How to Enable Windows Firewall using PowerShell
Windows Firewall is an essential security feature that protects your system from unauthorized access and threats. If it has been disabled for testing or mistakenly turned off, you can quickly re-enable it using PowerShell.
This guide provides a straightforward process to restore your firewall settings and ensure a secure environment. To enable Windows Firewall with PowerShell, follow these steps:
> Step 1: Understanding Windows Firewall Profiles
> Step 2: Check Current Firewall Status
> Step 3: Enable Windows Firewall
Step 1: Understanding Windows Firewall Profiles
Before running scripts or commands on a computer, it’s important for us to understand what each step is doing. We are enabling the Windows Firewall for all Profiles:
> Domain: For when you are connected to a Domain Controller (computer connected to AD).
> Private: For your home or private networks.
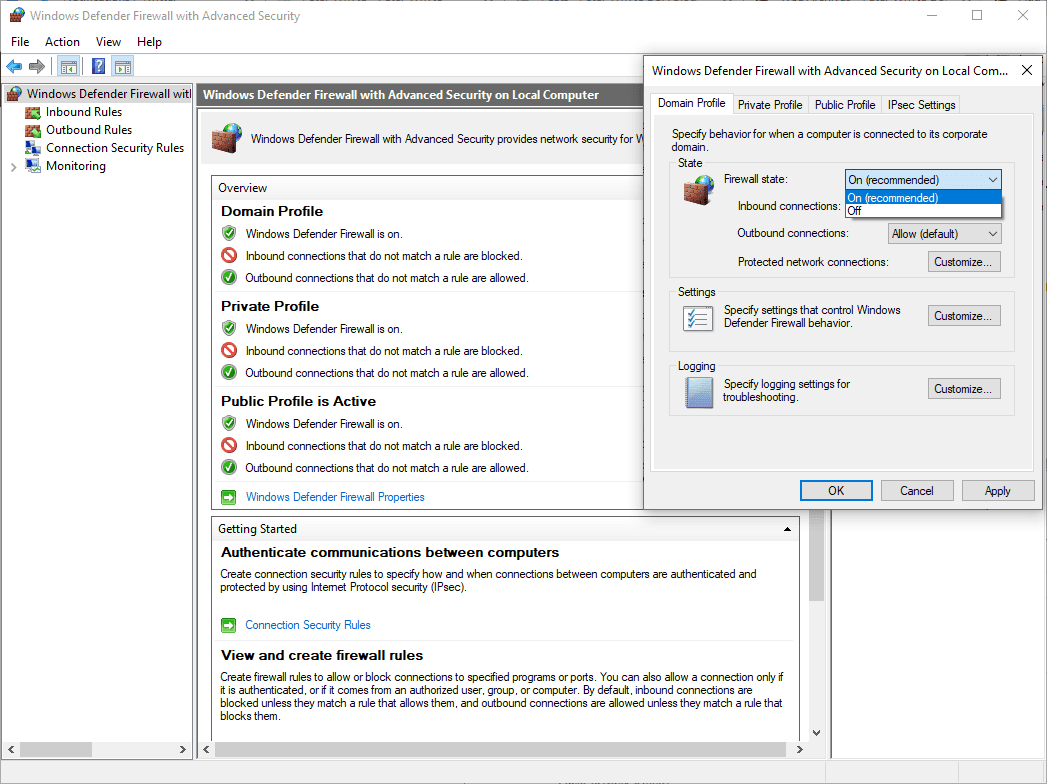
> Public : For public WIFI locations such as coffee shops etc.Make sure you understand which profile applies to your scenario before proceeding. You can also manage these settings via the GUI for additional clarity:
Step 2: Check Current Firewall Status
Before enabling the firewall, check its current status using the following PowerShell command:
# get local firewall status
Get-NetFirewallProfile | Format-Table Name, Enabled
This command retrieves the status of all firewall profiles and displays whether they are enabled (
True) or disabled (False).Step 3: Enable Windows Firewall
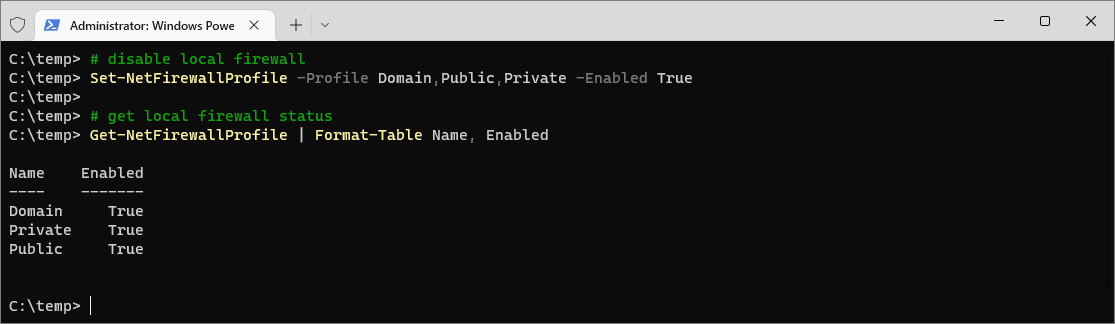
To enable the Windows Firewall for all profiles, use the
Set-NetFirewallProfilecmdlet. Run the following command in PowerShell or Windows Terminal with admin privileges:# disable local firewall Set-NetFirewallProfile -Profile Domain,Public,Private -Enabled True # get local firewall status Get-NetFirewallProfile | Format-Table Name, Enabled
By enabling the firewall, you significantly improve your system’s defense against unauthorized access and potential cyber threats. However, enabling the firewall may block some desired connectivity, requiring you to create new firewall rules to allow specific traffic while maintaining overall security. For detailed guidance on advanced configurations and creating firewall rules, refer to the official Microsoft documentation on the Windows Firewall.
-
How to Disable Windows Firewall with PowerShell
This post provides a demo on how to disable Windows Firewall with PowerShell on a Windows computer.
⚠ Important: Disabling the Windows Firewall is not recommended as it reduces your system’s security. However, there are scenarios, such as troubleshooting, where temporarily disabling the firewall may help identify if it is the root cause of a specific issue. Before turning it off entirely, try add some open rules on specific ports or adjusted IP’s on rules to avoid unintended vulnerabilities.
Anyhow, disabling Windows Firewall with PowerShell can be done by going through the following steps:
> Understanding Firewall Profiles in Windows
> Get Status of Windows Firewall with PowerShell
> Disable Windows Firewall with PowerShellUnderstanding Firewall Profiles in Windows
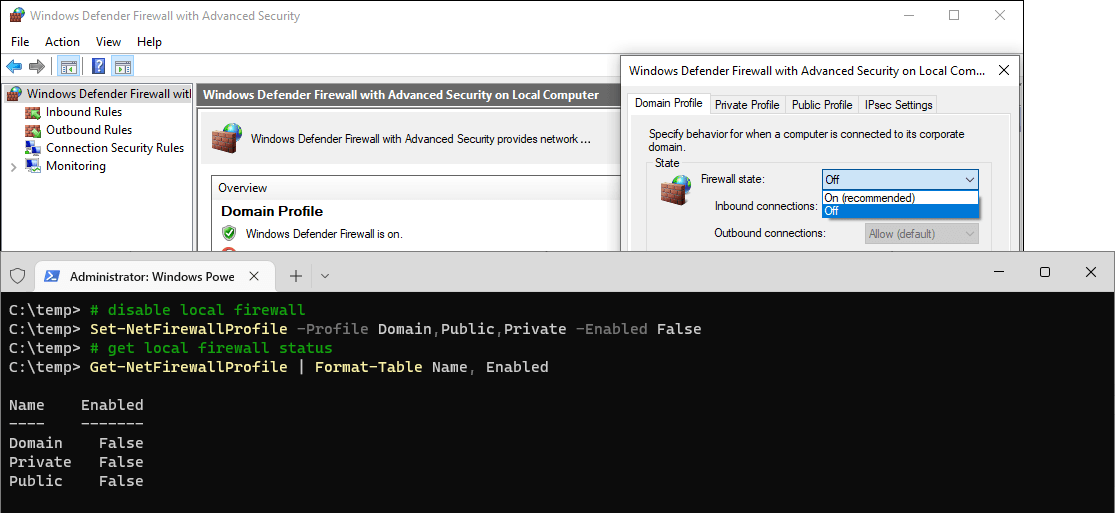
Before running any command or script on your machine, it’s important for us to understand the 3 Firewall Profiles. In the command below we are disabling all 3 profiles:
– Domain: For networks connected to a Domain Controller (typically found in corporate environments).
– Private: For your home or private networks.
– Public: For untrusted networks like coffee shops or public Wi-Fi.💡 Tip: While PowerShell is great for this, you can also manage firewall settings through the Windows GUI.
To do this, search for “Windows Firewall” in the Search / Start menu: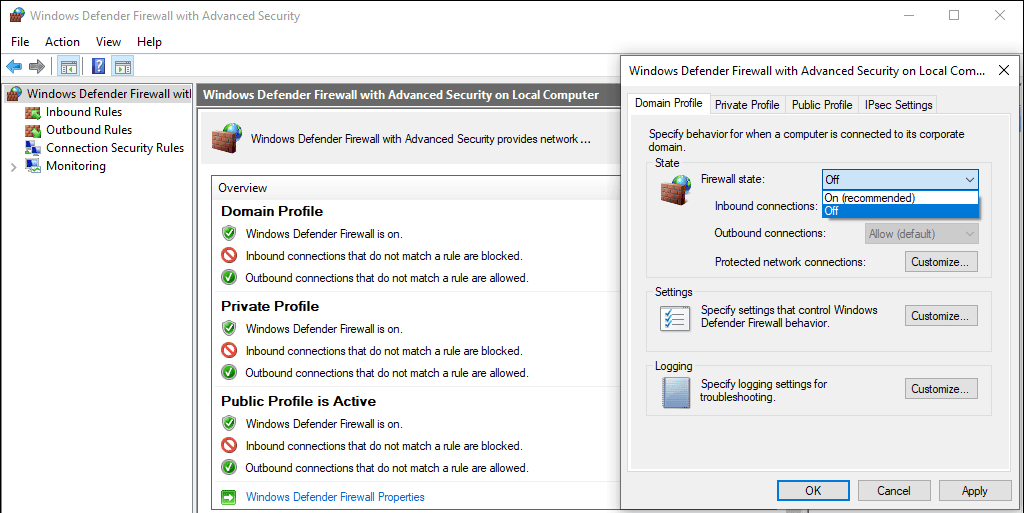
Get Status of Windows Firewall with PowerShell
PowerShell cmdlets follow a consistent verb-noun structure where the verb describes the action and the noun specifies the target.
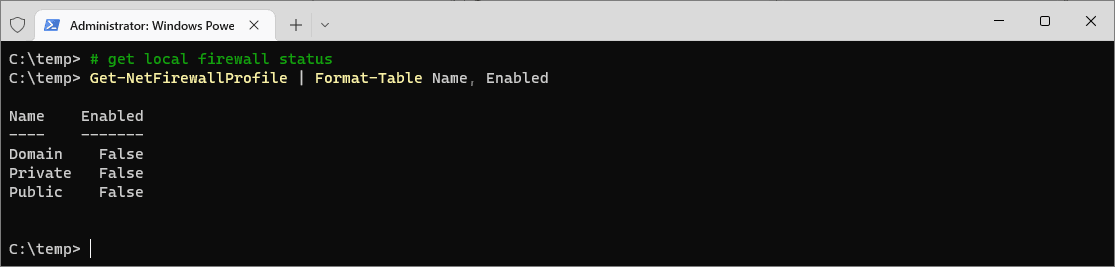
To check the status of all firewall profiles, use the following command:
# get local firewall status
Get-NetFirewallProfile | Format-Table Name, Enabled
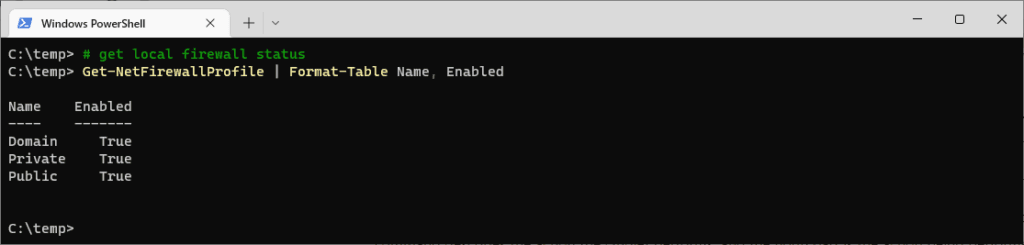
In the above screenshot, we’re running Get-NetFirewallProfile with Format-Table.
Disable Windows Firewall with PowerShell
To disable the firewall for all profiles, you’ll modify the cmdlet verb from
GettoSet.This requires elevated permissions, so open PowerShell or Windows Terminal as an administrator.
Set-NetFirewallProfile is being executed below, which disables all Profiles of the Local Windows Firewall:
# disable local firewall ps1
Set-NetFirewallProfile -Profile Domain,Public,Private -Enabled False

# get local firewall status ps1
Get-NetFirewallProfile | Format-Table Name, Enabled
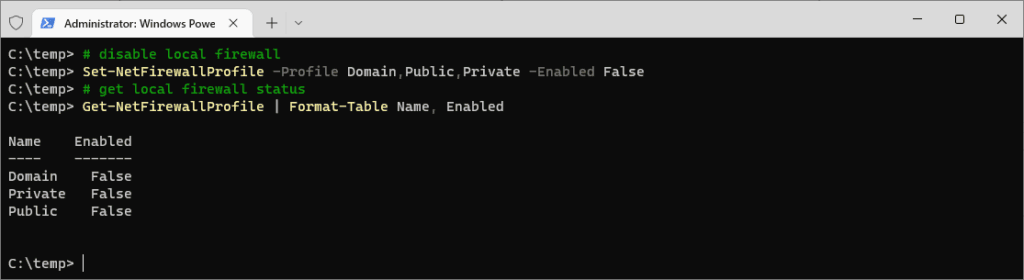
After running the command, we can verify the changes by rechecking the firewall status, as displayed in the screenshot above.
As an experienced admin, it’s always better to implement rule-based actions, even during testing, by creating specific rules for ports and subnets. However, there are times when temporarily disabling the Windows Firewall helps rule it out completely as a blocker. If you need to re-enable the firewall after testing, simply run the command:
# enable windows firewall cmd
Set-NetFirewallProfile -Profile Domain,Public,Private -Enabled True
This ensures you can easily roll back the change while keeping the system secure.
Hope this helps!
-

The Best Terminal for Windows
This is a post to share an opinion on the best Terminal for Windows, which is Windows Terminal.
The easiest way to install Windows Terminal is by following this link which takes you to the Microsoft Store, we can one click download/install from there. Windows Terminal is installed by default as of Windows 2025, and you can check out my other post that shows various ways of installing Windows Terminal.

That’s it. Done. No need to be looking at other terminals for Windows in the year 2022, especially if you’re learning the ropes. Just download and install Windows Terminal.
I’ll be honest, my reason for posting this one is to see how it performs against other websites for the term “Best Terminal for Windows”. It’s crazy, every post has way too much information – here are a billion different types of terminals in Windows. Download and try them all, even if you’re a novice.
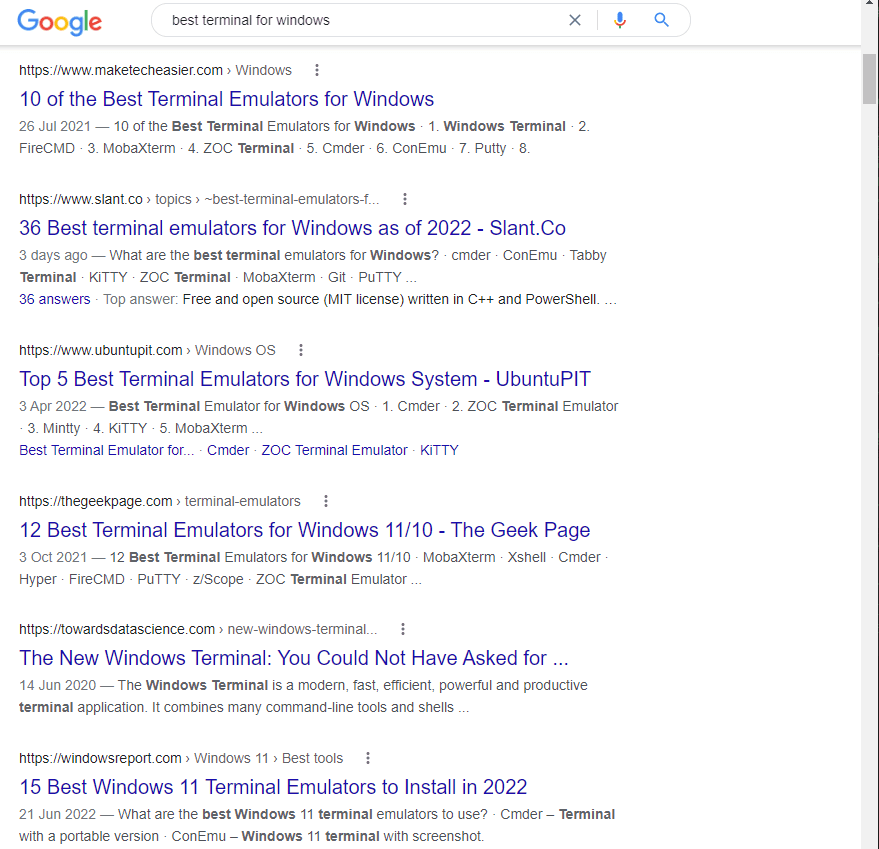
“best terminal for windows” – Google Search, August 2022 Every one of them is over the top, all done for the Google SEO Ranking points that you get for writing 10,000 words in a post for a target keyword.
But, if you’re up for exploring random text editors that some folk think makes a good Windows Terminal, then go ahead, maybe I’m wrong!
Why Windows Terminal is the Best
In Windows Terminal, we can have multiple tabs for whichever terminal session we need.
In the example below you can see I have a variety of terminal windows to chose from, including Windows Subsystem for Linux (WSL) tabs:
This is a different post from what I usually do. But it’s good to write and share random thoughts, why not. At least this “Best Terminal for Windows” post comes from someone in the software/database engineering game. I use Windows Terminal every day and love it.
Feel free to checkout some other links you see around here for more random tips from an experienced SQL DBA. Cheers.
