
This guide explains how to export a SQL Server query results to a CSV file using SSMS.
SQL Server Management Studio (SSMS) is the primary tool used for managing SQL Server databases and running queries. By default, SSMS exports data in a column-aligned format, but to export data as a CSV, we need to adjust the export settings to be comma-delimited.
Exporting Query Results to a File in SSMS
To begin the export process, we use the Results to File option instead of the default Results to Table. This method allows us to save the query output directly to a file.
1. Select ‘Results to File’:
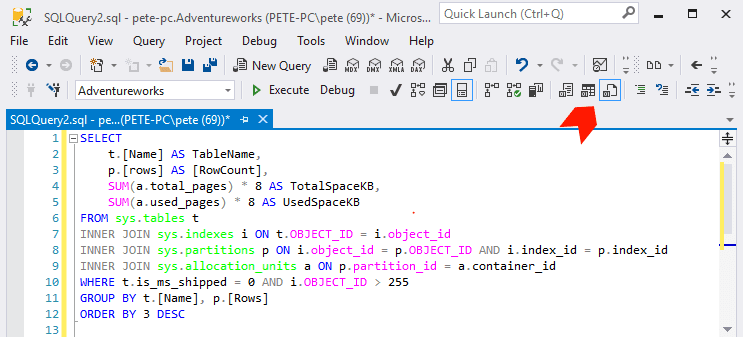
In SSMS, click on the Results to File option as shown in the screenshot below.
2. Run the Query:
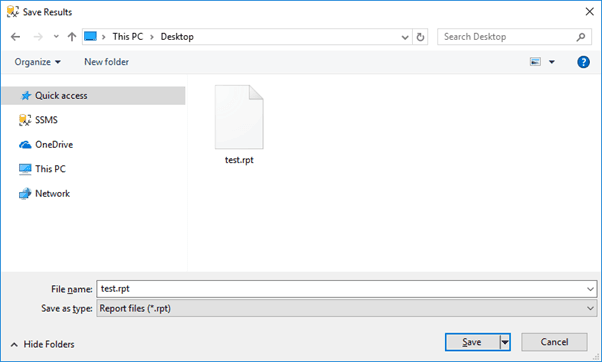
When you run the query, SSMS will prompt you to select a location and file name for saving the output.
3. Default Output Format:
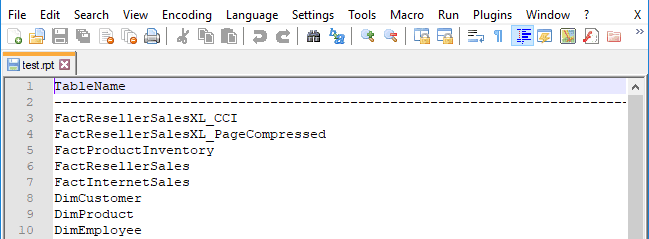
By default, the file will be saved with a .rpt extension. If you open this file in a text editor like Notepad++, it will display the data in a column-aligned format.
4. Save as CSV:
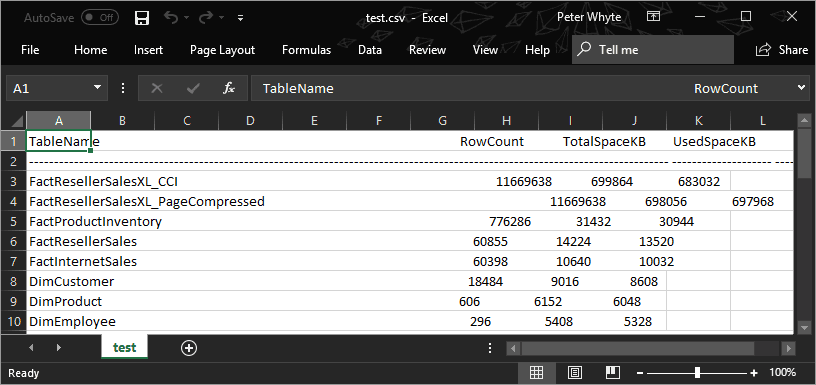
To save the file as CSV, you can change the file extension from .rpt to .csv. However, this will still not format the output correctly for CSV use.

You will now likely want to change the delimiter after looking at this output file. This .rpt file should not be opened as CSV.
Modifying SSMS Output Format for CSV
The next step is to adjust SSMS’s default export settings to ensure that the output is in a proper comma-delimited format for CSV files.
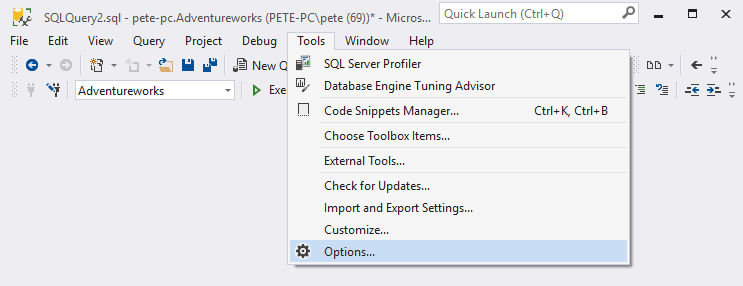
1. Access SSMS Options:
Navigate to Tools > Options in SSMS.
2. Change Query Output Settings:
In the Options window, go to Query Results > SQL Server > Results to Text.
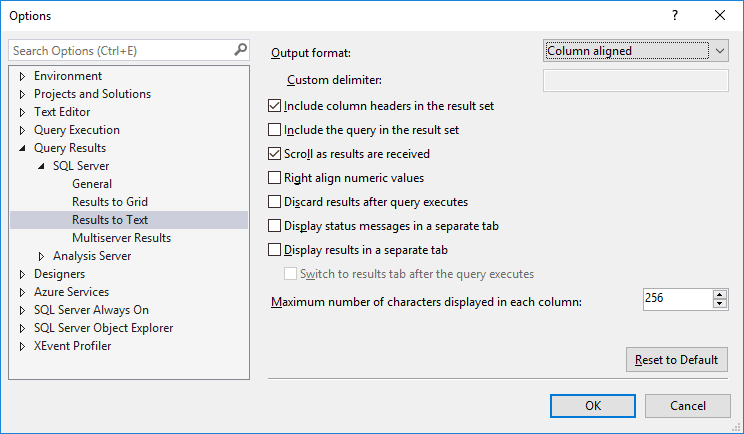
3. Set Delimiter to Comma:
By default, the output is set to “Column-aligned.” Change this to “Comma delimited.”

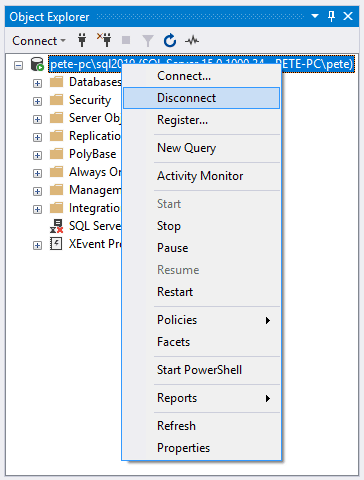
4. Reconnect to SQL Server:
After making these changes, disconnect from your current session in the SSMS Object Explorer and reconnect to the SQL Server instance.
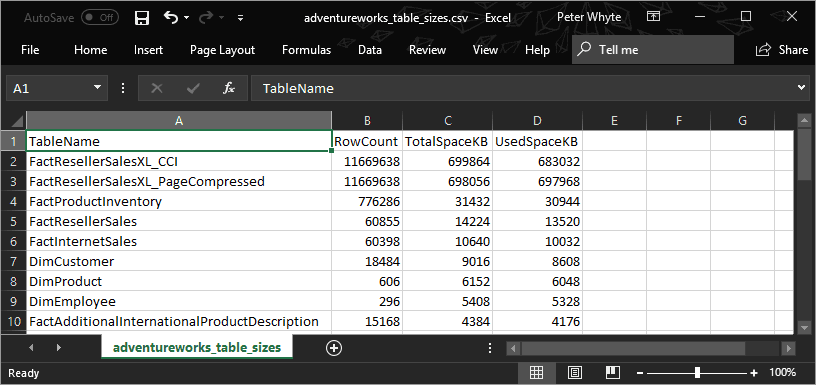
5. Export Again:
Run your query again. This time, the output file will be formatted correctly for CSV, with values separated by commas.
Note for SQL Server Devs/Admins:
You may encounter an issue with the exported CSV data, and it contains “rows affected” at the end of it. The reason for this is that we need to include SET NOCOUNT within the SQL query when we use Results to Text. I talk more about this in another one of my posts: Count Rows in CSV Files.
The Comma in Your Data Will Break the File
This is the one that matters, and it is worth knowing before you send the file to somebody. SSMS does not put quotes around values that contain commas. It puts a comma between columns and stops there.
So a name stored as Smith, John becomes two fields, that row gains a column, and whatever opens the file next either errors or silently shifts everything after it into the wrong place. Tested on SQL Server 2025:
Name,Code,Notes
----,----,-----
Smith, John,00123,NULL
Jones,00456,ok
Three things are wrong there, and all three are worth seeing:
- Row 3 has four fields, not three. Nothing is quoted, so the comma inside the name is indistinguishable from a delimiter.
- That row of dashes is in the file. It is the header underline, and it is a data row as far as anything reading the CSV is concerned.
- The NULL is the literal text
NULL, not an empty field. It will import as a four character string.
bcp behaves the same way. Tested with a comma terminator, the same value came out as Smith, John,00123, unquoted and broken in exactly the same fashion.
Two Ways to Get a File That Is Actually Correct
Change the delimiter to something the data does not contain. If the export is for another system rather than for Excel, a pipe or a tab sidesteps the whole problem. It is the quickest fix and the least fragile.
Or export from PowerShell, which quotes properly. Export-Csv follows the CSV convention rather than just inserting separators:
$q = 'SELECT Name, Code, Notes FROM dbo.Customers'
Invoke-Sqlcmd -ServerInstance 'SQLPROD01' -Database 'SalesDB' -Query $q |
    Export-Csv -Path 'C:\temp\customers.csv' -NoTypeInformation -Encoding UTF8
Same data, run through that instead:
"Name","Code","Notes"
"Smith, John","00123",
The name survives as one field, and the NULL comes through as genuinely empty rather than the word NULL. -NoTypeInformation suppresses the type comment that older PowerShell versions put on line one.
If you are staying with sqlcmd, the -h -1 switch removes the header underline row. Verified, and the dashes disappear. SET NOCOUNT ON matters as well, or the rows affected message lands in your file too.
Then Excel Gets Hold of It
Even a perfectly formed CSV can be damaged by opening it, because Excel converts as it reads and does not ask. The usual casualties:
- Leading zeros vanish. The
00123above becomes123, which quietly breaks account numbers, product codes and anything zero padded. - Long digit strings go scientific. Sixteen digit references turn into
1.23457E+15, and the original digits are gone once saved. - Dates get reinterpreted according to regional settings, so day and month can swap.
The fix is not to fix the file. It is to stop double clicking it: in Excel use Data, then From Text/CSV, and set the affected columns to Text during the import. If the recipient will definitely open it by double clicking, send them a real spreadsheet file rather than a CSV and skip the argument.
One more, for anything with accented characters or non English names: save as UTF-8 with BOM. Without the byte order mark Excel assumes the legacy code page and mangles them. In Windows PowerShell 5.1 the UTF8 encoding option writes the BOM; in PowerShell 7 ask for utf8BOM, because there the plain utf8 option deliberately omits it.
A Note on the File Name
Small thing, and it catches people every time. SSMS saves Results to File as .rpt by default. The contents are whatever you configured, but the extension is not .csv, so Windows will not open it with a spreadsheet and some tools will refuse it outright. Type the full name including .csv in the save dialog rather than accepting what it offers.
Leave a Reply