
-
How to Apply Force Encryption in SQL Server
If you’re planning to allow external connections to a SQL Server, one of the first security measures to implement is encryption, both at rest and in transit.
SQL Server provides an option to force encryption for all connections, ensuring secure SQL connectivity. This guide walks you through the steps to enforce encryption, following Microsoft’s official documentation: Enable Encrypted Connections to the Database Engine. Given the complexity of this process, it’s essential to review the official docs thoroughly before proceeding.
What This Guide Covers:
1. Creating a Certificate for SQL Server
2. Importing the Certificate to Trusted Root Certificates
3. Importing the Certificate into SQL Server
4. Forcing Encryption in SQL Server
5. Verifying Encrypted SQL Server Connections
1. Creating a Certificate for SQL Server
A certificate issued for Server Authentication is required, and its name must match the fully qualified domain name (FQDN) of the server.
For this tutorial, we’ll use PowerShell to create a new self-signed certificate. Modify the output file location and DNS names to match your environment if you are using this script.
# Create a new self signed certificate
New-SelfSignedCertificate -DnsName lab-sql1.whyte.net -CertStoreLocation cert:\LocalMachine\My -FriendlyName lab-sql1-cert -KeySpec KeyExchange -NotAfter (get-date).AddYears(99)
$thumbprint = $(Get-ChildItem Cert:\LocalMachine\My).thumbprint
$Pwd = ConvertTo-SecureString -String "Str0ngePassword1!" -Force -AsPlainText
Export-PfxCertificate -Cert "Cert:\LocalMachine\My\$thumbprint" -FilePath "C:\temp_certificates\lab-sql1pk.pfx" -Password $Pwd -Force
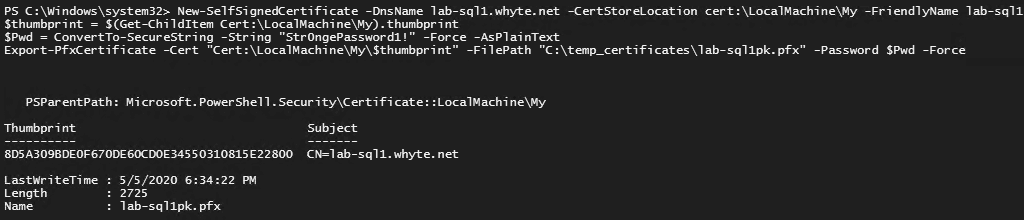
Here’s the output .pk file:

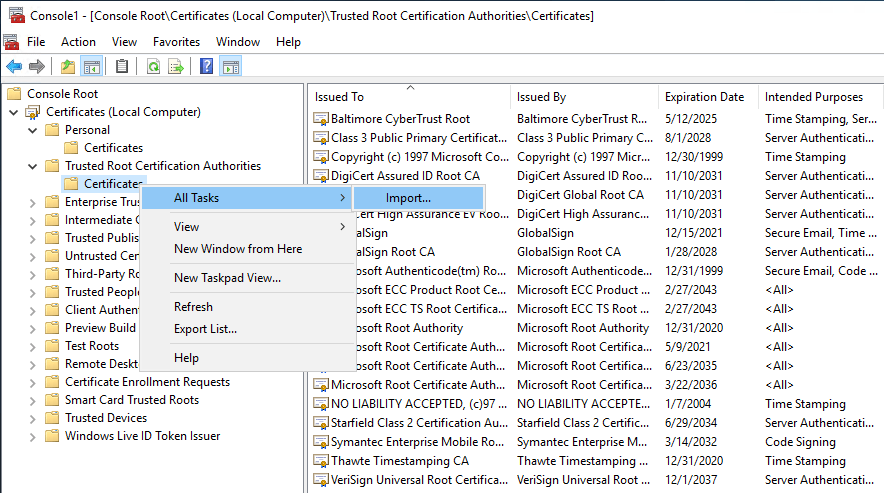
2. Importing the Certificate to Trusted Root Certificates
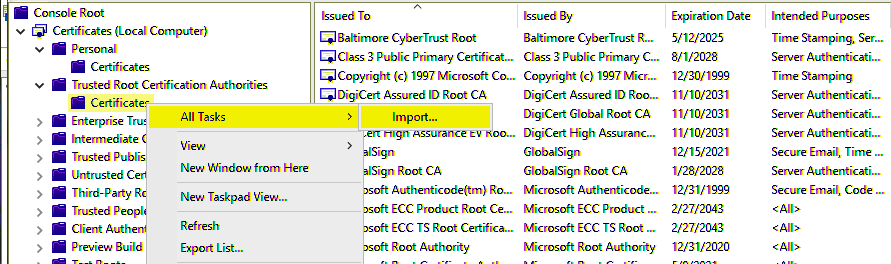
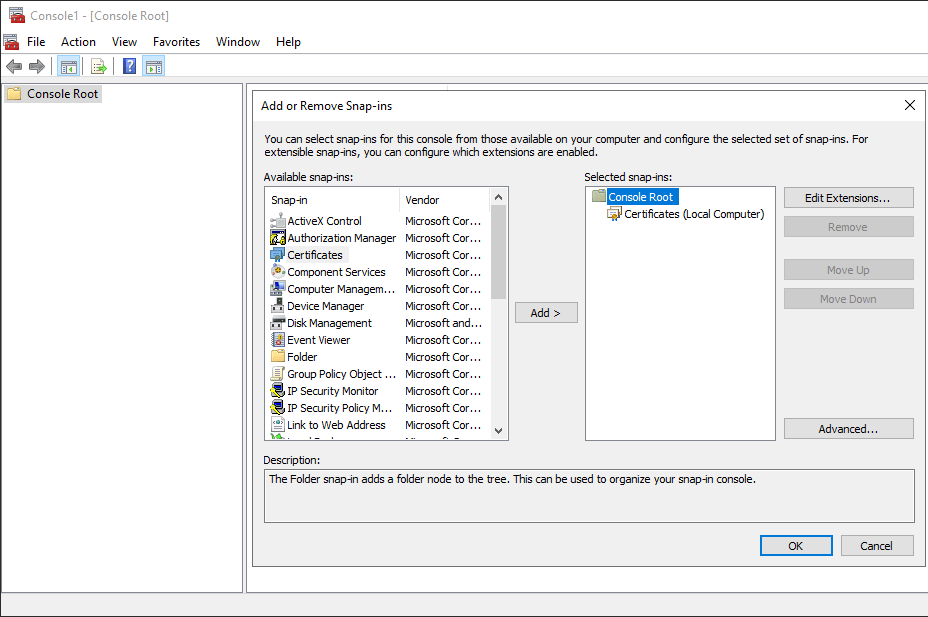
1. Open Microsoft Management Console (MMC), and add the Certificates (Local Computer) Snap-in.
2. Expand Trusted Root Certification Authorities.
3. Right-click and select All Tasks > Import.
4. Navigate to the
.pfxfile.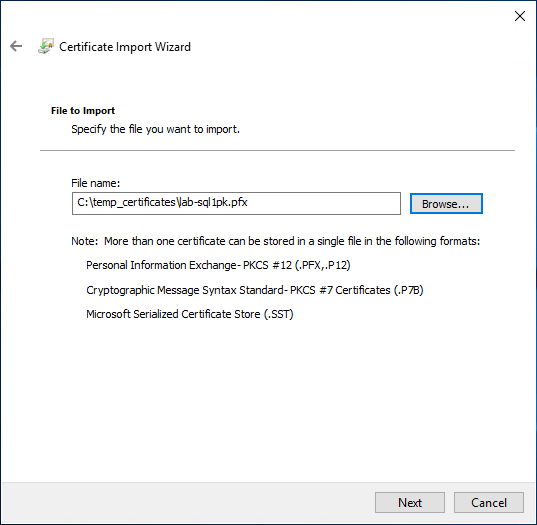
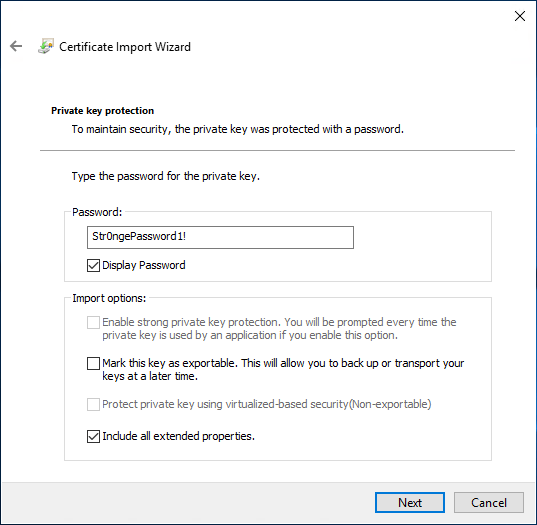
5. Enter a password & continue.
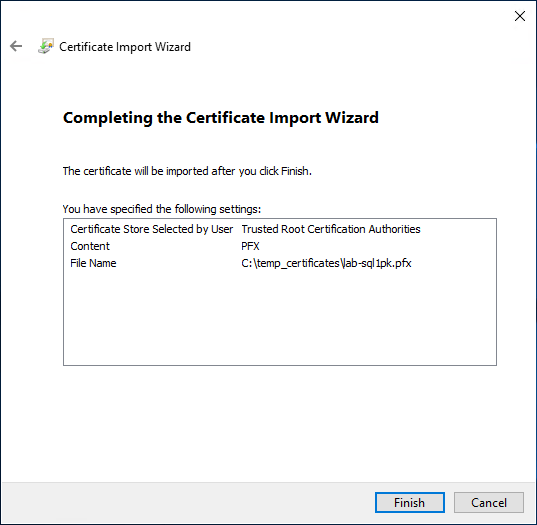
6. Finish up the wizard.
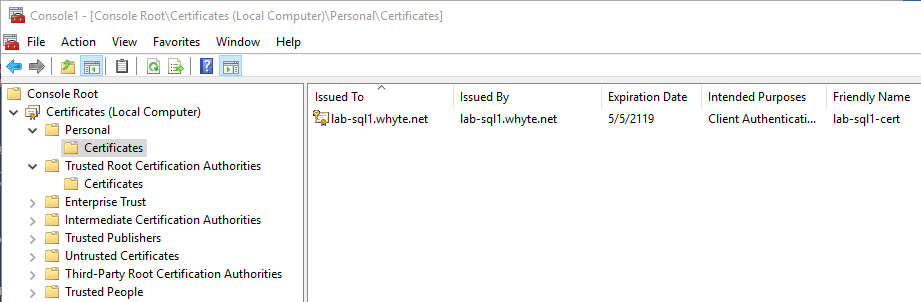
7. Verify the imported certificate in MMC.

3. Importing the Certificate into SQL Server
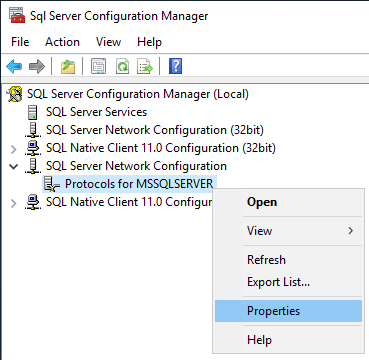
1. Open SQL Server Configuration Manager.
2. Right-click Protocols for MSSQLSERVER and select Properties.
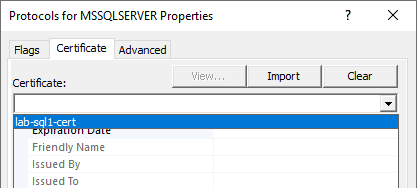
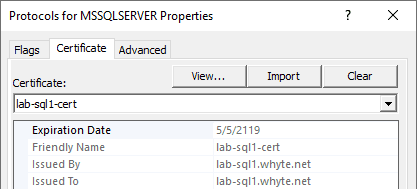
3. Open the Certificate tab and you should be able to view & select the new certificate from the drop-down menu.
4. Click to Apply & Ok out of the window – I’m doing the Forcing of Encryption separate next.
You’ll get this prompt.
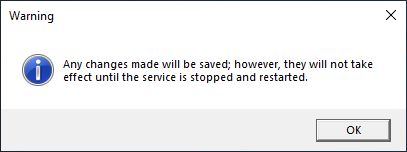
Now, restart the SQL Services from the configuration manager.
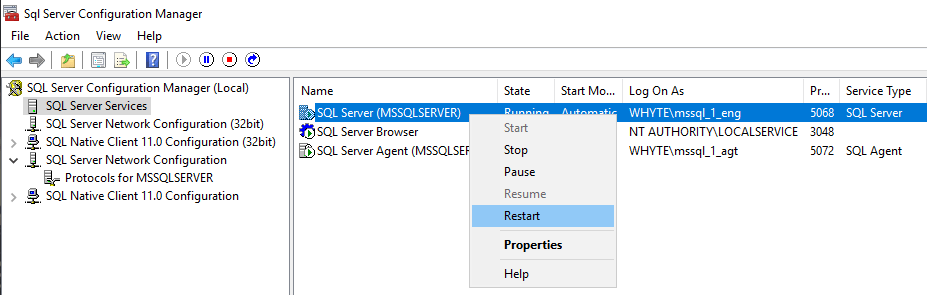
If your services don’t start back up again, then ensure the service accounts have the appropriate permissions. For this demo, my AD Service Accounts are members of the local Administrators group.
4. Forcing Encryption in SQL Server
To force connections to be encrypted in SQL Server:
1. In SQL Server Configuration Manager, right-click Protocols for MSSQLSERVER and select Properties.
2. Within the Flags tab, enable Force Encryption.
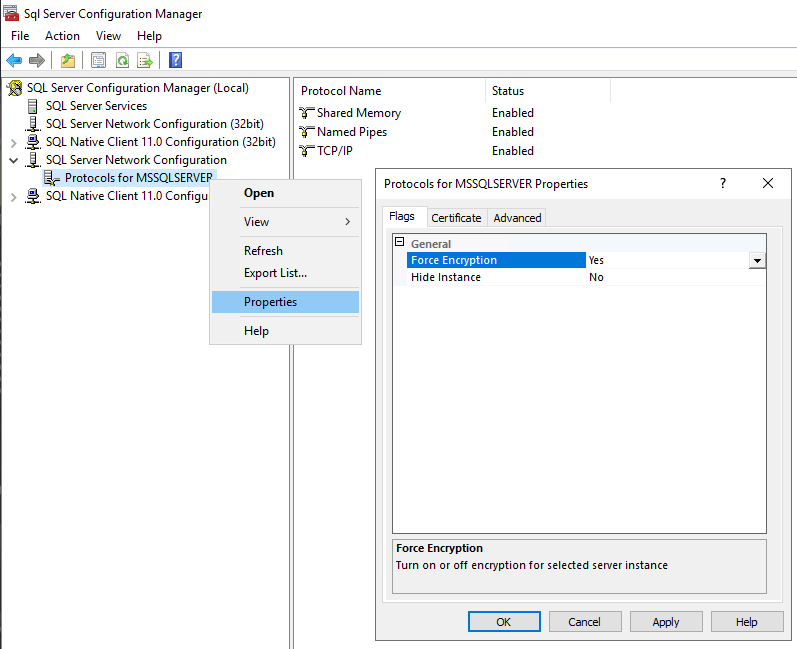
3. Restart the SQL Services.
5. Verifying Encrypted SQL Server Connections
Now that we have configured our SQL Server to force connections to be encrypted, lets verify that’s the case.
1. Open SSMS and connect to the SQL Server.
You may now have to ensure the Encrypt connection & Trust server certificate options are checked!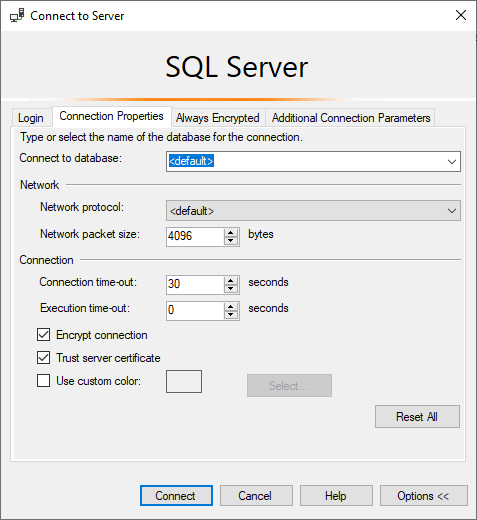
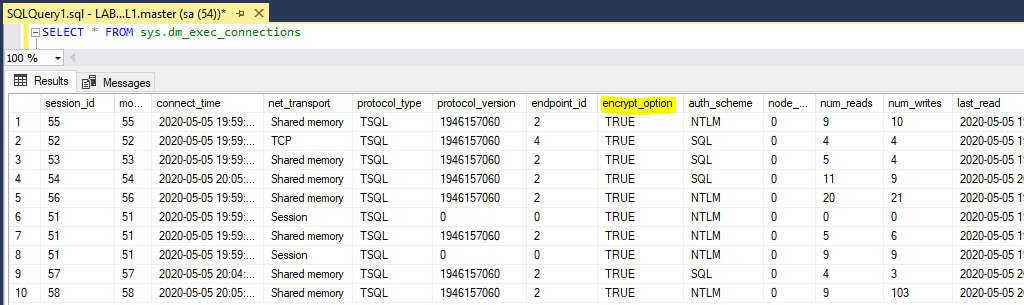
2. Once connected, query the sys.dm_exec_connections table and check the
encryption_optioncolumn for all the incoming SQL connections.
Checkout the MS Docs as linked for more information on the meaning behind the information displayed below.-- check if connections are encrypted (encrypt_option col) SELECT * FROM sys.dm_exec_connections
I hope this guide provided clear and actionable steps to help you configure forced encryption in SQL Server!
-
Include Execution Trace Messages in SQL Server Error Logs
Execution trace messages in SQL Server Agent error logs can be helpful for diagnosing issues. This guide explains how to enable this option.
Logs are always important if you’re supporting systems. The SQL Server Agent is used very often by DBA’s and Software Devs, so writing execution trace messages to the logs might be useful for investigating a random complex issue.
This guide follows the Microsoft Documentation page: Write Execution Trace Messages to the SQL Server Agent Error Log
Enabling the execution trace messages option comes with the following warning: it will make your error logs to become large in size, this should only be enabled during troubleshooting and disabled thereafter.
I’ve never enabled this before and discovered the option today. Hope this is useful!
Writing Execution Trace Messages to the SQL Agent Error Log
1. Open SQL Server Management Studio (SSMS).
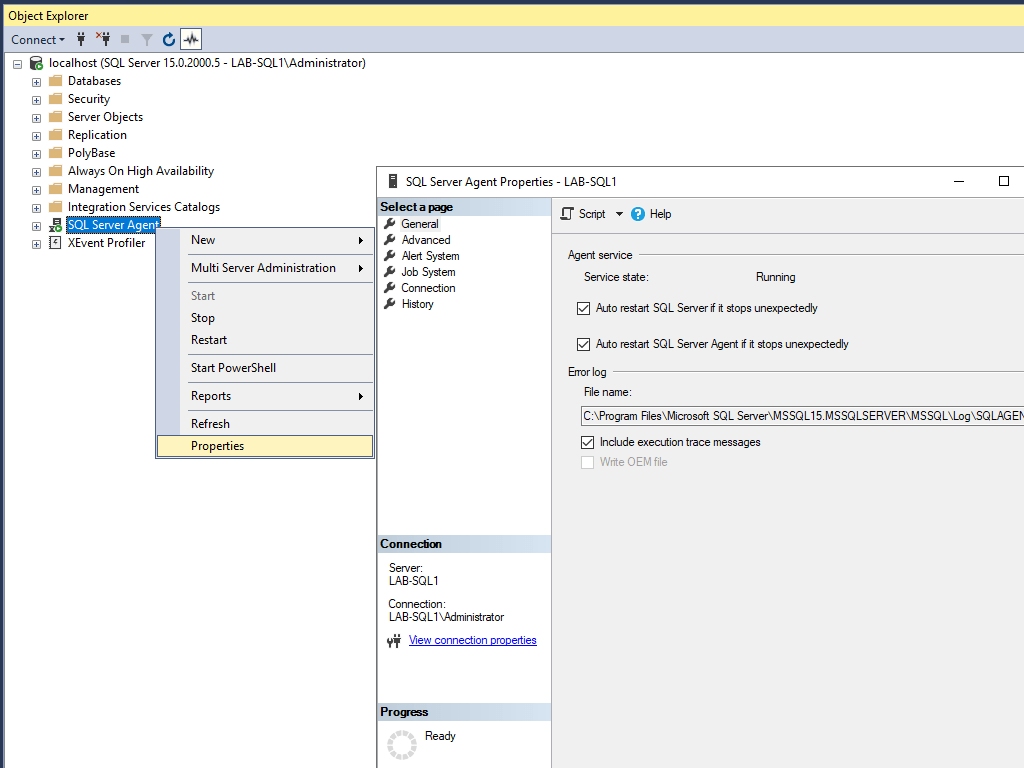
2. Right-click SQL Server Agent within the SSMS Object Explorer.
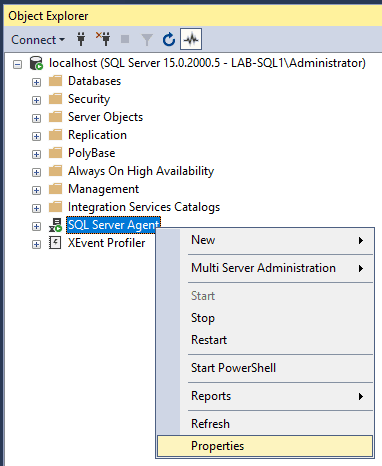
3. In the General tab, check the box for Include execution trace messages.
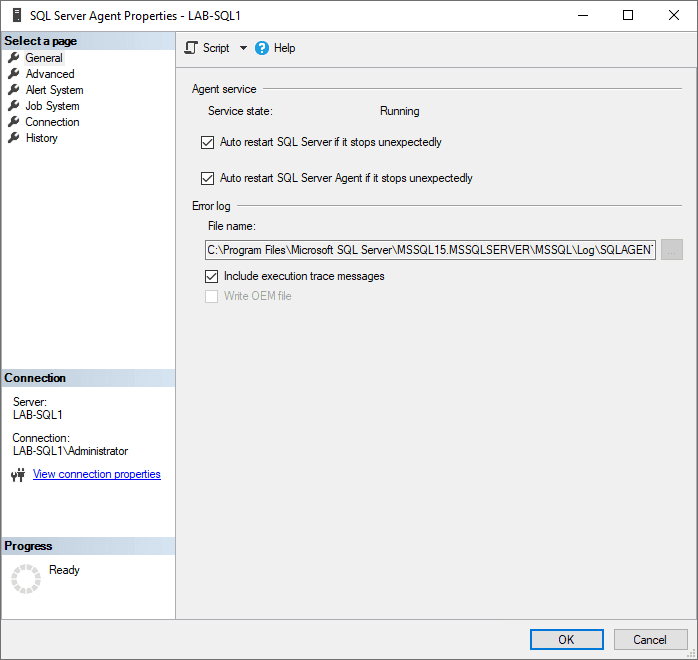
This feature is ideal for situations requiring detailed execution traces to identify specific SQL Server Agent problems. Once the issue is resolved, consider disabling this option to prevent excessive log growth.
-
Backing up a SQL Server Database with Encryption
Backing up a SQL Server database with encryption is an essential practice when dealing with sensitive data, particularly if backups are stored off-site or include private customer information. SQL Server provides a secure method to back up databases using encryption by specifying an encryption certificate with the
BACKUP DATABASEcommand.Unlike older versions of SQL Server, where backups could be password-protected, starting with SQL Server 2012, backups require encryption to secure the backup file. The process of encrypting a database backup involves using an encryption certificate that ensures only authorized users can restore the backup. Below, I’ll walk you through the process of encrypting SQL Server backups.
The demo below guide was created by following MS Docs: Create an Encrypted Backup.
Backup a Database with Encryption
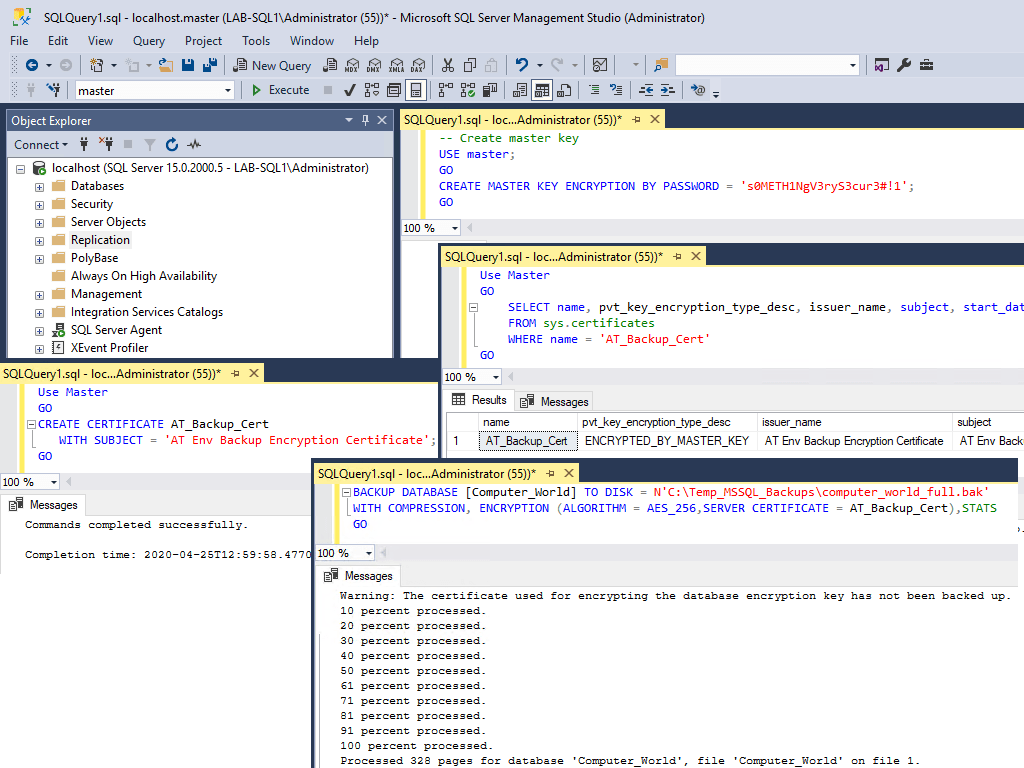
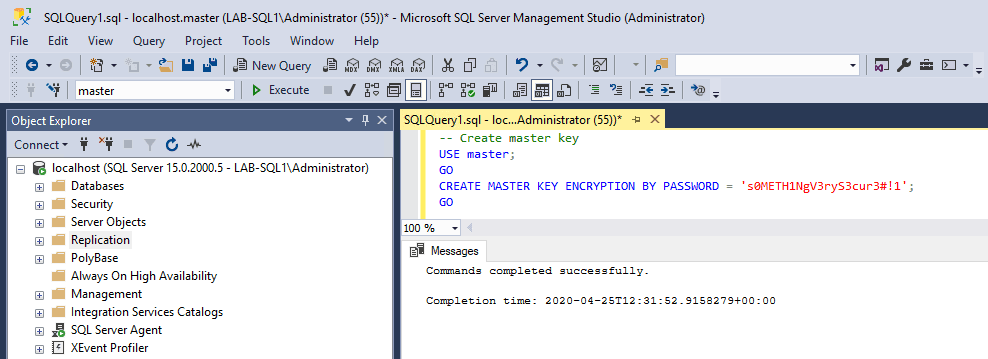
1. Create a Database Master Key:
Before you can create a certificate, ensure that a database master key exists in the database. If not, you’ll need to create one.-- create master encryption key for sql CREATE MASTER KEY ENCRYPTION BY PASSWORD = 'YourStrongPasswordHere';
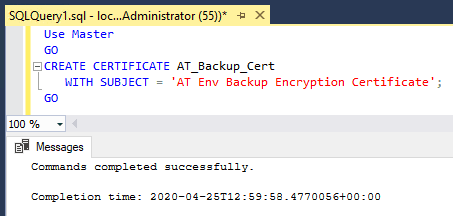
2. Create the Encryption Certificate:
The certificate will be used for the backup encryption process. It’s stored in themasterdatabase and is required for both creating and restoring encrypted backups.-- create cert in mssql USE [master]; GO CREATE CERTIFICATE AT_Backup_Cert WITH SUBJECT = 'Backup Encryption Certificate'; GO
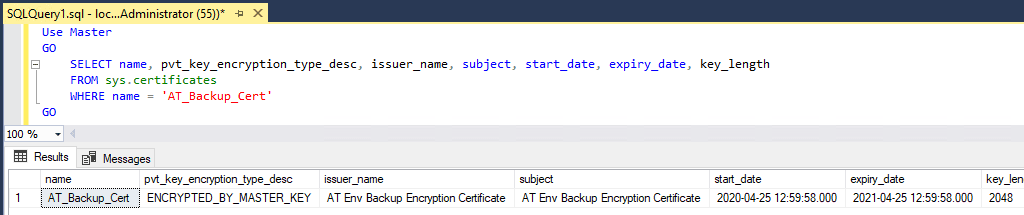
3. View the Created Certificate:
After creating the certificate, you can verify it by querying thesys.certificatesview. It’s important to monitor certificates for expiration dates and ensure they’re backed up regularly.USE [master]; GO SELECT * FROM sys.certificates WHERE name = 'AT_Backup_Cert' GO
4. Backup the Database with Encryption:
Now that you have the certificate, you can use theBACKUP DATABASEcommand to encrypt the backup. Specify theENCRYPTIONoption along with the encryption algorithm and the certificate to use.-- backup database with encryption mssql BACKUP DATABASE [Computer_World] TO DISK = N'C:\Temp_MSSQL_Backups\computer_world_full.bak' WITH COMPRESSION, ENCRYPTION (ALGORITHM = AES_256,SERVER CERTIFICATE = AT_Backup_Cert),STATS GO
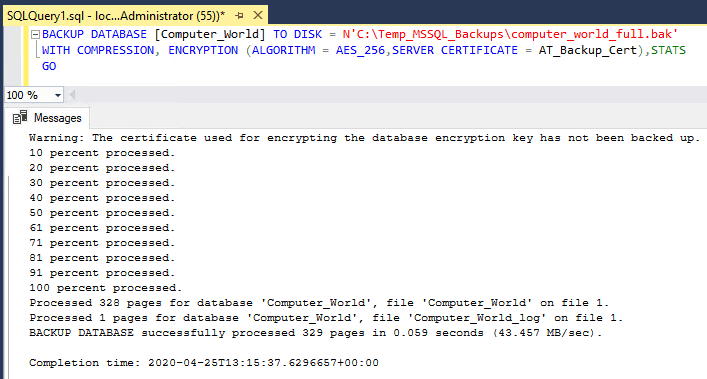
The database has successfully been backed up with encryption.
In this example:
– The backup is stored in theC:\Temp_MSSQL_Backups\directory.
– Compression is enabled to save storage space.
– AES-256 encryption is applied using theAT_Backup_Certcertificate.
– TheSTATSoption provides progress information during the backup.5. Backup the Certificate and Private Key:
After backing up the database, SQL Server will issue a warning stating that the certificate used for encryption hasn’t been backed up yet. It’s critical to back up both the certificate and its associated private key to ensure the backup can be restored later.The warning we see is regarding the certificate created prior to the backup is as follows:
Warning: The certificate used for encrypting the database encryption key has not been backed up. You should immediately back up the certificate and the private key associated with the certificate. If the certificate ever becomes unavailable or if you must restore or attach the database on another server, you must have backups of both the certificate and the private key or you will not be able to open the database.Hope this was useful. Next up, you should checkout my post: How to Backup a SQL Server Certificate!
-
How to Backup a SQL Server Certificate
Backing up SQL Server certificates is essential if you use them, especially for encrypted database backups that may need restoration on another server.
This guide explains how to securely back up a SQL Server certificate and its private key.
Backing up a SQL Server Certificate
1. Check Existing Certificates
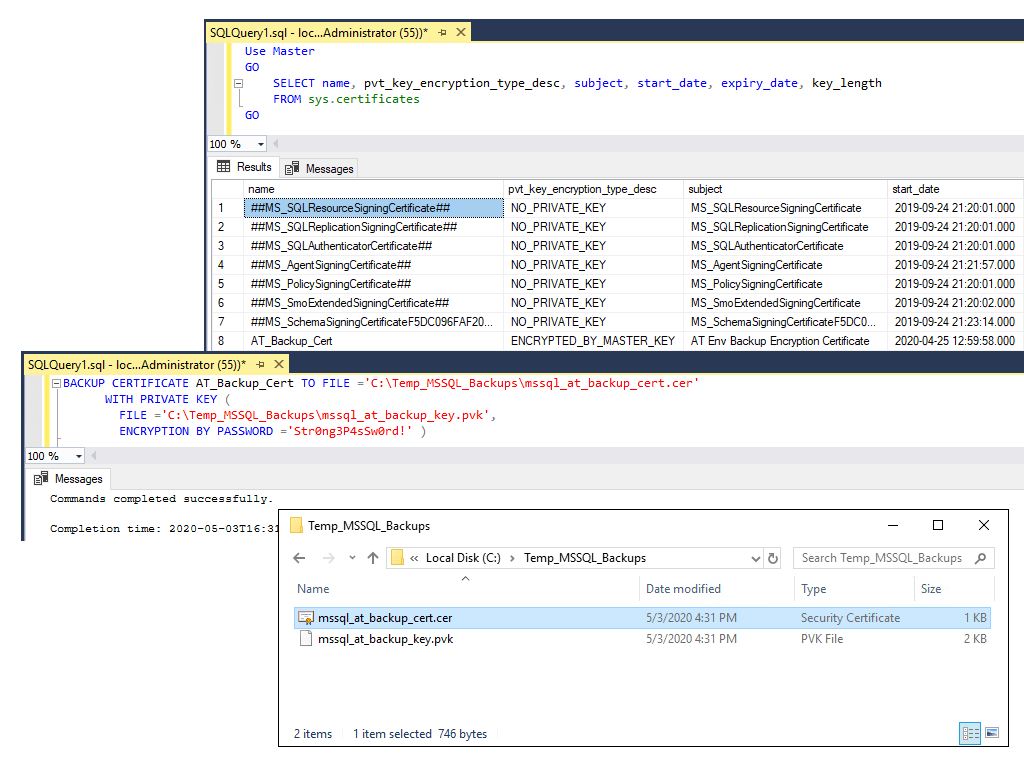
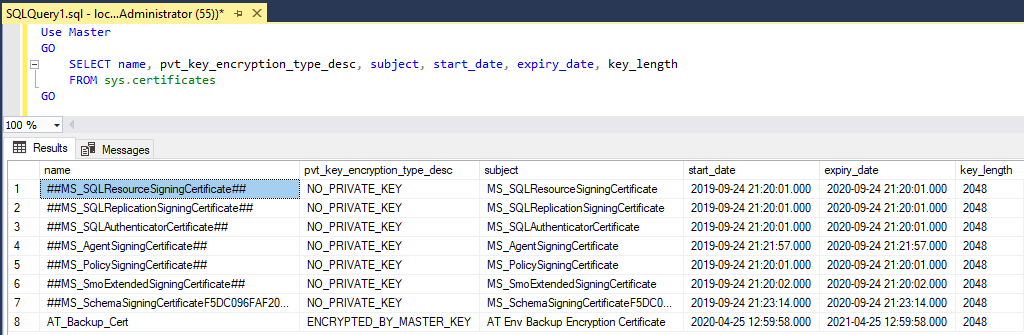
To check your existing SQL Server certificates you want to back up, run the query below. We’re querying sys.certificates to get this info.
-- get server certificates
Use Master
GO
	SELECT name, pvt_key_encryption_type_desc, subject, start_date, expiry_date, key_length
	FROM sys.certificates
GO
2. Backup the Certificate and Private Key
Replace file paths and passwords as needed in the SQL command below. Check out the MS Docs for Backup Options and more info.
-- backup sql server certificate
BACKUP CERTIFICATE AT_Backup_Cert TO FILE ='C:\Temp_MSSQL_Backups\mssql_at_backup_cert.cer'
      WITH PRIVATE KEY (
		FILE ='C:\Temp_MSSQL_Backups\mssql_at_backup_key.pvk',
		ENCRYPTION BY PASSWORD ='Str0ng3P4sSw0rd!' )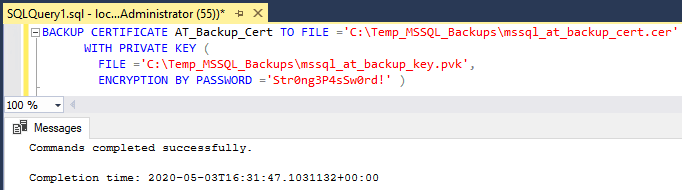
3. Secure the Backup Files
Move the
.cerand.pvkfiles to a safe location, such as an encrypted storage device or secure cloud storage.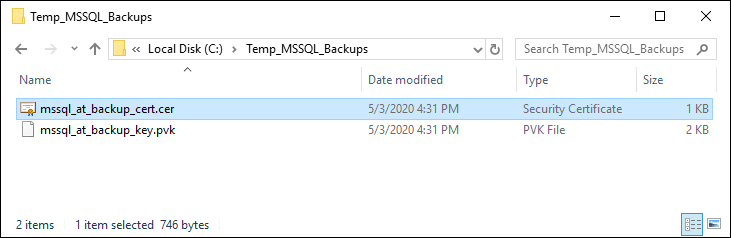
Notes
Use strong passwords to encrypt your SQL Server certificate backups.
Certificates are needed for restoring encrypted backups, and losing them can result in permanent data loss if caught in a Disaster Recovery incident.
Store backups securely and restrict access to authorised personnel only.
-
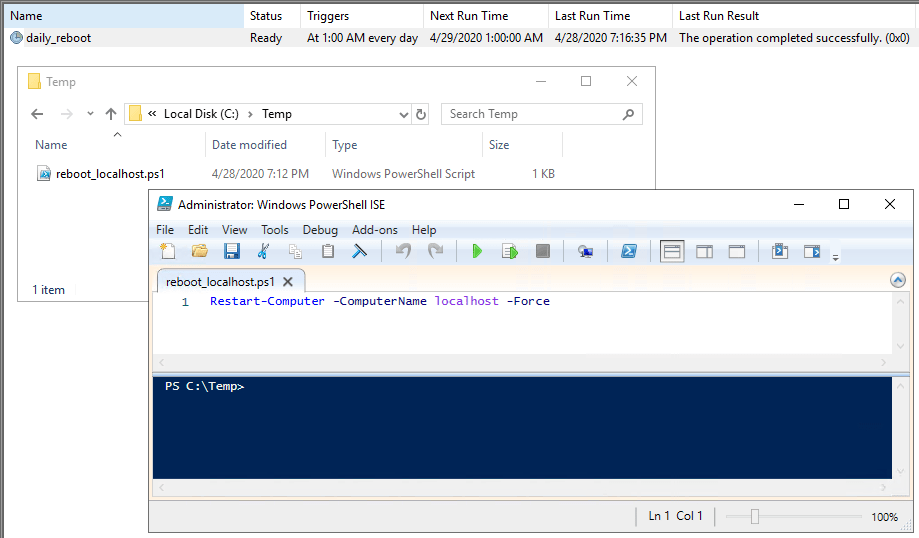
Running PowerShell Scripts as Scheduled Tasks in Windows
When you need to schedule tasks in Windows, Task Scheduler is the tool for the job. Running PowerShell (.ps1) scripts as Scheduled Tasks differs from running standard batch (.bat) scripts. I often find myself needing a refresher on the process, so I decided to document it in this post.
Below, I outline the steps to create a Scheduled Task that runs a PowerShell script to perform a daily reboot on a Windows Server system. Hope this is useful for you!
Creating a Scheduled Task to Run a PowerShell Script
1. Open Task Scheduler.
Launch Task Scheduler from the Start menu or by runningtaskschd.mscin the Run dialog (Win + R).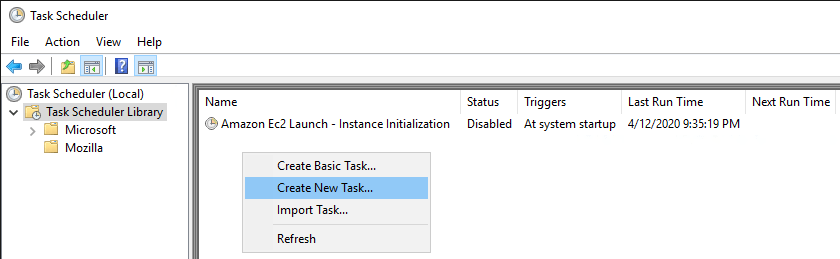
2. Create a New Task.
– In Task Scheduler, right-click on Task Scheduler Library and select Create New Task.
– In the General tab, provide aNameandDescription.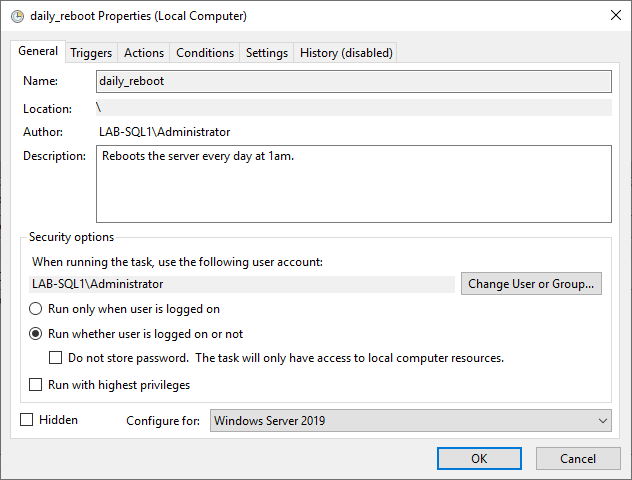
📌 If running in a professional environment, consider using an Active Directory (AD) service account for execution. If the script is local and security settings allow, you may not need to store a password under the Security options.
3. Configure the Trigger.
– Navigate to the Triggers tab and create a new schedule.
– Set the frequency and timing as needed (e.g., Daily at a specified time).
– You can also configure triggers based on Windows Events, system idle time, or logon events.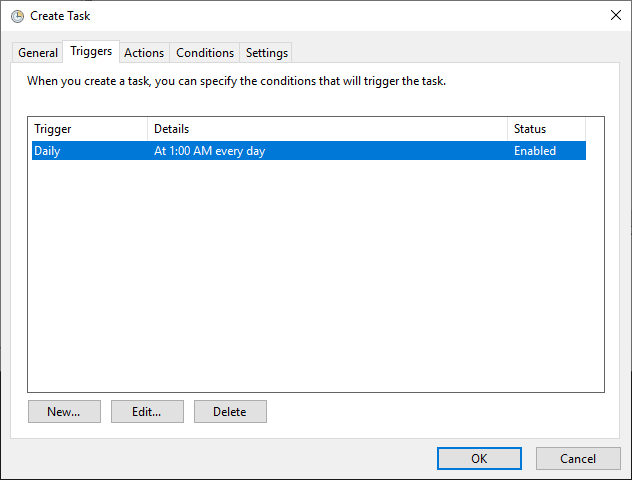
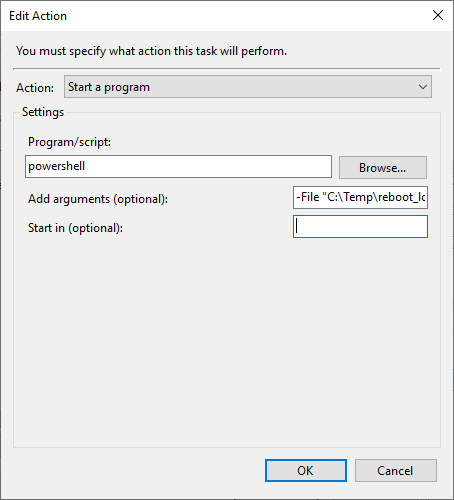
4. Set the Action.
– Go to the Actions tab and create a new action.
– Choose Start a program as the action.
– In the Program/script field, enter:powershell.exe.
– In the Add arguments field, specify the script path:-File "C:\Temp\powershell_script.ps1"

5. Configure Conditions and Settings.
– Under the Conditions and Settings tabs, review options that best suit your needs.
– A useful setting is to stop the task if it runs longer than 1 hour to prevent stuck processes.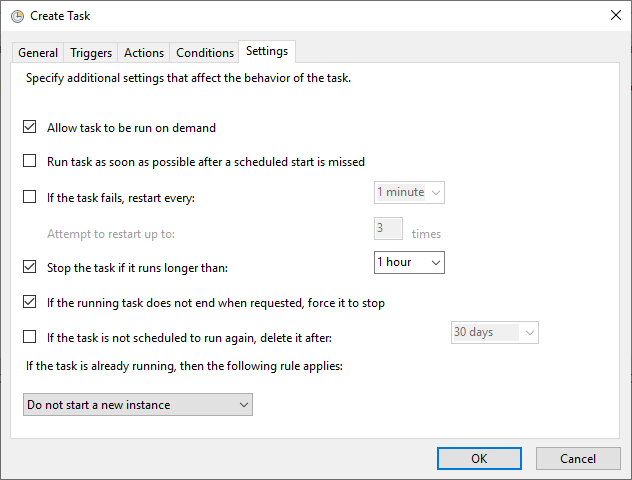
6. Test and Verify.
– Run the task manually to ensure it executes correctly.
– For tasks that impact connectivity (such as a server reboot), verify by checking event logs or monitoring system status.