
-
How to Check Features Installed in SQL Server
This guide explains how to check which features are installed on a SQL Server instance.
When downgrading from SQL Server Enterprise to Standard, checking the installed features is crucial to ensure compatibility and avoid losing critical functionality. Some Enterprise features may not be available in the Standard edition, so reviewing installed components helps you identify what needs to be removed or adjusted.
Additionally, this process is important for troubleshooting, verifying licensing compliance, and optimizing resources. By checking installed features, you can ensure a smooth transition, maintain security standards, and plan for future growth without unexpected disruptions.
Steps to Discover Installed Features
1. Locate SQL Server Installation Files
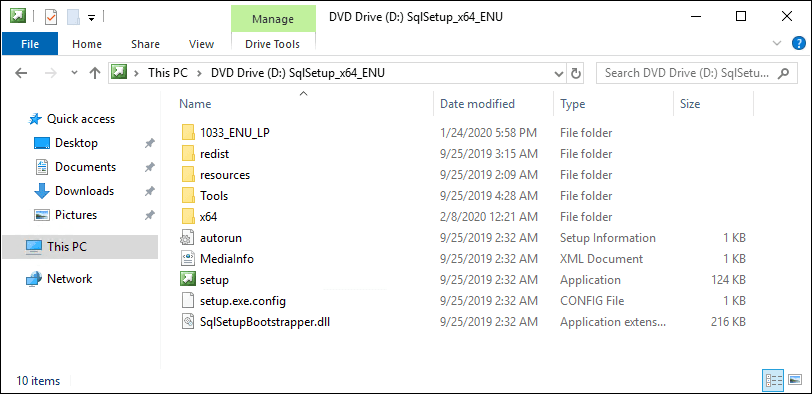
You can find the SQL Server installation files within theSetup Bootstrapfolder. For example:C:\Program Files\Microsoft SQL Server\150\Setup Bootstrap\SQL2019
Alternatively, you may already have the installation ISO handy.
2. Open Command Prompt
Navigate to the folder containing the SQL Server installation files. From the top navigation bar, opencmd.exe.
3. Run Setup.exe with the Discovery Parameter
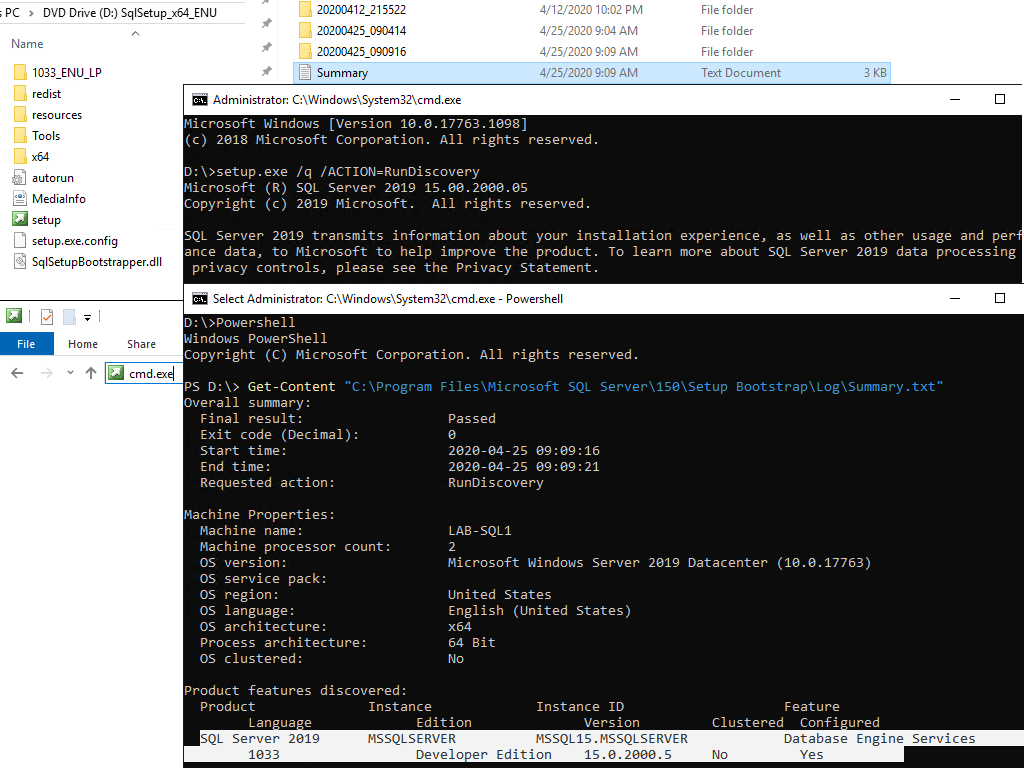
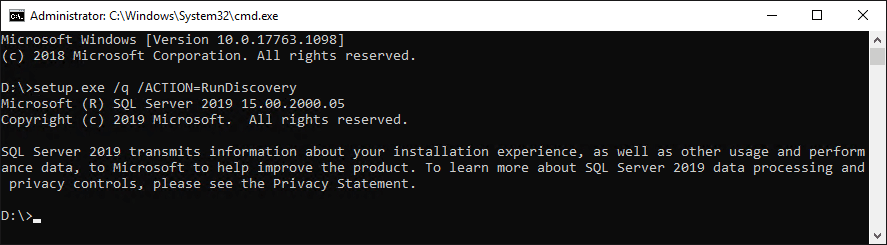
Execute the following command to generate the discovery report:Setup.exe /ACTION=RunDiscovery
>> For reference, see Microsoft Docs: Installation Parameters.
4. Locate the Discovery Report
The discovery report is saved to the following location:%ProgramFiles%\Microsoft SQL Server\<nnn>\Setup Bootstrap\Log\<last Setup Session>
Replace
<nnn>with the version number of SQL Server:
– SQL Server 2012:110
– SQL Server 2014:120
– SQL Server 2016:130
– SQL Server 2017:140
– SQL Server 2019:150
– SQL Server 2022:160
– SQL Server 2025:170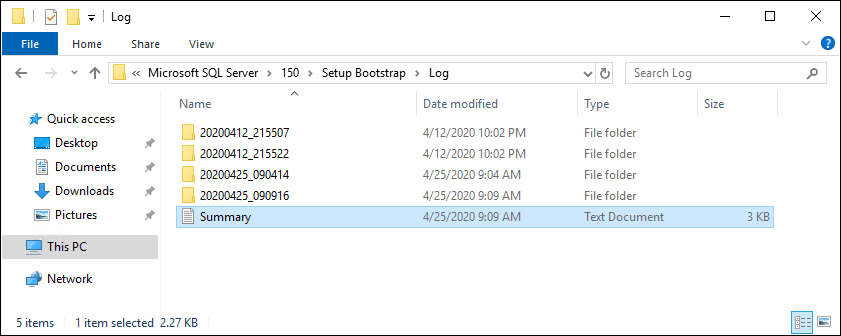
5. Review the Discovery Report
Open the discovery report to see the installed features. It highlights components such as the Database Engine Services or Reporting Services.If you prefer PowerShell, use
Get-Contentto navigate through the log files and locate the summary:# show sql upgrade/installation summary file Get-Content "C:\Program Files\Microsoft SQL Server\<nnn>\Setup Bootstrap\Log\<last Setup Session>\Summary.txt"
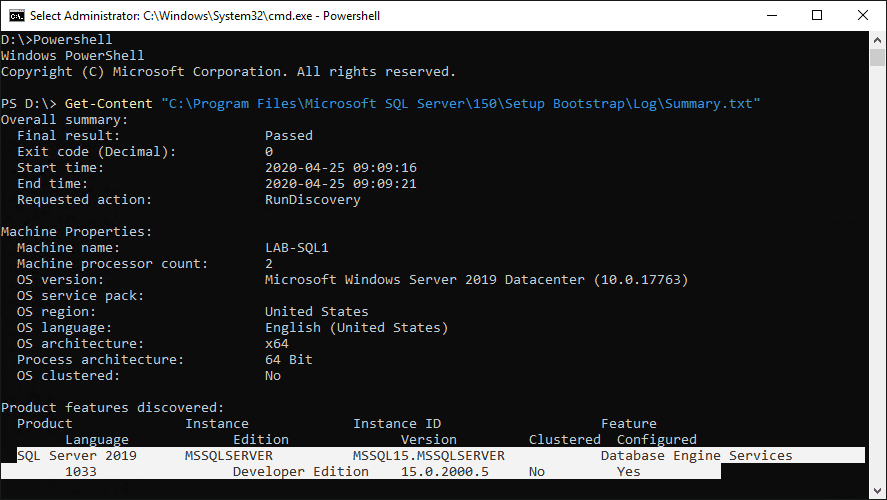
The highlighted sections in the discovery report will show installed features. For instance, the report may indicate that only the Database Engine Services are installed for SQL Server 2019 Developer Edition.
By following these steps, you can efficiently determine the features installed on your SQL Server instance. This is especially useful for troubleshooting or verifying the configuration of your environment.
-

How to Install SQL Server on Linux
As from SQL Server 2017, we now have support for running our favorite RDMS on Linux, as well as Windows!
This guide walks you through installing SQL Server 2019 on Red Hat Linux, setting up command-line tools, and connecting both locally and remotely. Hope it helps!
Topics Included:
1. Installing SQL Server on Linux
2. Installing the SQL Server Command-Line Tools
3. Connecting to SQL Server from Linux
1. Installing SQL Server on Linux
First, ensure your system is up to date:
sudo curl -o /etc/yum.repos.d/mssql-server.repo https://packages.microsoft.com/config/rhel/8/mssql-server-2019.repo
Step 1: Add the SQL Server Repository
Download and configure the Microsoft SQL Server 2019 repository for Red Hat:sudo curl -o /etc/yum.repos.d/mssql-server.repo https://packages.microsoft.com/config/rhel/8/mssql-server-2019.repo

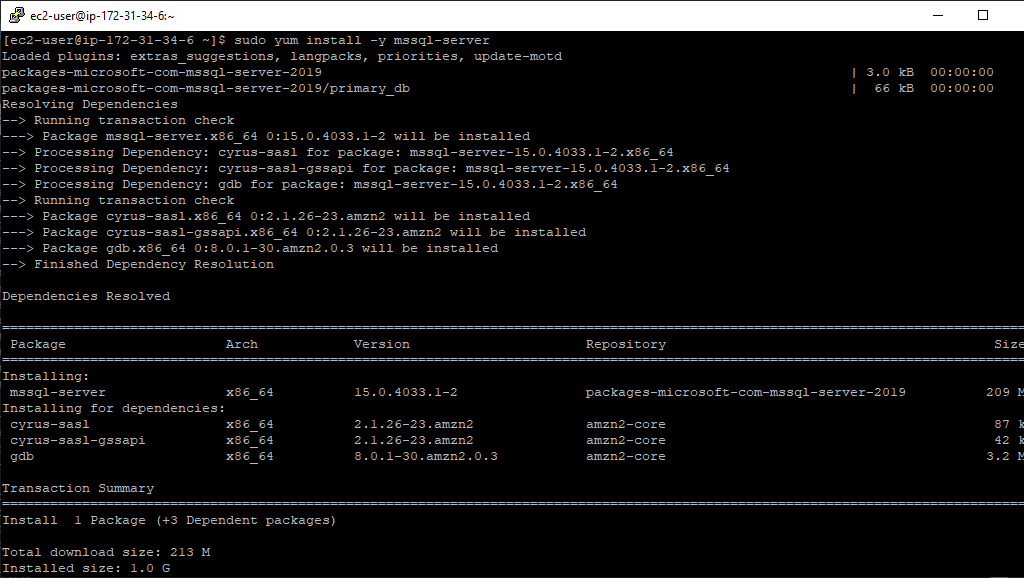
Step 2: Install SQL Server
Run the following command to install SQL Server:sudo yum install -y mssql-server
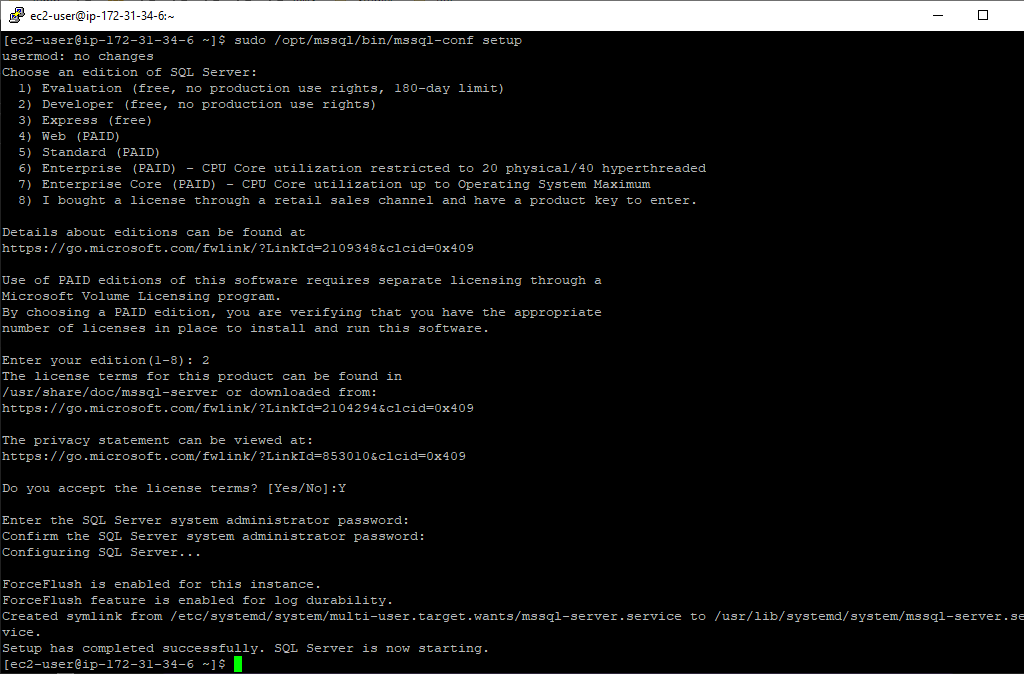
Step 3: Configure SQL Server
Once installed, run the setup tool to choose the edition, set the SA (System Administrator) password, and accept the license agreement:sudo /opt/mssql/bin/mssql-conf setup
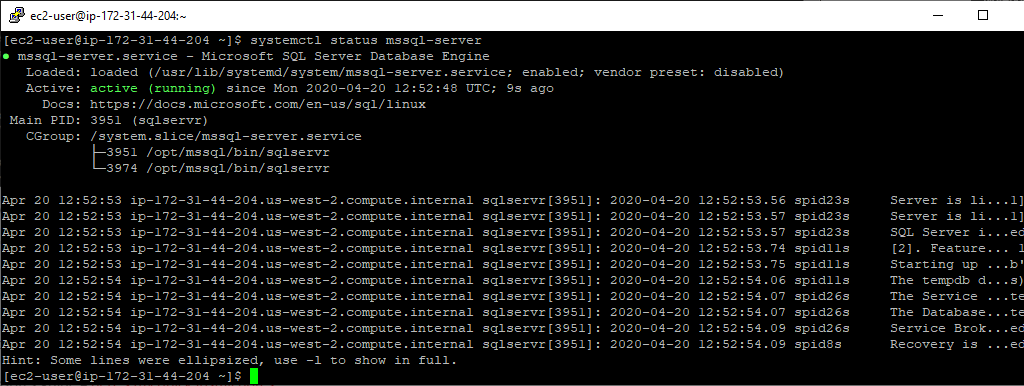
Step 4: Verify SQL Server is Running
Check the service status to confirm that SQL Server is up and running:systemctl status mssql-server
If it’s not running, start the service, and we should ensure SQL Server is enabled for start at boot:
sudo systemctl start mssql-server
sudo systemctl enable mssql-server
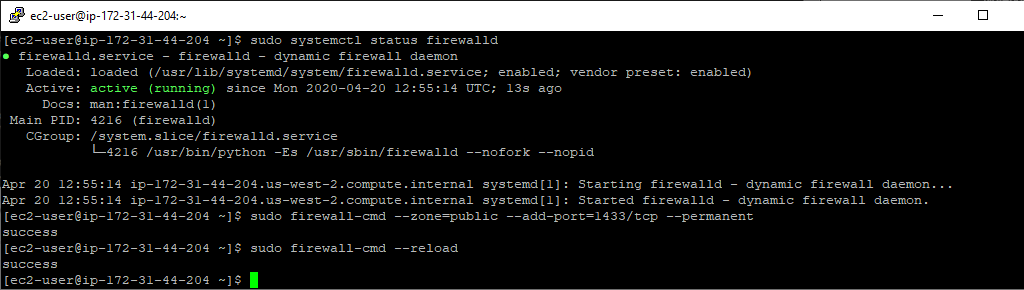
Step 5: Allow Remote Connections
To install firewalld which I’m using here, you can follow my other guide: How to Install Firewalld on Linuxsudo firewall-cmd --zone=public --add-port=1433/tcp --permanent sudo firewall-cmd --reload
2. Installing the SQL Server Command-Line Tools
The command-line tools (SQLCMD & BCP) allow you to interact with SQL Server from the terminal.
Step 1: Add the Microsoft Repository
Download and configure the Microsoft Red Hat repo:sudo curl -o /etc/yum.repos.d/msprod.repo https://packages.microsoft.com/config/rhel/8/prod.repo

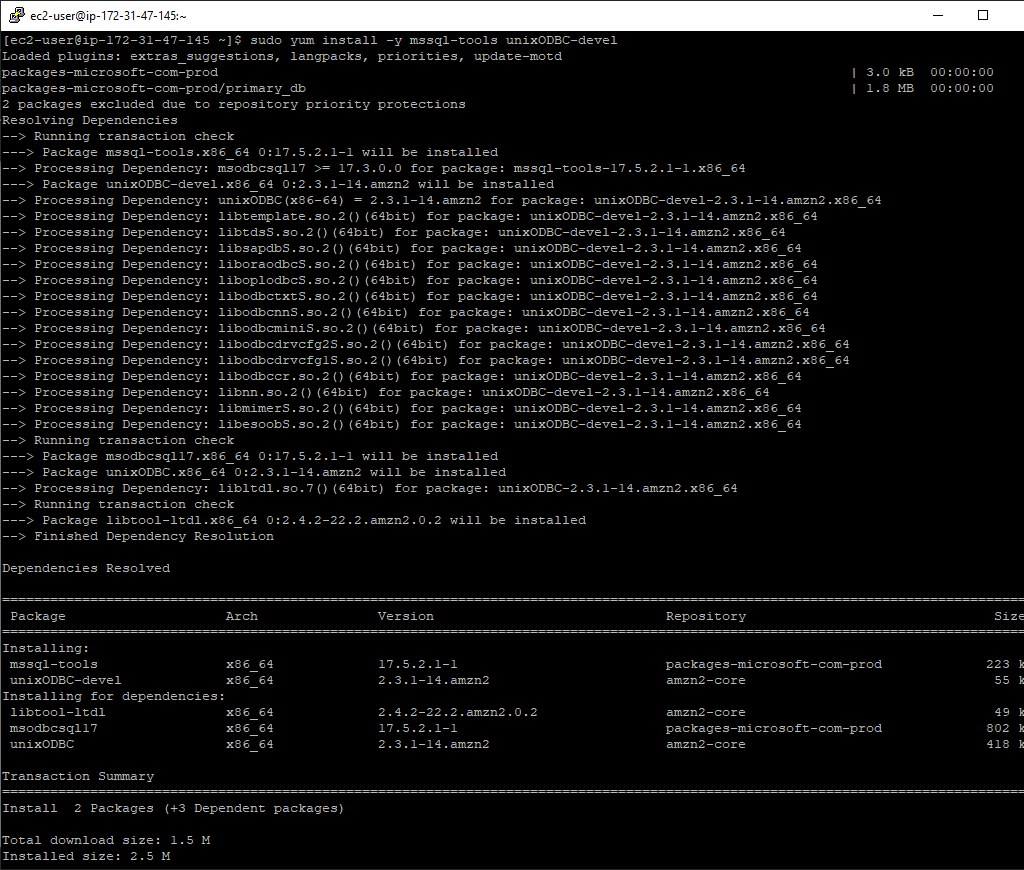
Step 2: Install SQL Server Command-Line Tools
Run the following command to install the ODBC driver for SQL Server on Linux:sudo yum install -y mssql-tools unixODBC-devel
Step 3: Add SQL Server Tools to PATH
To usesqlcmdandbcpwithout specifying the full path, update your PATH environment variable:echo 'export PATH="$PATH:/opt/mssql-tools/bin"' >> ~/.bash_profile echo 'export PATH="$PATH:/opt/mssql-tools/bin"' >> ~/.bashrc source ~/.bashrc

3. Connecting to SQL Server from Linux
Once you have SQL Server along with the command-line tools installed, we can connect using
sqlcmdby running the following:sqlcmd -S localhost -U SA -P '<YourStrongPassword>'

If connected successfully, you’ll see a
1>prompt, indicating the SQL environment is ready.Alternatively we can be connecting from a Windows computer running SSMS:
-
How to Install Firewalld on Linux
Firewalld is a firewall management tool that simplifies rule configuration for Linux systems. It dynamically manages firewall rules, supports zone-based configurations, and integrates with D-Bus.
In this post I’m showing how to install Firewalld on an Amazon Linux 2 EC2 Instance. Hope you find this useful!
Installing Firewalld on Linux
1. Enable EPEL Repository:
First, install the Extra Packages for Enterprise Linux (EPEL) repository, which provides additional software packages, including Firewalld:sudo yum install epel-release
After installation, verify that the repository has been added by running:
yum repolist | grep epel
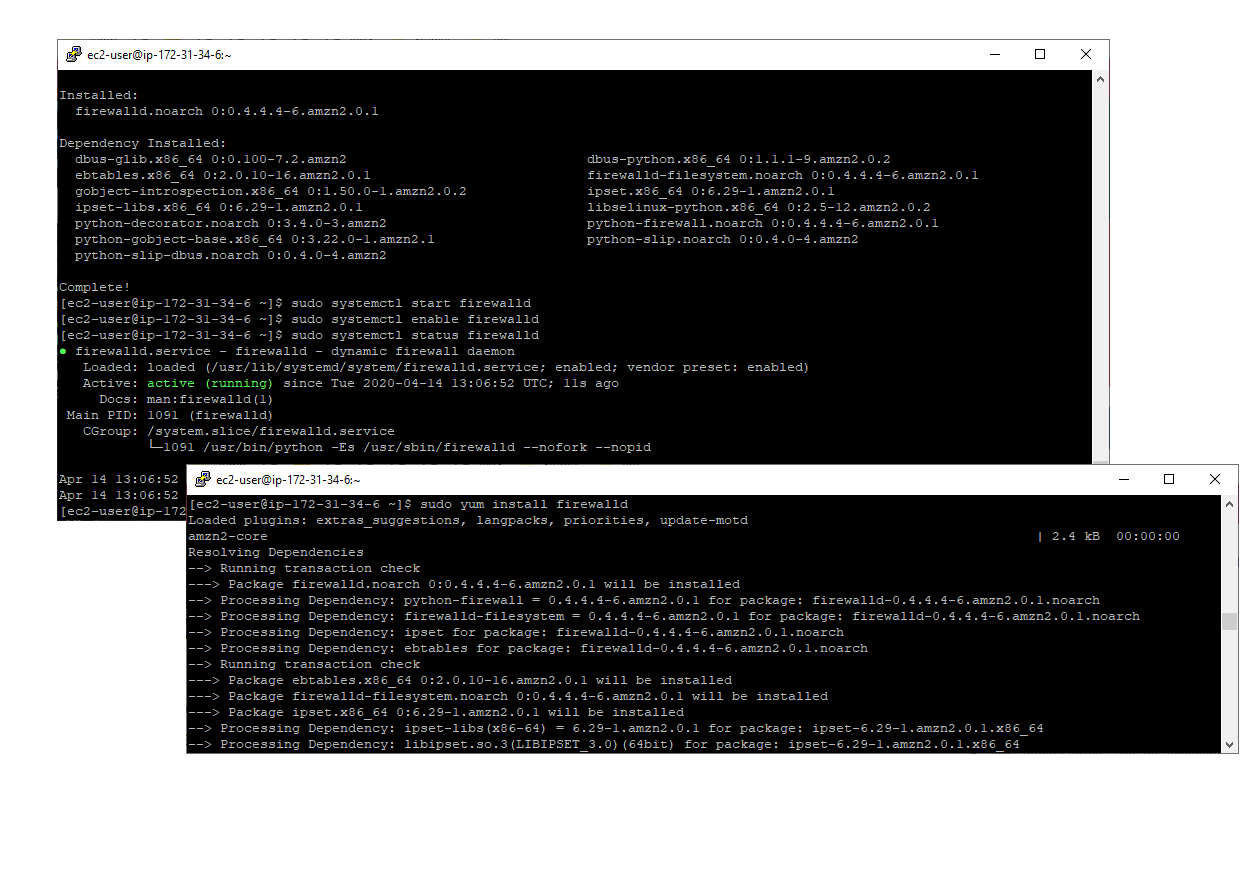
2. Install Firewalld:
Now, install the Firewalld package using the following command:sudo yum install -y firewalld
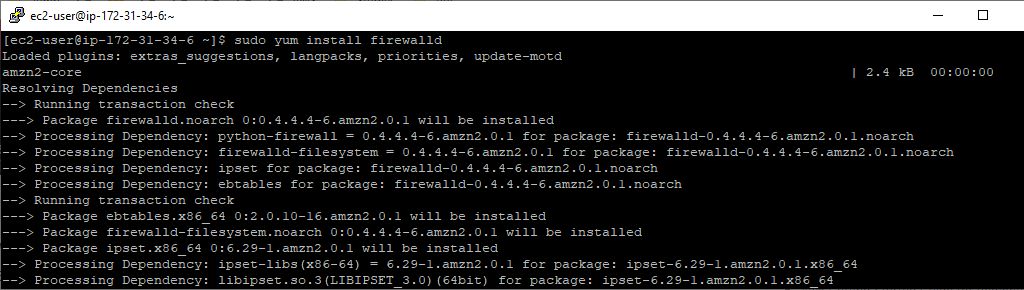
Once installed, check the package version to confirm installation:
rpm -q firewalld
3. Start and Enable Firewalld:
Below I’m starting the Firewalld service, enabling it to run on system boot and then checking the status of the service.sudo systemctl start firewalld sudo systemctl enable firewalld sudo systemctl status firewalld
If needed, allow Firewalld through the system’s security policies:
sudo systemctl restart firewalld
4. Verify Active Rules:
Check the currently applied firewall rules using:firewall-cmd --list-all
This command provides details on active zones, allowed services, and open ports.
Firewalld should now be installed and running. Use
firewall-cmdfor rule management. For advanced configurations, check the official documentation. -
How to Enable TCP/IP Connections in SQL Server
Some network protocols, like TCP/IP, are disabled by default in SQL Server. To allow TCP connections, you need to enable them and restart the SQL Server service.
Here’s a simple guide to do this via GUI & command: :
> Option 1: Enable TCP/IP via SQL Server Configuration Manager.
> Option 2: Enable TCP/IP using PowerShell.Option 1: Enable TCP/IP via SQL Server Configuration Manager
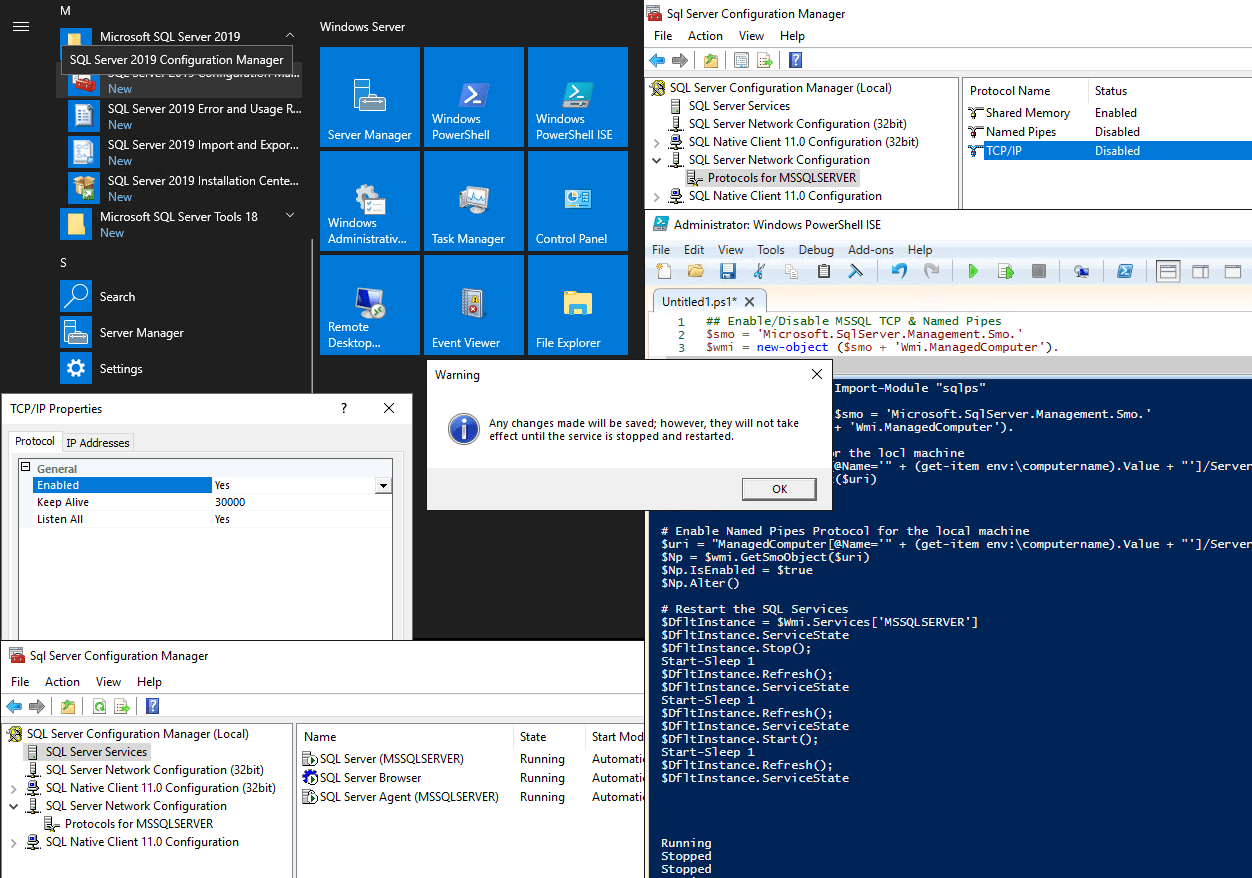
1. Open SQL Server Configuration Manager.
Use the Start Menu to locate and open it.
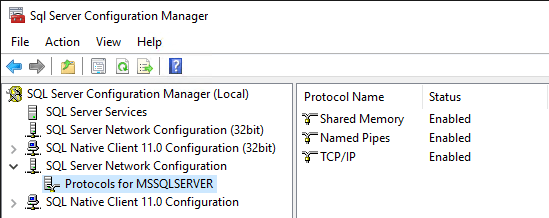
2. Access the TCP/IP Protocols.
Navigate to SQL Server Network Configuration > Protocols for MSSQLSERVER and double-click TCP/IP.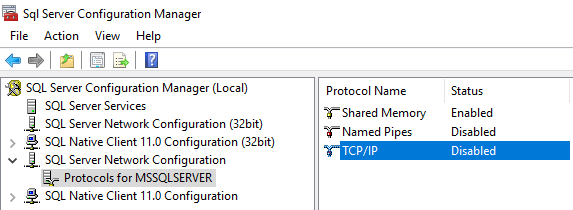
3. Enable the Protocol.
In the Protocol tab, set Enabled to Yes.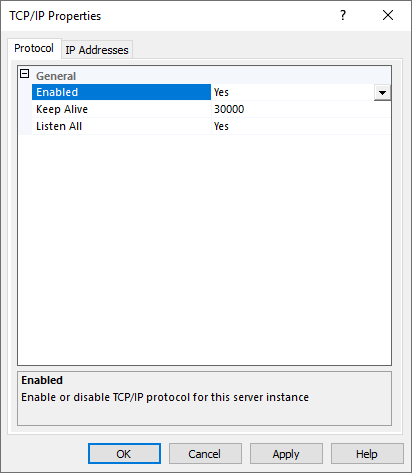
4. Adjust IP Settings.
Under the IP Addresses tab, configure the required IPs (e.g., IPv4).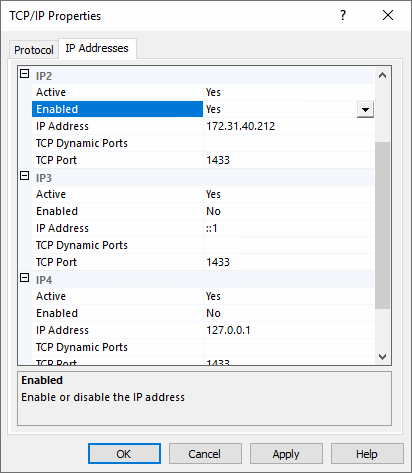
5. Apply Changes.
Click Apply and close the properties window.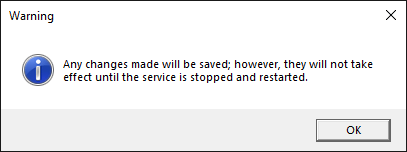
6. Restart the SQL Server Service.
Go to SQL Server Services in the Configuration Manager. Right-click the SQL Server service and select Restart.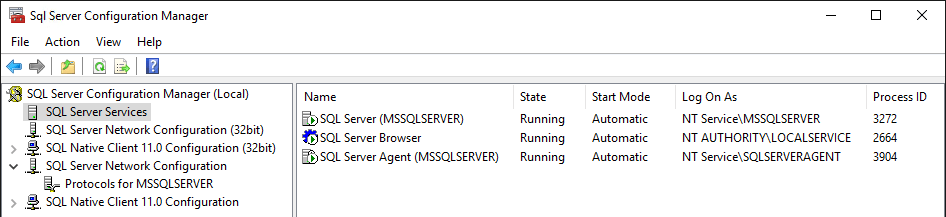
Option 2: Enable TCP/IP Using PowerShell
If you prefer scripting, you can use PowerShell to enable TCP/IP and restart the service.
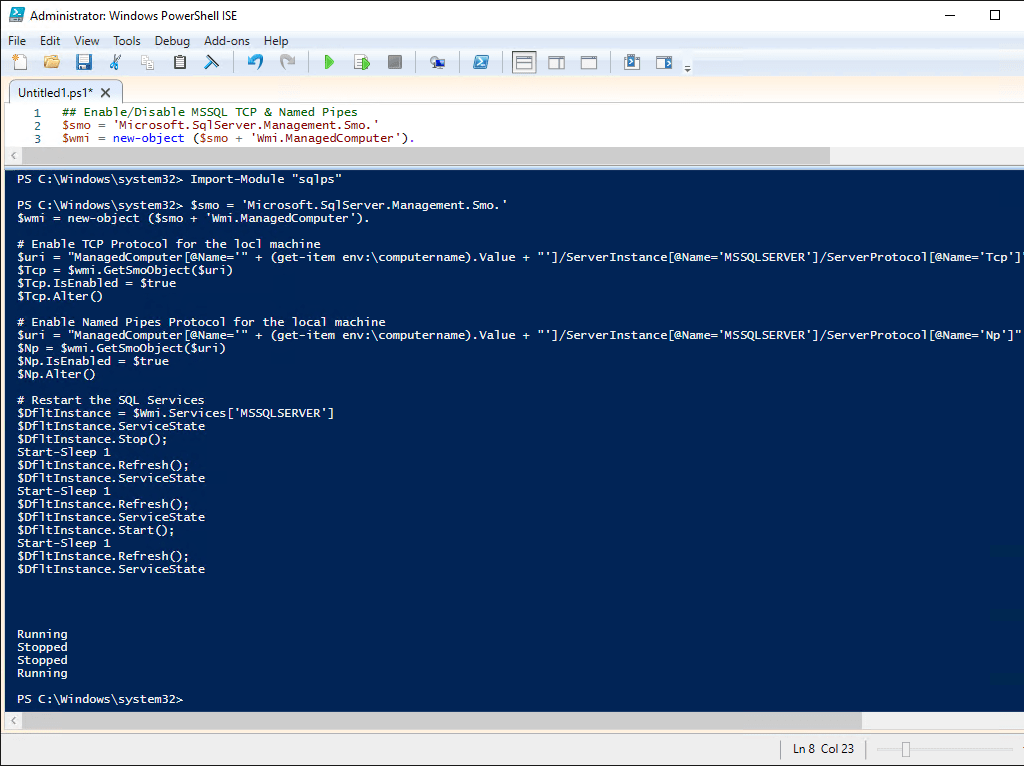
The script below will enable TCP IP for a SQL Server Instance, including Named Pipes.
Prerequisite: Install SQL Server PowerShell module
## Enable/Disable MSSQL TCP & Named Pipes
$smo = 'Microsoft.SqlServer.Management.Smo.'
$wmi = new-object ($smo + 'Wmi.ManagedComputer').

# Enable TCP Protocol for the locl machine
$uri = "ManagedComputer[@Name='" + (get-item env:\computername).Value + "']/ServerInstance[@Name='MSSQLSERVER']/ServerProtocol[@Name='Tcp']"
$Tcp = $wmi.GetSmoObject($uri)
$Tcp.IsEnabled = $true
$Tcp.Alter()

# Enable Named Pipes Protocol for the local machine
$uri = "ManagedComputer[@Name='" + (get-item env:\computername).Value + "']/ServerInstance[@Name='MSSQLSERVER']/ServerProtocol[@Name='Np']"
$Np = $wmi.GetSmoObject($uri)
$Np.IsEnabled = $true
$Np.Alter()

# Restart the SQL Services
$DfltInstance = $Wmi.Services['MSSQLSERVER']
$DfltInstance.ServiceState
$DfltInstance.Stop();
Start-Sleep 1
$DfltInstance.Refresh();
$DfltInstance.ServiceState
Start-Sleep 1
$DfltInstance.Refresh();
$DfltInstance.ServiceState
$DfltInstance.Start();
Start-Sleep 1
$DfltInstance.Refresh();
$DfltInstance.ServiceState
After enabling TCP/IP, you can check the status using SQL Server Configuration Manager to give some confidence it’s applying the change correctly.
-
What’s New in the SQL Server 2019 Installation Wizard
SQL Server 2019 was released on November 4, 2019, at Microsoft Ignite, following months of testing with release candidates. In this post, I’ll share my experience with the SQL Server 2019 installation wizard, highlighting key features and improvements that will be useful for DBAs.
Key Features of SQL Server 2019
SQL Server 2019 introduces several major improvements, including:
- Release Date: Officially released on November 4, 2019 at Microsoft Ignite.
- Big Data Clusters: Seamless integration with Hadoop, Spark, and other big data tools.
- Enhanced Security: New encryption features, including Always Encrypted with Secure Enclaves.
- Improved Performance: Faster data recovery and better in-memory capabilities.
- Azure Integration: Deeper integration with Azure services.
For full details, check out Microsoft’s release notes.
Key Changes in the Installation Wizard
Two changes stood out during my installation of SQL Server 2019:
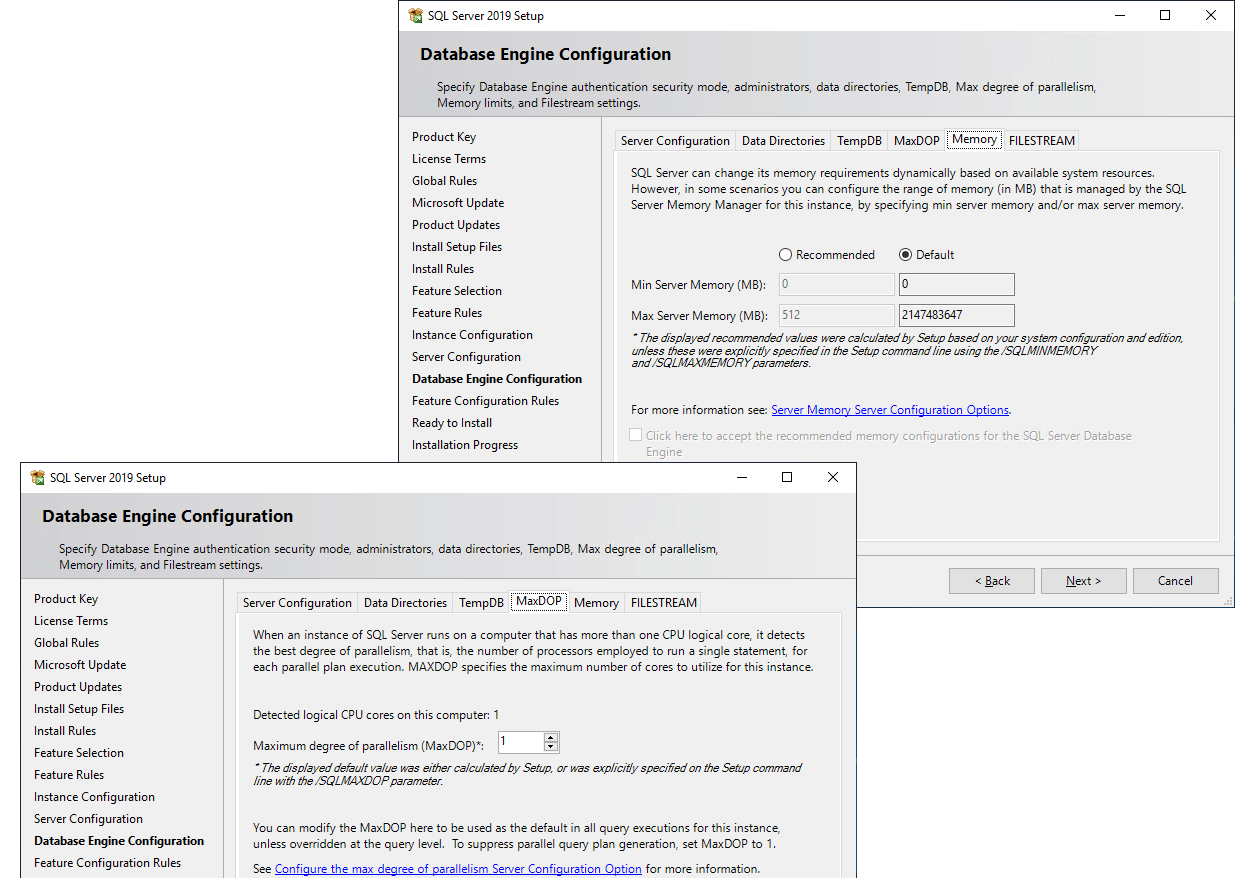
> Max Memory Configuration:
SQL Server 2019 allows you to set a Max Memory limit during installation, preventing SQL Server from consuming too much RAM and causing contention with other applications. This is especially helpful in avoiding performance degradation and monitoring alerts related to high memory usage.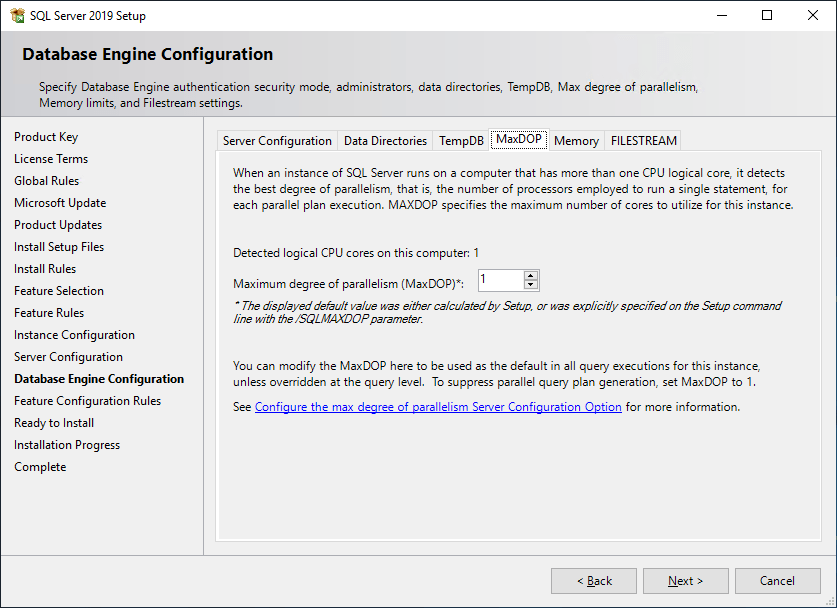
> MAXDOP (Maximum Degree of Parallelism):
The installation wizard now offers more visibility and easier configuration of the MAXDOP setting, which controls CPU parallelism for queries. This improvement helps prevent performance issues by ensuring efficient resource use.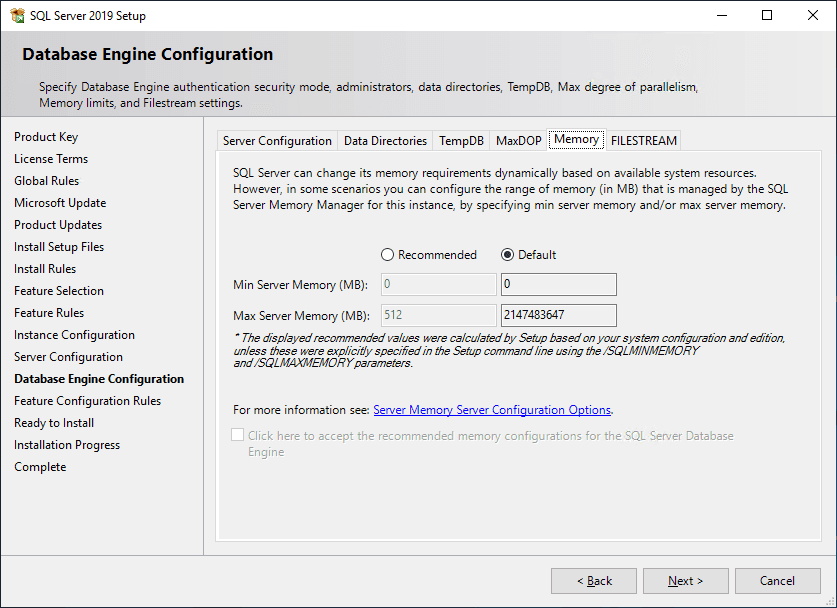
SQL Server 2019’s new installation features, like MAXDOP and Max Memory, make it easier to optimize your instance right from the start. It can always be configured later if not done here.
I look forward to getting to know this SQL version more!