-
Creating a Linked Server for a PostgreSQL Database
This is a post on how to create a Linked Server to a PostgreSQL database.
In my previous post, I created a Linked Server to another SQL Server instance. This time, it’s a link to a Postgres database. I recommend checking out my other post for pre-requisite information including testing connectivity to the remote database server.
Follow these steps to create a Linked Server to a Postgres server:
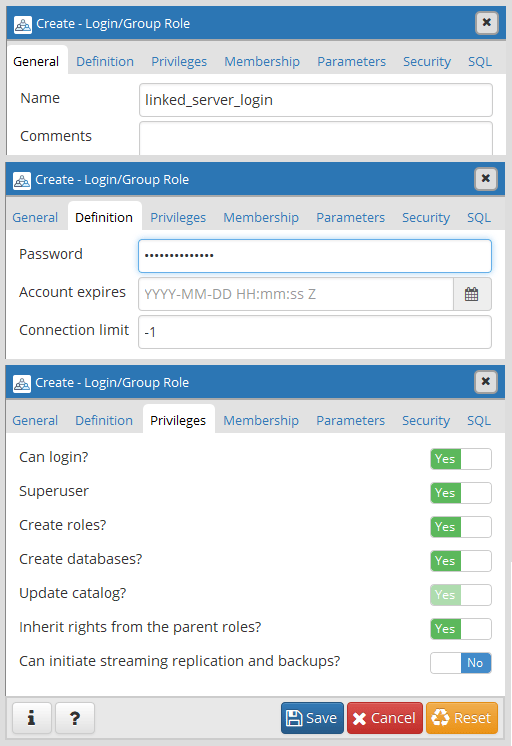
1. Create Linked Server Login on Postgres.
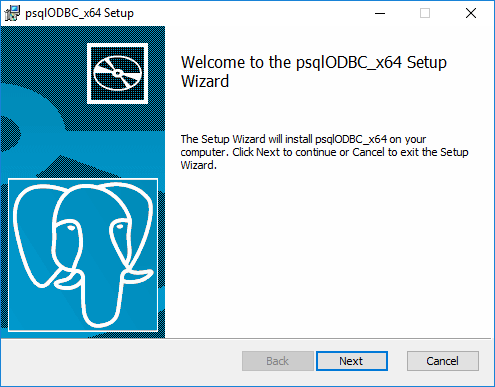
2. Install the Postgres ODBC Driver.
3. Configure ODBC Data Source Settings.
4. Create Linked Server to a Postgres Database.1. Create Linked Server Login on Postgres
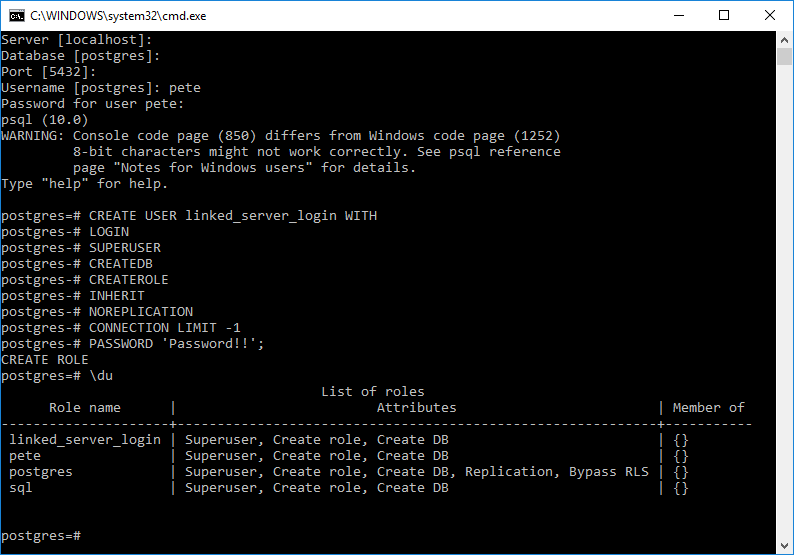
We first need to create a login for the Linked Server on Postgres:

For this example I’m making the user in Postgres a Superuser. This is not ideal, we should be configuring it with the least permissions it requires. This is just a demo though.
For demo purposes, I’m also showing how this would be done using a terminal:
2. Install Postgres ODBC Driver
The ODBC driver must be installed on both ends. This step is a reminder to ensure you have this installed.
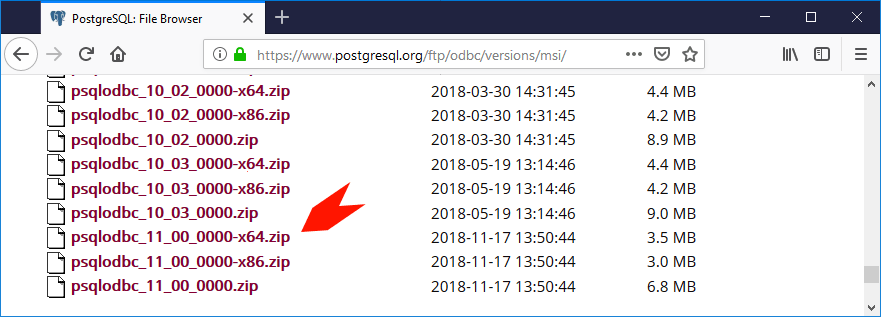
You can use Stack Builder to install it, or download the Postgres ODBC driver package on its own:
We need to install this:
Accept License stuff.
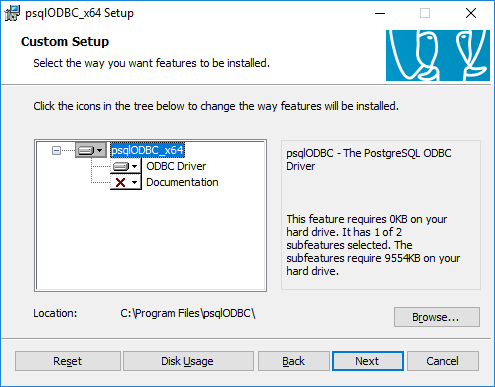
Specify directory & we don’t need the documentation.
It’s a straight-forward install:
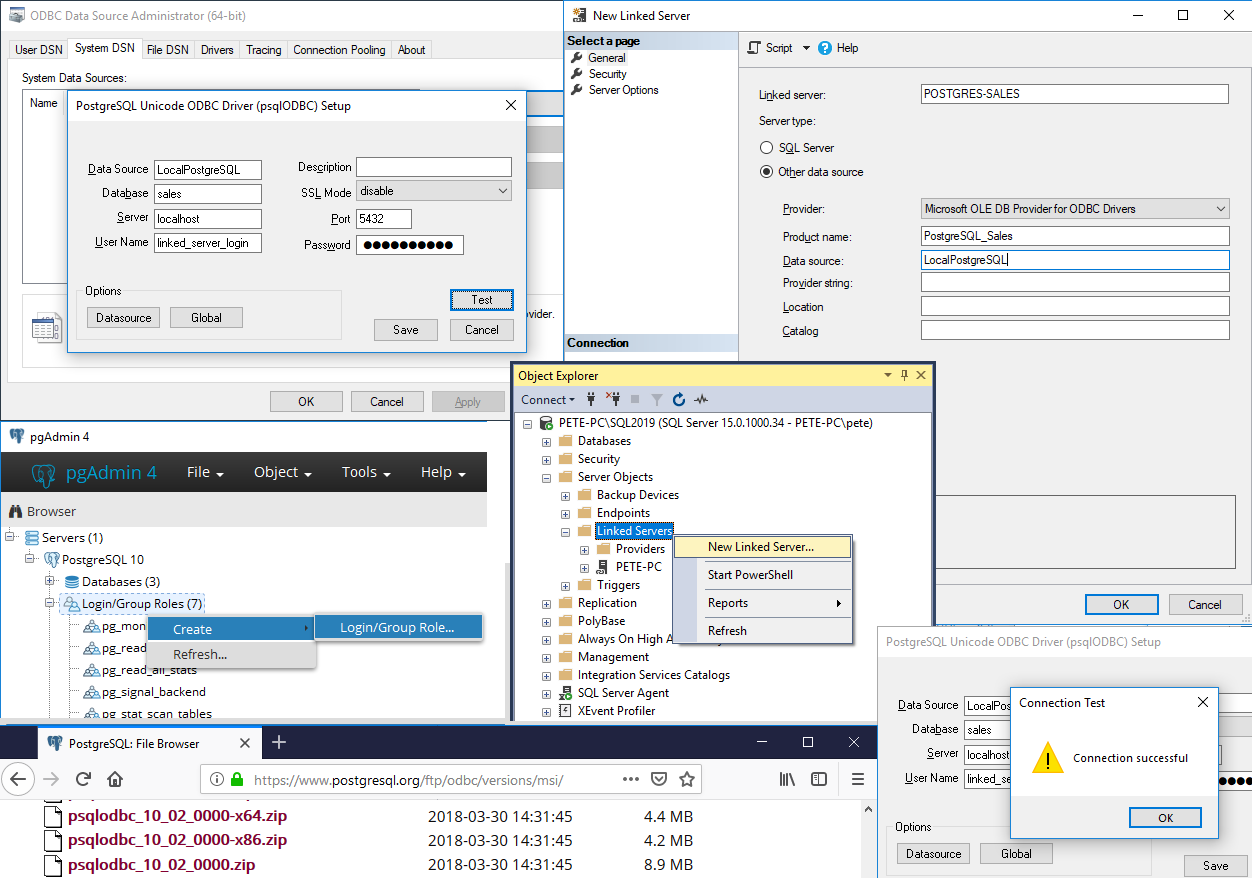
3. Configure ODBC Data Source Settings
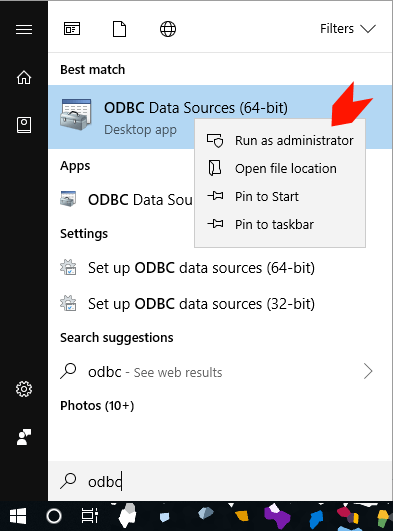
On our SQL Server, we need to configure the ODBC driver for the Postgres database.
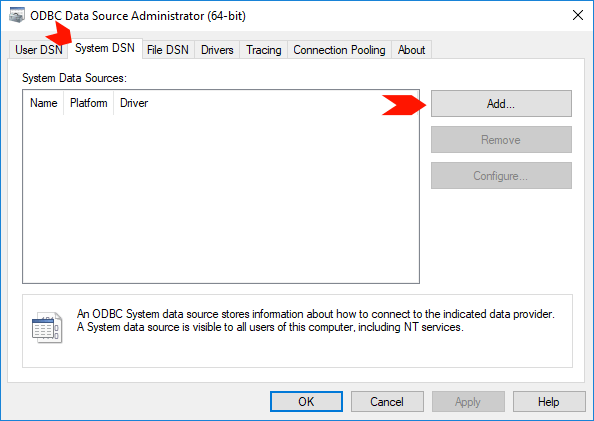
To do this, open ODBC Data Sources as Administrator:
Click the System DSN tab and click Add.
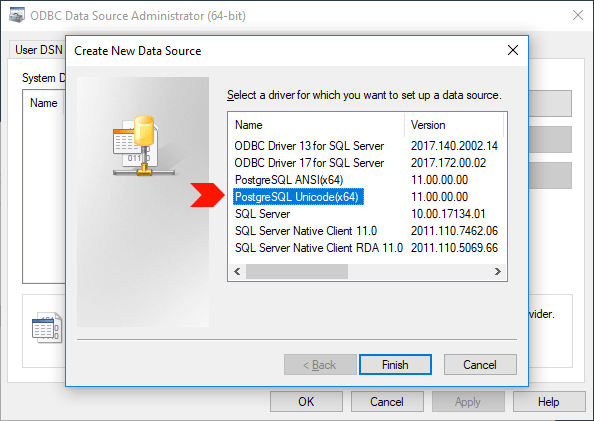
Select the PostgreSQL Unicode driver:
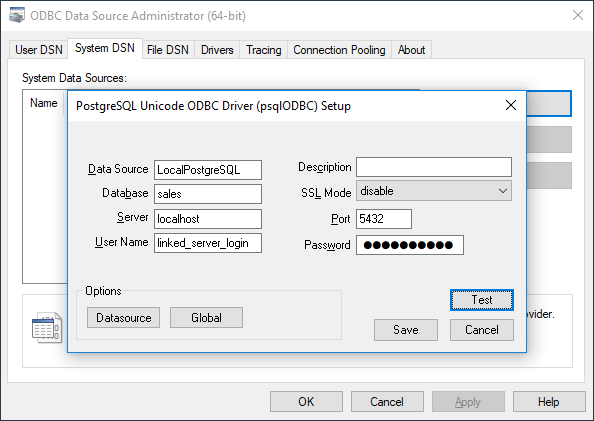
Enter all details required, In this example I created a ‘sales’ database which I’m connecting to:
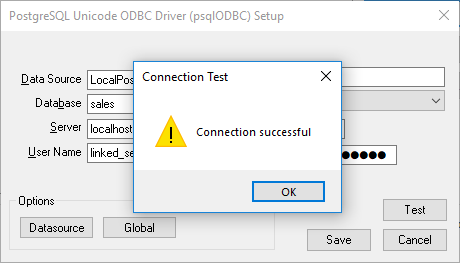
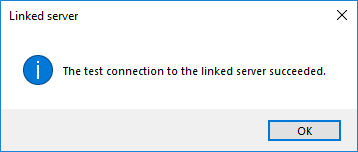
Finally, we should test the connection to verify all is good:
4. Create Linked Server to a Postgres Database
To create a Linked Server to Postgres:
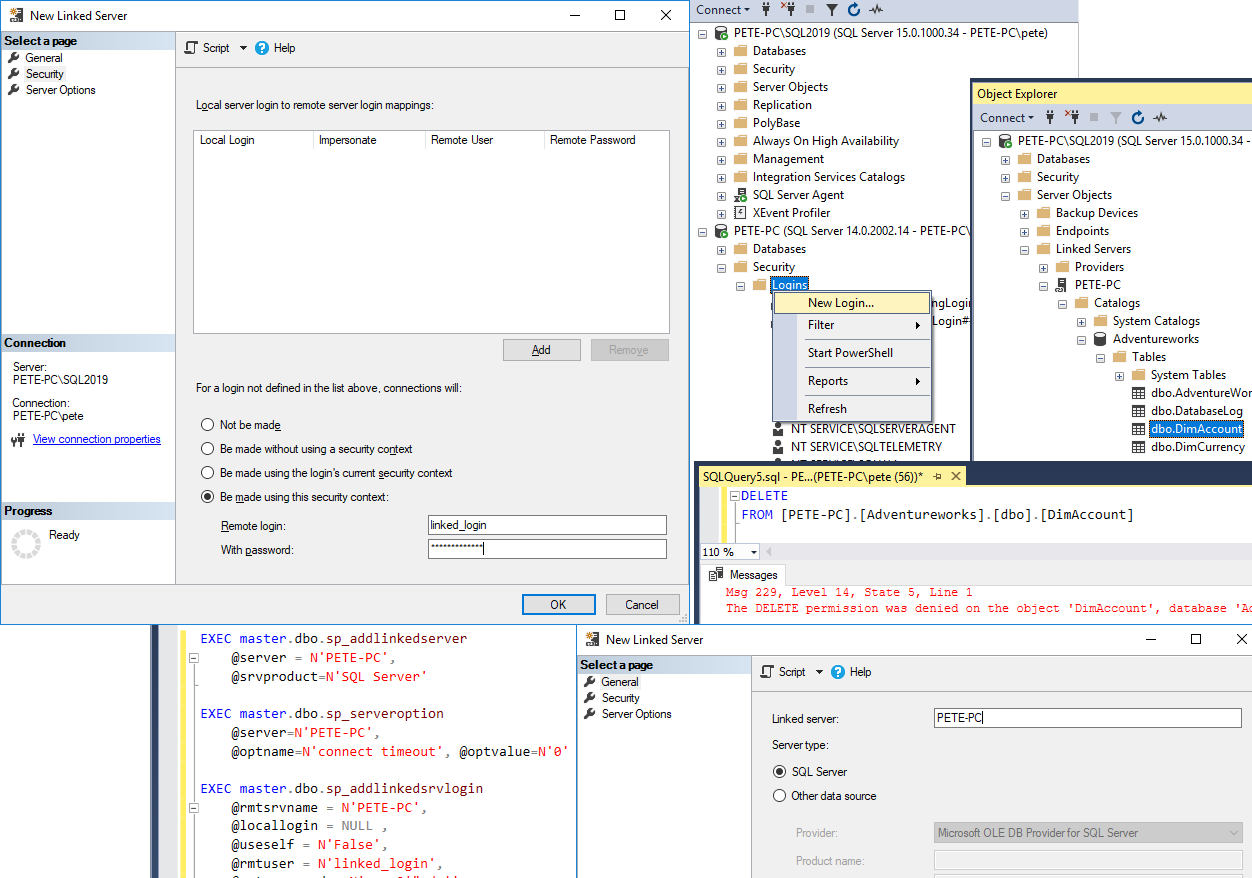
1. Expand Server Objects, right-click Linked Servers and select New Linked Server.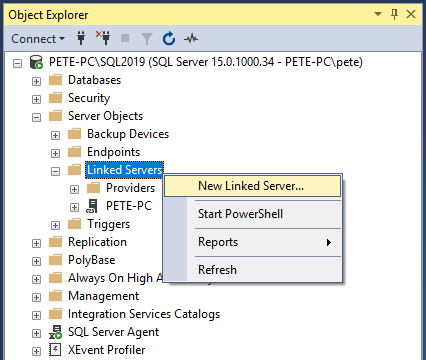
2. The New Linked Server Wizard will prompt.
Configure your settings, choose a provider for ODBC, entering the correct Data Source Name which you entered within the ODBC driver settings above in this post.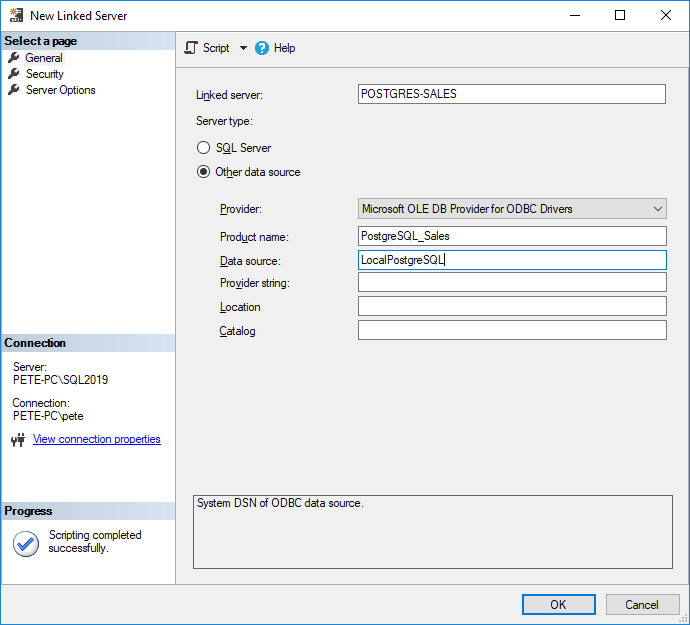
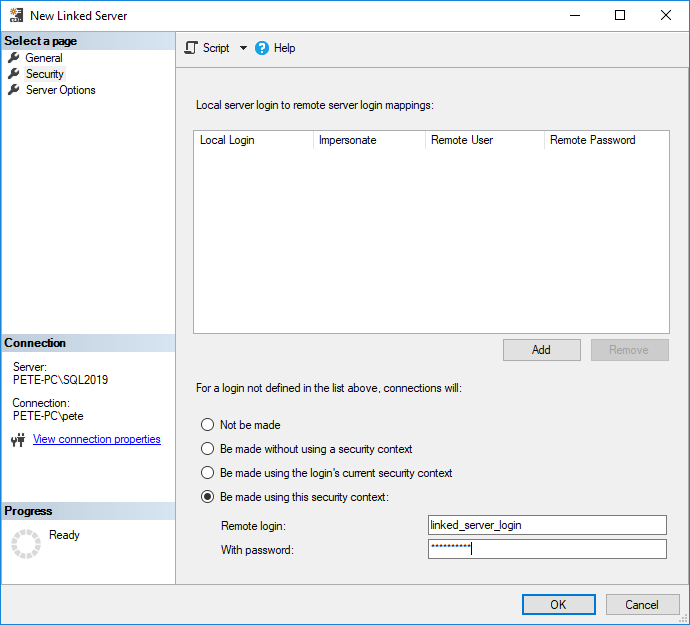
3. Enter the Postgres Login Details as created above within this post in the Security tab.
4. We can skip the Server Options tab and hit OK.
5. Next, we should test the Linked Server connection.
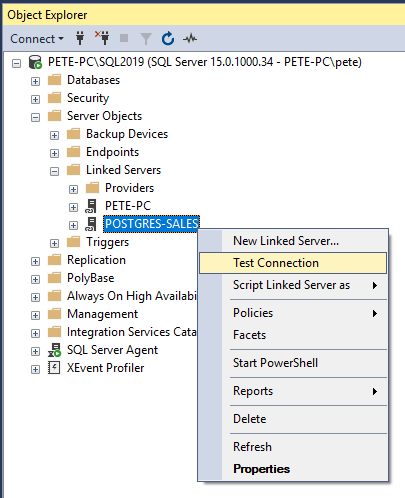
It should show this:
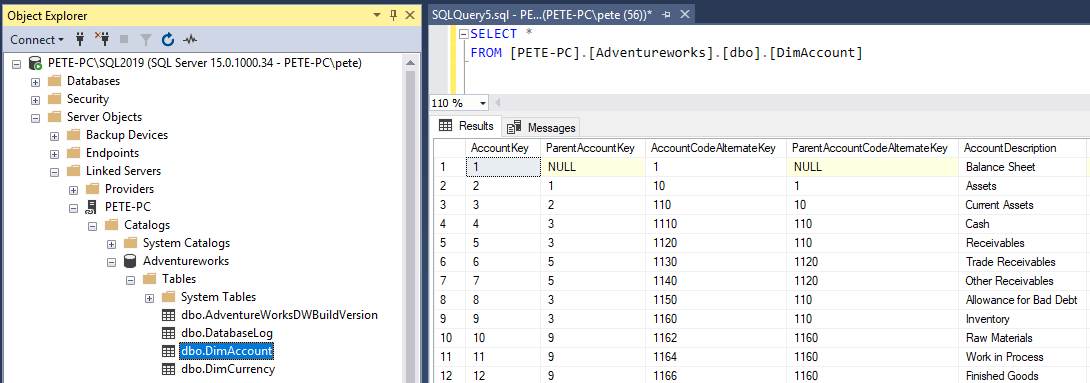
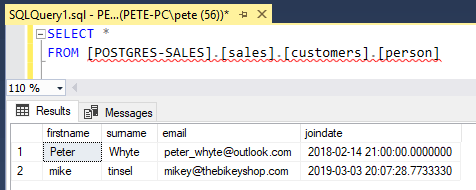
We can now verify the Linked Server is working as it should by running the following query:
-- linked server query example
select *
from [linked-server-name].[database-name].[schema-name].[table-name];
I hope this was a good and useful post for you. Feel free to check out the links you see around here for more random useful info from a random database guy!
-
Creating a Linked Server to SQL Server
Linked Servers in SQL Server allow you to query external databases, such as remote SQL Server instances, Oracle, ODBC or MS Access databases. It provides easy query access to another database server for users, however it’s not the most efficient ways to do it.
The following steps should help walk you through creating a Linked Server to another SQL Server:
> 1, Test Connectivity to the Remote Server
> 2. Create a SQL Login for Linked Server
> 3. Create a Linked Server to SQL Server1. Test Connectivity to the Remote Server
An important step before we begin the SQL Server configuration, we need to confirm we have line-of-sight to the remote server. On this local setup, I have nothing to worry about, it’s
localhost\sql-instance01connecting tolocalhost\sql-instance02.The network information we’ll need for this includes:
– Remote Server Address (IP Address or FQDN)
– Port Number (The SQL Server default port is 1433)Once you have this info, amend the following Test-NetConnection cmdlet and run it:

In this example, both the Ping and TCP tests are succeeding. You’ll find that it has a delay when failing, maybe it’s 30 seconds.
If it fails, you’ll have to review things like the Local Firewall Rules, Security Groups, and External Firewalls (contact the network folks).
If using Windows 8 / Windows Server 2012 or Older:
Use the script in this other blog post, or if you’d like to see some added info on this.Here’s some other note-worthy default database server ports to have as a note:
– PostgreSQL (5432)
– MySQL (3306)
– Oracle (1521)
– Sybase (5000)
– DB2 (50000)2. Create a SQL Login for the Linked Server
We’ve verified we have network connectivity to the remote server, now we need to create a SQL login for the Linked Server.
We need a new user on the server we’re linking to. I’m using my
PETE-PC\SQL2019SQL Instance as my main server, creating the new login on thePETE-PCNamed Instance below: .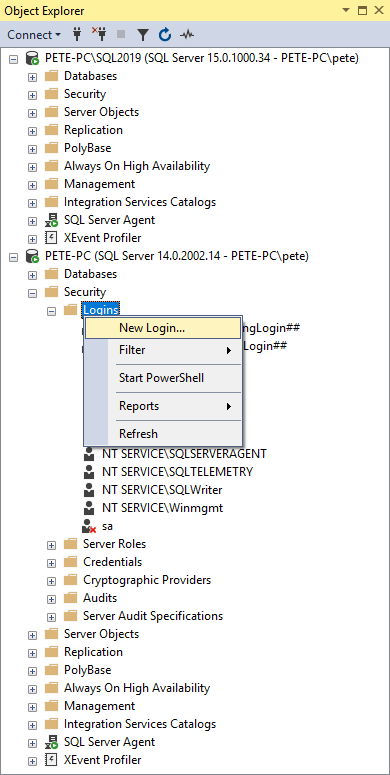
Select SQL Server authentication:
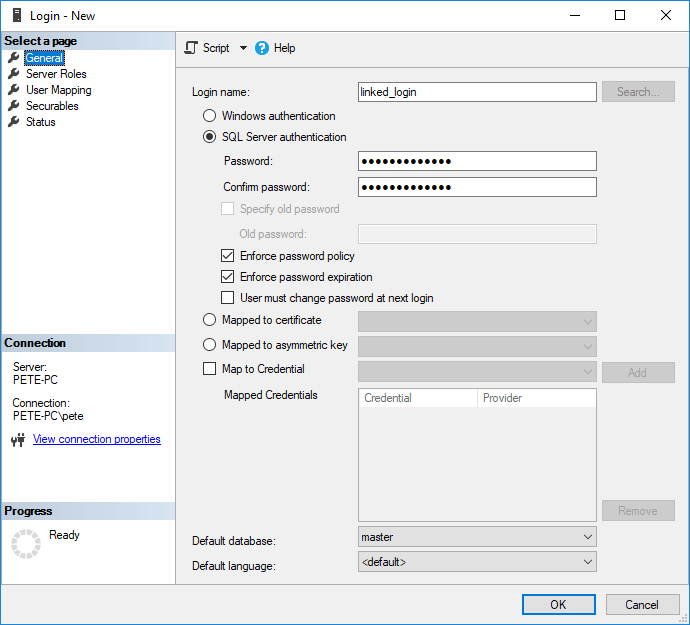
Set the required permissions.
For this example I only need read access, so I’ll select db_datareader on the database: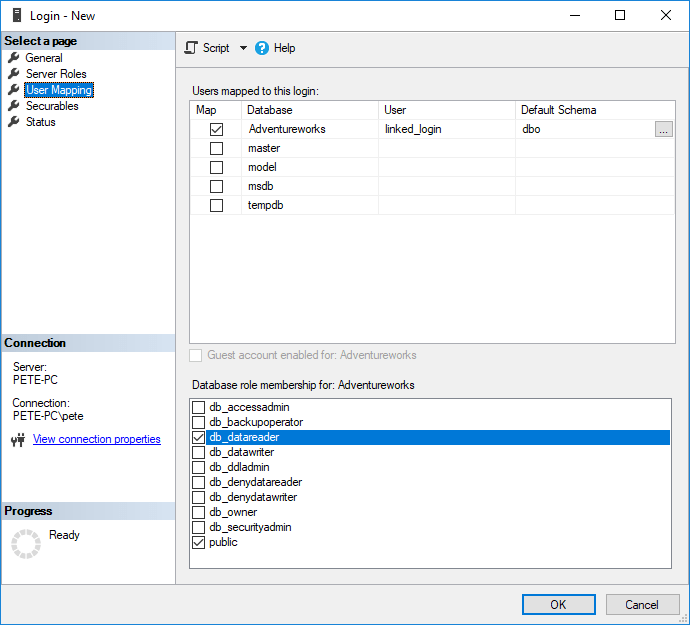
Once you have this set you can click OK and proceed to the next steps.
3. Create a Linked Server to SQL Server
To create a Linked Server to another SQL Server:
1. Open SQL Server Management Studio (SSMS) and connect to your server,
2. Expand Server Objects.
3. Right-click Linked Servers.
4. Select New Linked Server.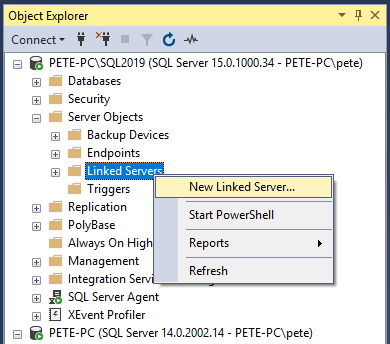
5. A New Linked Server window will prompt.
Select SQL Server as the server type and enter the the remote SQL Server Name.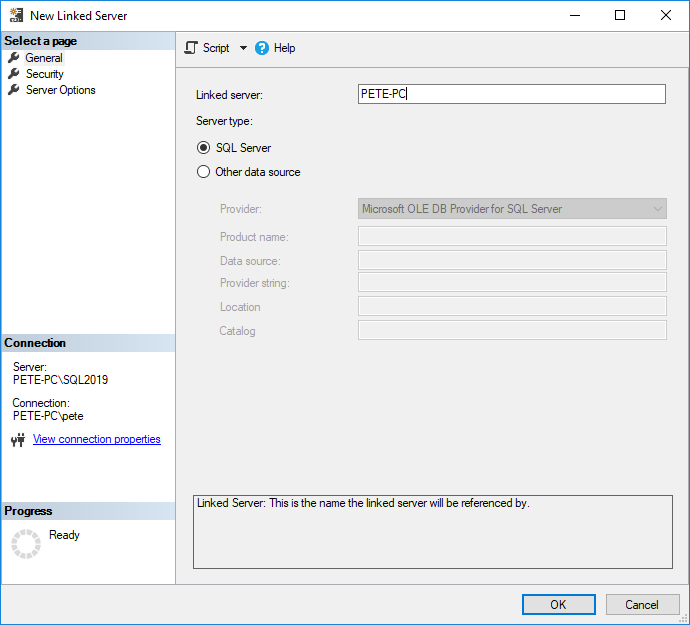
Into the Security tab next, enter the remote login details (as created above).
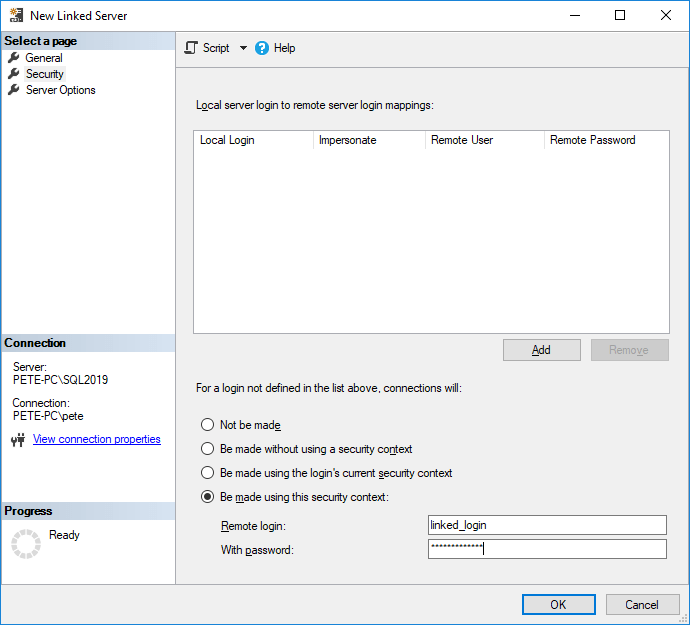
6. Click OK to confirm.
We can also script this configuration out to a T-SQL query window before running it.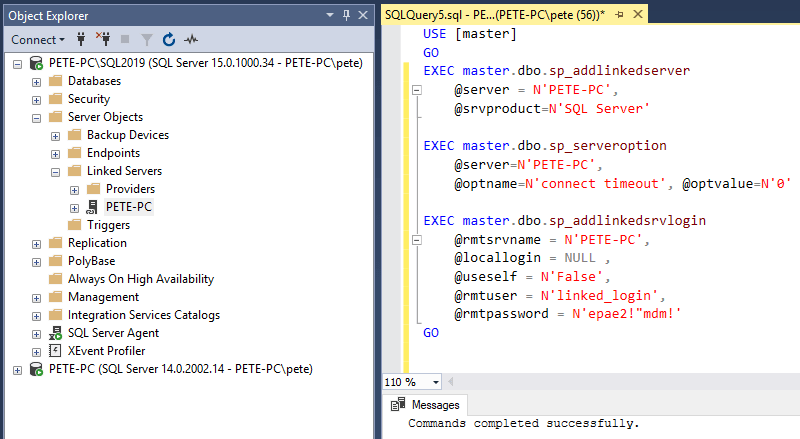
To create this Linked Server it’s using the following Stored Procs:
> sp_addlinkedserver
> sp_serveroption
> sp_addlinkedsrvlogin7. Verify Linked Server.
We can verify the link by querying the new Linked Server Database:-- query linked server database SELECT * FRMO [linked-server-name].[database-name].[schema-name].[table-namme];

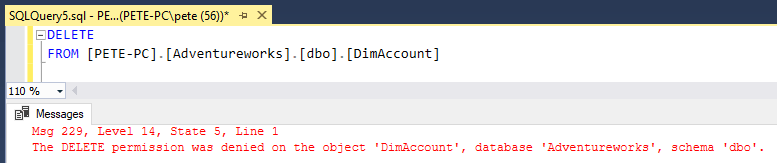
8. And finally, as a DBA we should be verifying permissions:
-
How to Set Database Growth Sizes in SQL Server
In SQL Server, database growth events occur when a database file reaches its maximum allocated size, triggering an automatic expansion to accommodate additional data. These growth events are needed for maintaining sufficient space but can also lead to performance issues if not properly managed.
Configuring a good database growth event size in SQL Server is crucial to avoiding fragmentation, resource contention, and other performance-related issues. Below, I’ll show you how to set database growth sizes in SQL Server and share tips along the way!
Setting Growth Event Size in SQL Server
You can configure the growth increments for database files in SQL Server using the ALTER DATABASE statement or through the database properties interface. It’s important to choose appropriate sizes to balance performance, disk usage, and potential fragmentation.
Here’s an example of how to set growth event size for your data and log files:
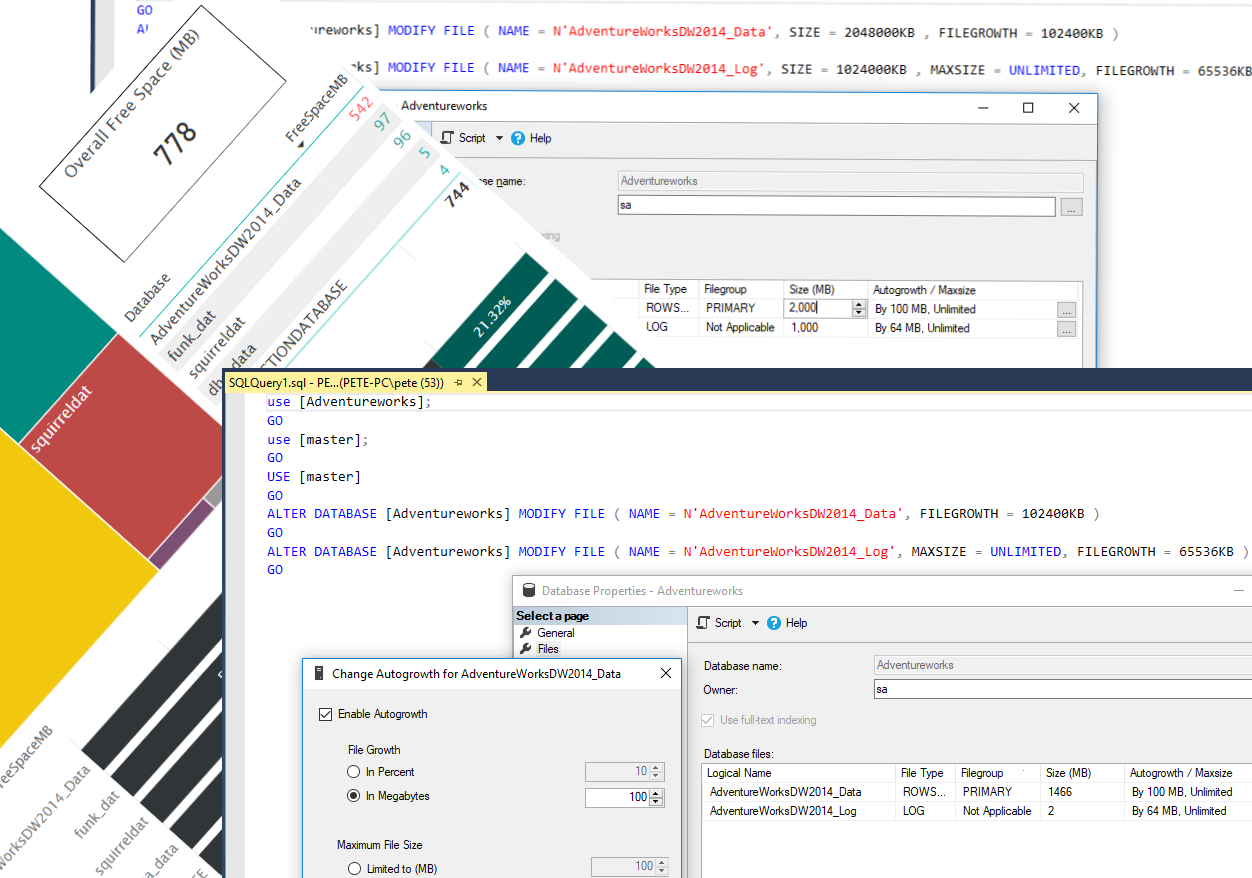
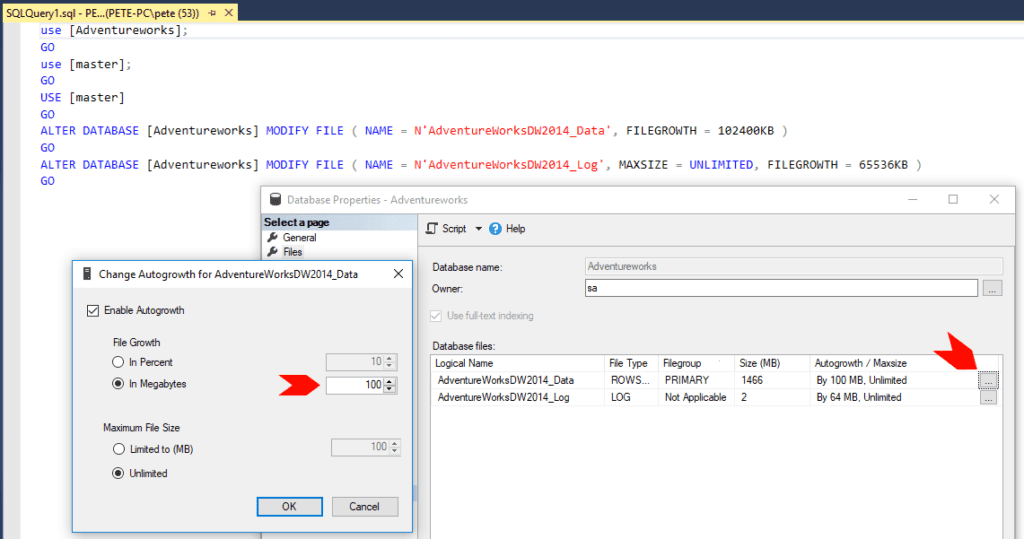
ALTER DATABASE MyDatabase
MODIFY FILE
(
    NAME = 'MyDatabase_Data',
    FILEGROWTH = 100MB -- or specify growth in percentage
);
To do this from within SQL Server Management Studio (SSMS),you can right-click the database and select Properties (Files tab) to see the following:
Properly managing these growth settings is critical to maintaining performance and avoiding issues like fragmentation and resource contention. More explained below…
Managing Growth Sizes for Data and Log Files
Log Files:
Log file growth must be carefully controlled to avoid fragmentation of Virtual Log Files (VLFs). VLF fragmentation can slow down database recovery, backups, and general operations. To minimize this risk, consider using larger, fixed-size increments for log files. Avoid using small, percentage-based growth for log files, as this could lead to an excessive number of VLFs.Data Files:
Data file growth doesn’t face the same challenges as log files, but poor configuration can still lead to problems. If the growth increments are too small, frequent growth events will occur, increasing fragmentation and placing unnecessary load on the system. Conversely, excessively large increments can cause delays in file expansion or unplanned disk space usage, particularly in Temp DB files.Should You Use Percent Growth?
Using percent-based growth may appear attractive since it scales with the size of the database. However, for large databases, it often leads to performance issues because growth events based on percentages can be too large and cause significant delays in growth operations.
Although enabling Instant File Initialization can reduce the delay during data file growth (note: this does not apply to log files), relying solely on percentage growth is generally not recommended. Instead, many DBAs opt for fixed-size growth increments to achieve more predictable performance.
Best Practices for Configuring Growth Increments
To effectively manage database growth, track your database’s growth patterns over time using monitoring tools. This helps you set the right growth increments, preventing frequent auto-growth events and avoiding performance issues or disk space shortages. By staying on top of growth trends, you can make proactive adjustments for smoother expansions.
While a dedicated monitoring solution simplifies this process, any data visualization tool, like Power BI, can also be used to track disk space usage. Below is an example of a Power BI report I created for SQL Server’s disk space which also represents the free space precent within each database:
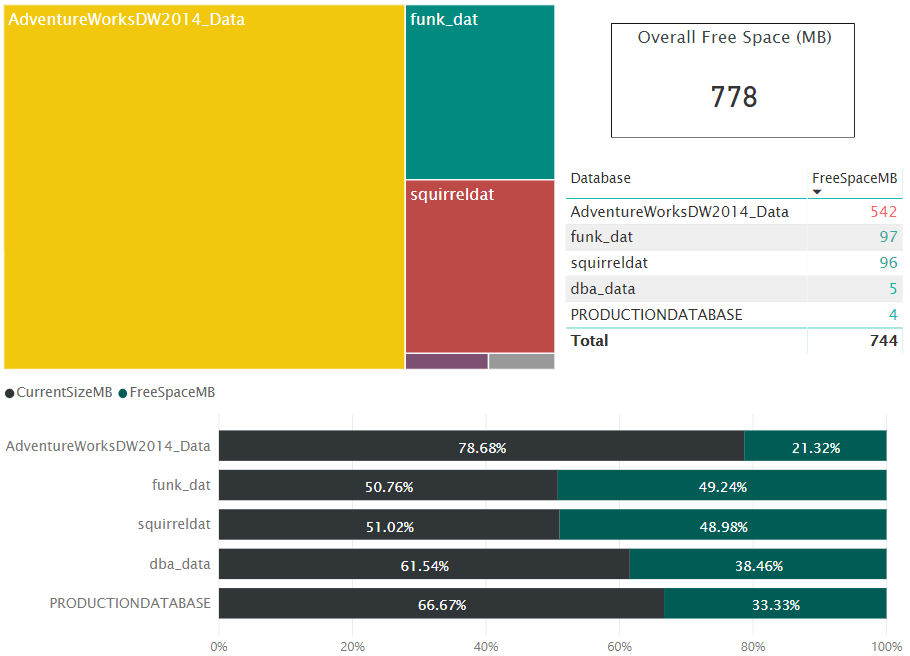
🔎Monitoring Free Space Within Databases: SQL Server
For better monitoring, track data growth over time, include collection intervals, and schedule data collection through SQL Agent.
As a rule of thumb, I aim for around 10% free space. If I see that, I know everything is on track.
I hope this post was a useful one for you. Managing database growth events is crucial for avoiding issues in SQL Server. By configuring appropriate growth increments, monitoring growth patterns, and scheduling regular checks, you can ensure your SQL Server runs smoothly!
As a follow-up, you should check out my other post which contains a SQL script that will show all database growth events since your last service restart: SQL Server Script: Get Database Growth Events
-
Setting Maximum Database File Sizes in SQL Server
This post shares how to set maximum database file sizes in SQL Server, capping your database file size limits for proper disk space management.
Configuring maximum database file sizes in SQL Server is often considered a safeguard or tactical measure rather than a primary strategy. Ideally, you want your databases to grow as needed, without arbitrary limits. However, there are situations where capping database sizes becomes a practical necessity.
Why Set Maximum Database File Sizes?
While it’s never ideal for a production database to stop updates or inserts due to size restrictions, there are valid reasons to enforce limits in certain scenarios:
1. Managing Disk Space in High-Usage Environments:
If unpredictable disk usage, such as massive temporary table operations in Temp DB, is causing space issues and triggering alerts, capping file sizes can prevent critical resources from being consumed entirely.2. Handling Unpredictable User Behavior:
Ad hoc user queries that inadvertently consume large amounts of space can cause major disruptions. Educating users about resource usage takes time, and setting temporary limits may be necessary to maintain server stability in the interim.3. Optimizing Multi-Tenant SQL Environments:
On SQL Server instances hosting thousands of small databases, capping file sizes helps ensure fair resource distribution and prevents a single database from monopolizing server capacity.4. Custom Growth Management:
In some cases, you might cap database sizes intentionally and rely on custom jobs to manage file growth. For example, this can be useful in environments where disk expansion is carefully controlled or audited.Capping database file sizes should generally be seen as a tactical measure, not a long-term solution. Addressing the root cause of unpredictable usage is the ultimate goal.
How to Set a Maximum Database File Size
Using SQL Server Management Studio (SSMS)
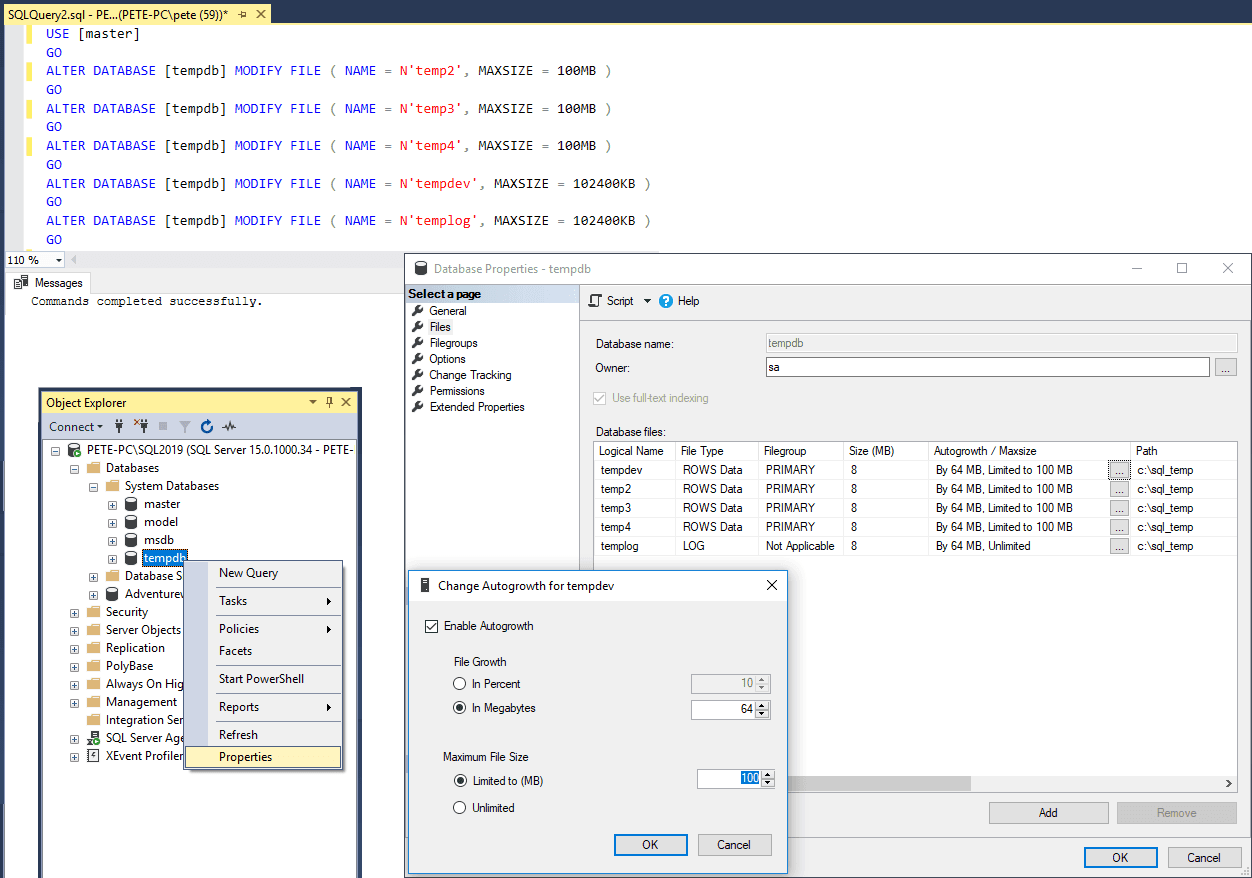
1. Right-click on the database you want to modify and select Properties.
2. Navigate to the Files tab in the left-hand menu.
3. In the database file settings, locate the Autogrowth/Maxsize column.
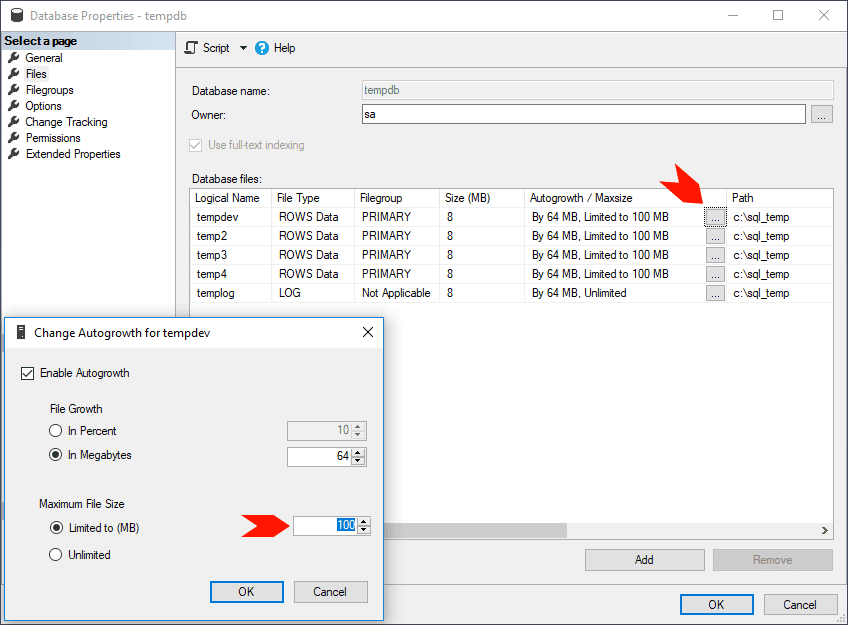
4. Click the button in this column to set the maximum file size (as shown below).
Note: Avoid setting Temp DB file sizes too small during testing. Use appropriate values based on your production environment.Using T-SQL:
ALTER DATABASEStatementYou can achieve the same result programmatically with the
ALTER DATABASEstatement. Here’s an example:-- cap database max size to 100gb ALTER DATABASE [YourDatabaseName] MODIFY FILE ( NAME = 'YourFileName', MAXSIZE = 100GB );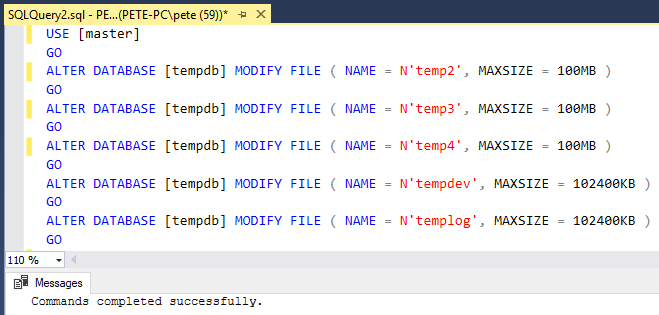
This approach allows for precise control, and the size values can be specified in KB, MB, or GB.
Setting maximum file sizes is a useful short-term measure for stabilizing SQL Server, but it’s crucial to address root causes like query optimization, user education, or storage management to ensure long-term stability.