
-
Updating Help Documentation in PowerShell
Keeping your PowerShell help documentation up to date ensures you always have the latest guidance and reference materials for installed modules. The
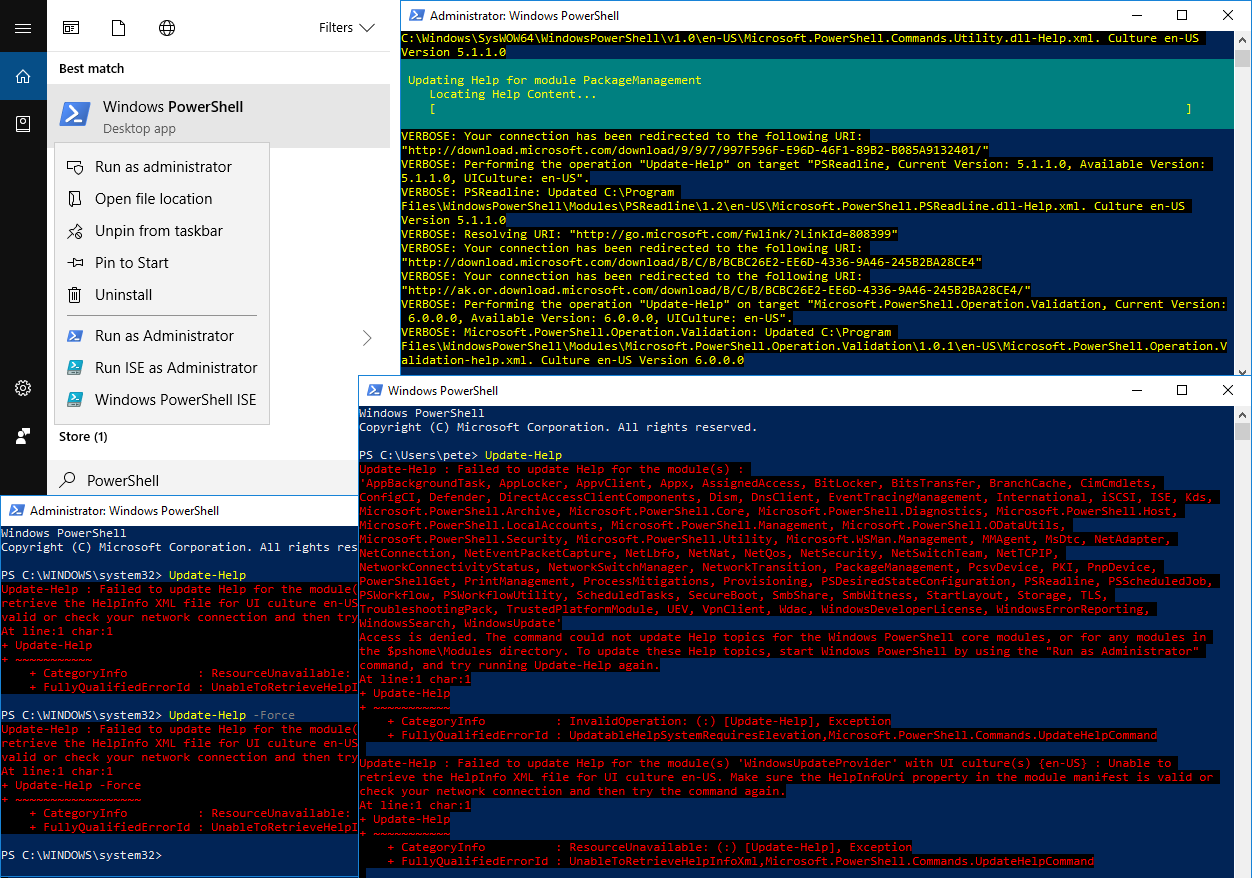
Update-Helpcmdlet allows you to download and install the most recent help files, but you may encounter an access denied error if PowerShell is not run with administrative privileges:Running PowerShell as Administrator
Running PowerShell as Administrator is a requirement for this one, else you’ll get the following error:
Update-Help L Failed to update Help for the module(s)
Access is denied. The command could not update Help topics for the Windows PowerShell core modules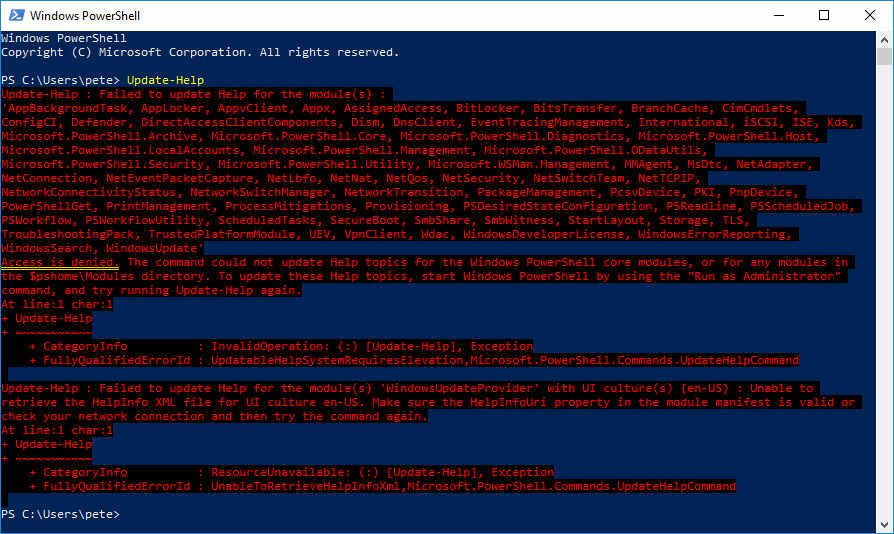
This error occurs because updating help files requires elevated permissions.
To resolve this, ensure you launch PowerShell as an administrator:
1. Click Start, search for PowerShell.
2. Right-click Windows PowerShell and select Run as Administrator.
3. Confirm the User Account Control (UAC) prompt if required.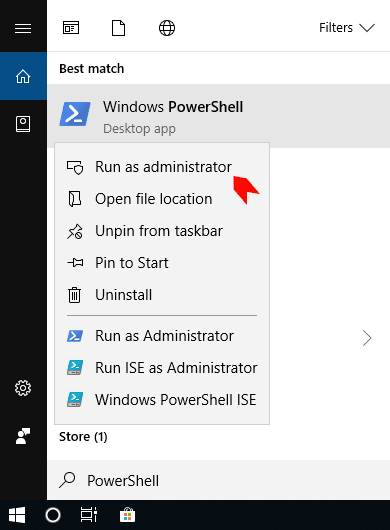
Using the
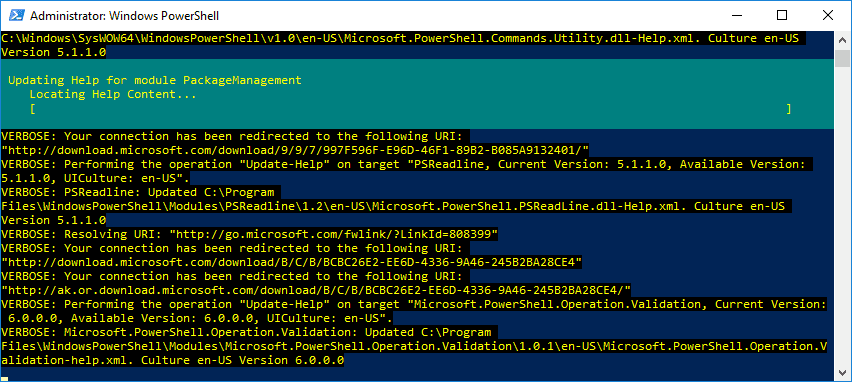
-ForceParameterEven when running as Administrator, you may still experience issues updating help files. If running
Update-Help -Forcefails, try the following command instead:# update powershell help modules Update-Help -Force

This should trigger the update process immediately, ensuring your help files are current.
By following these steps, you can keep your PowerShell documentation up to date without running into unnecessary errors.
-

How to Move Temp DB Files in SQL Server
It’s a solid best practice to store temp db files on a separate drive, away from your C: drive. This is because temp db can grow very large, very quickly, sometimes within minutes depending on workloads. This growth affects both the temp db data (
.ndf) and log (.ldf) files.This post is a quick tutorial on how to move all temp db files from one location to another in SQL Server. Keep in mind that a planned maintenance window is required when performing this on production servers.
Demo: Moving Temp DB Database Files
1. Use the
sp_helpfilesystem stored proc to view the logical names and file paths of your database files.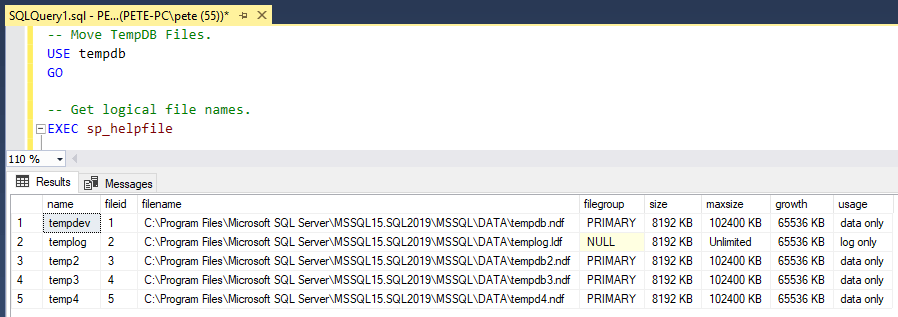
2. Use the SQL
ALTER DATABASEstatement to change the file paths for each temp db file. Update the name and full file path inside the single quotes as needed: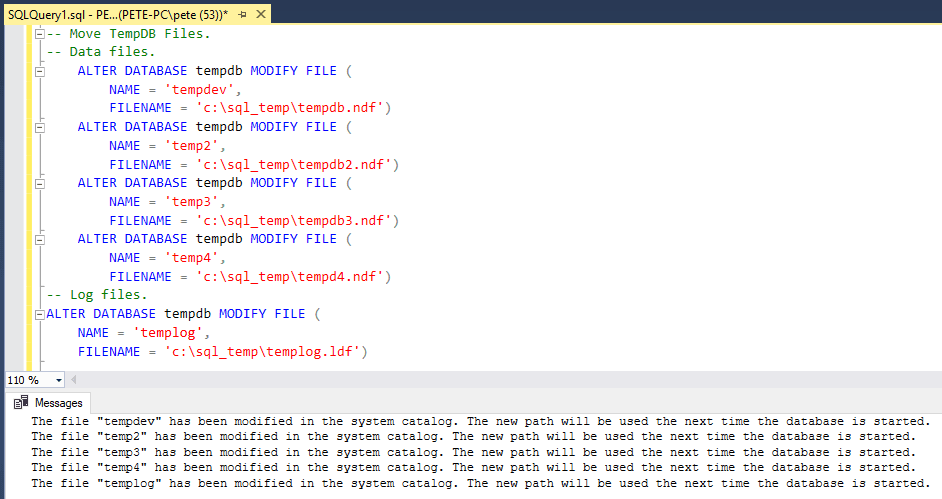
If you need to generate these statements quickly for multiple files, this should help you out:
3. After running the
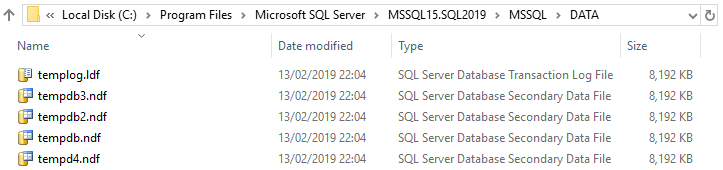
ALTERstatements, you’ll notice the output message states that the changes will take effect the next time the database is started. Restart the SQL Server service to apply the changes.4. After restarting, verify that the files have been moved to the new location by running
sp_helpfileagain: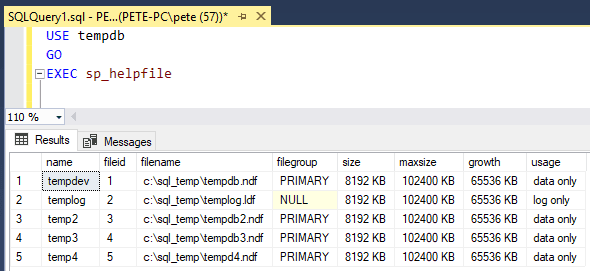
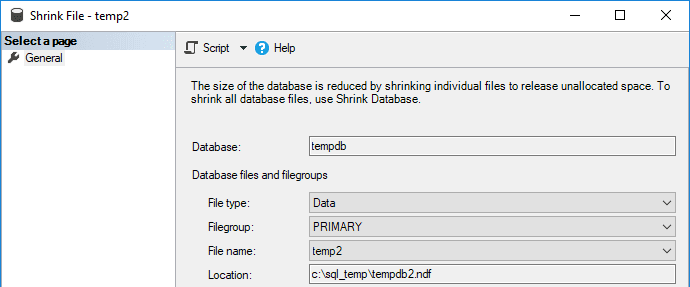
5. We can open the Shrink File window in SQL Server Management Studio (SSMS) to visually confirm the new file locations:
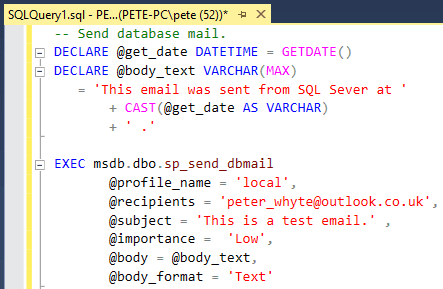
6. DBA’s will often send a test email after such changes to ensure this server functionality is running smoothly:
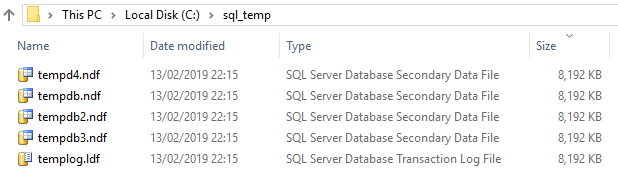
7. Finally, remember to delete the old temp db files from their original location. If the files are on the same disk, this cleanup is especially important to free up space.
Note: You won’t be able to delete temp db files that are currently being used by an active SQL Server service. Ensure the files are no longer in use before attempting removal. We can also look at the last date modified on the files to verify activity.
Moving temp db files to a dedicated drive is a recommended best practice for optimizing SQL Server performance and ensuring stability under heavy workloads. Follow the steps above carefully, and always double-check the file locations and configurations after making changes.
Feel free to add a comment below if you have any questions or issues on this.
-

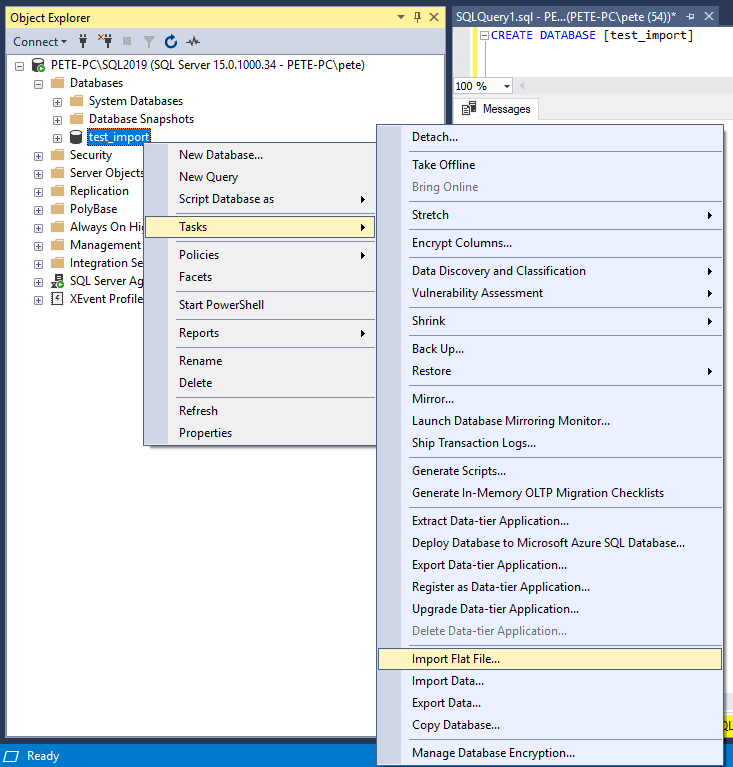
SSMS Import Flat File Feature
The Import Flat File feature in SSMS (SQL Server Management Studio) was introduced in December 2017 (14.0.17213.0). This is a streamlined version of the Import Data feature and it minimizes the user intervention during a file import.
Unlike the Import and Export Data Feature, you don’t have the option to save the import as a .DTS package for SSIS. This makes the Import Flat File method a good one for quick imports of individual files to SQL Server, but not so much if it’s a repetitive task you want to automate it.
In this guide, we will walk through the process of importing a CSV file into a SQL Server database using the Import Flat File feature!
How to a Import Flat File to SQL Server
To import a flat file into a SQL Server database table, we can use the Import Flat File Feature in SQL Management Studio (SSMS).
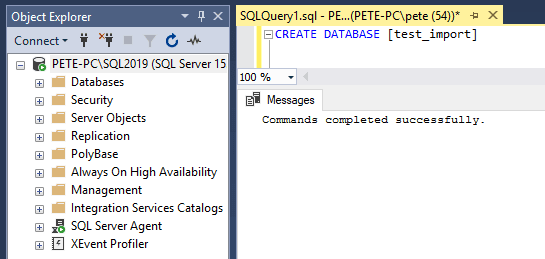
Once you have SSMS open, we need to identify the database we are restoring to. For this demo, I’m creating a new test database:
Now, onto the Flat File import.
Step 1: Right-click your destination database, select Tasks and Import Flat File.
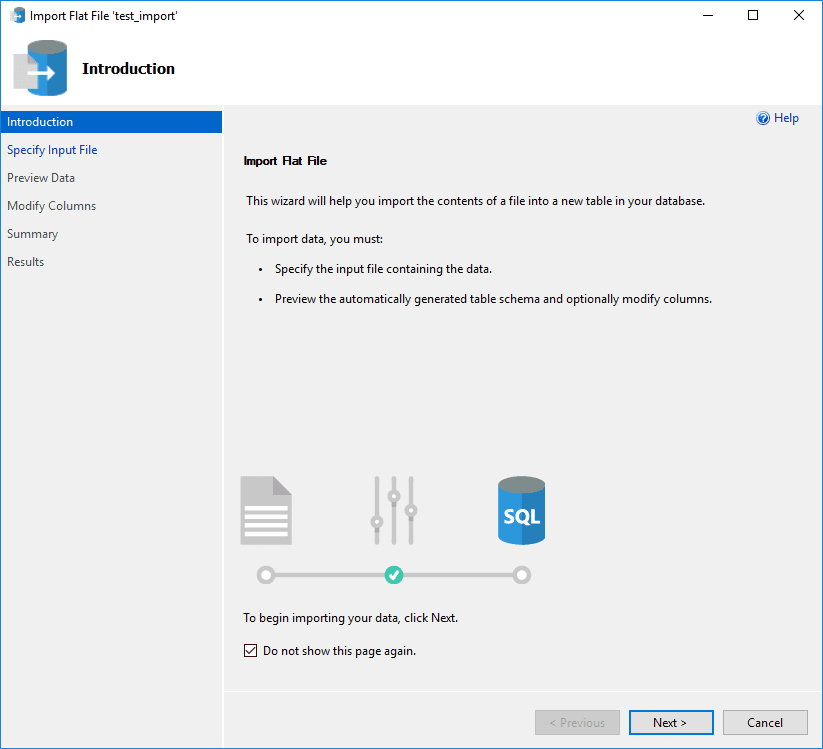
Step 2: Click Next to continue in the Flat File Wizard.
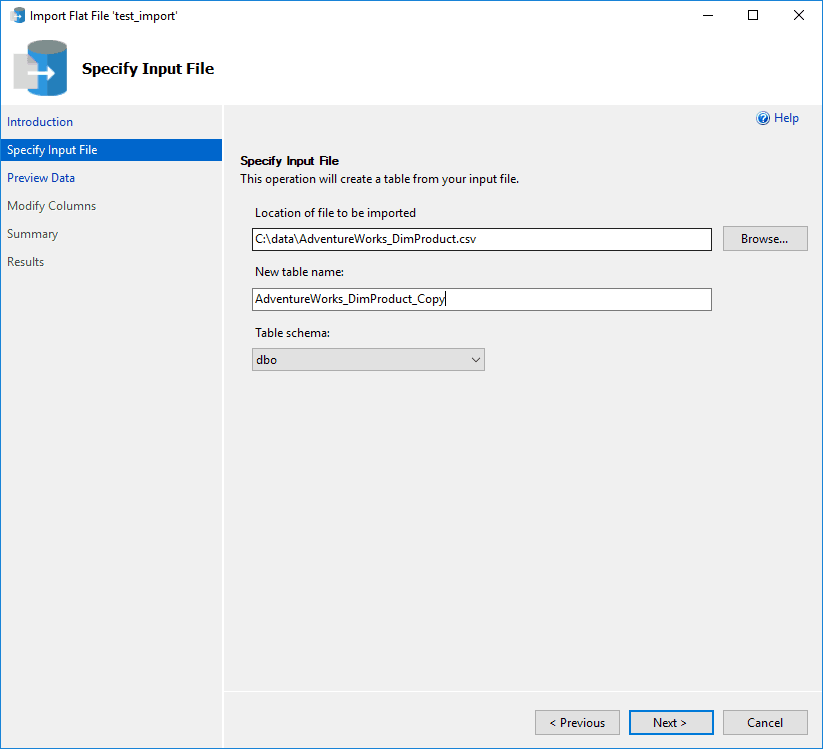
Step 3: Browse to the file, enter the desired table name and amend the schema name accordingly.
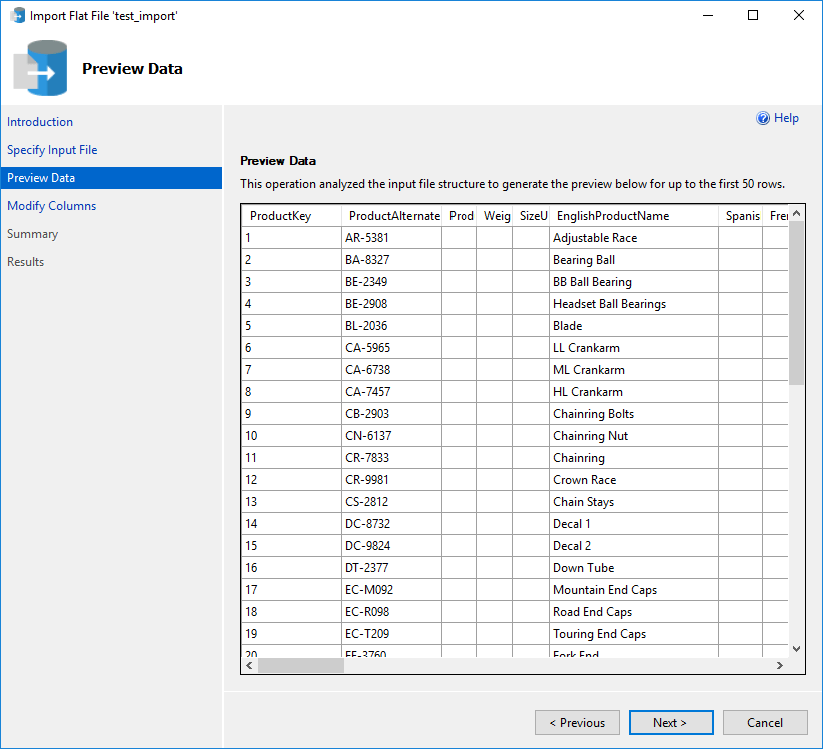
Step 4: Preview the data on the next window and click Next when you are happy.
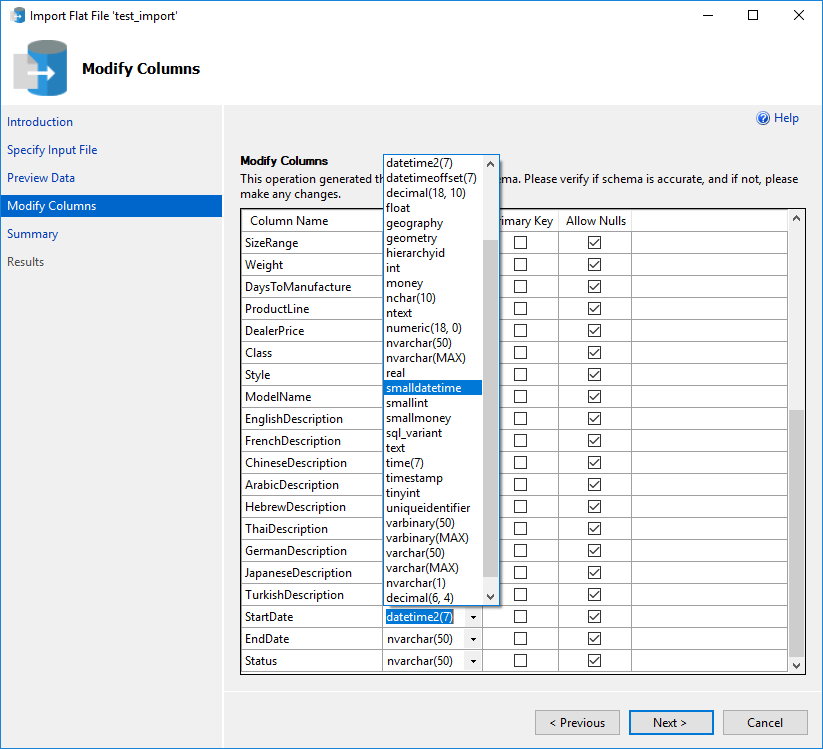
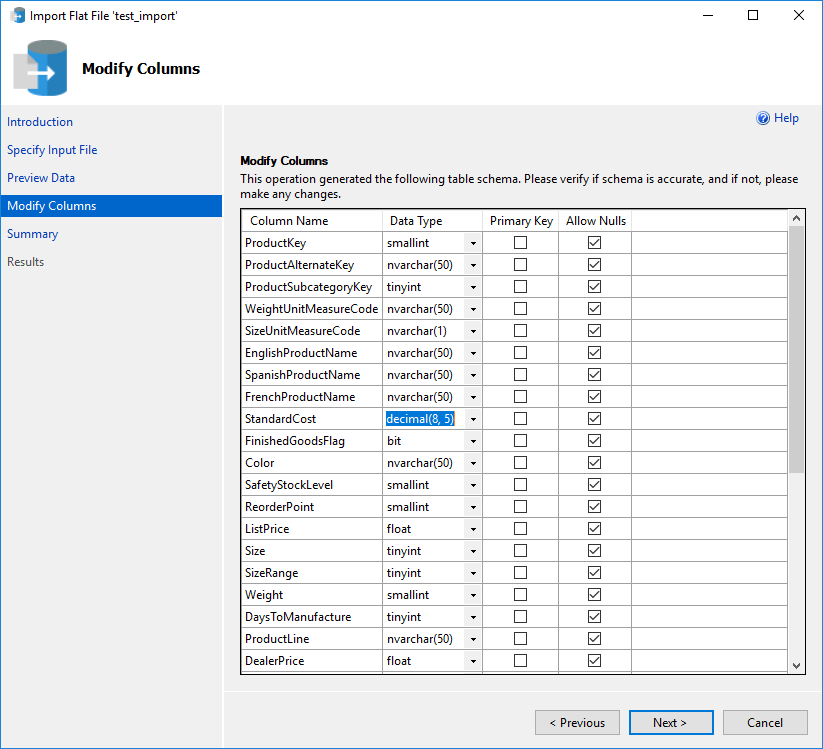
Step 5: Review Column Names/Primary Keys/NULLs, and take as much time as you need when selecting Data types!
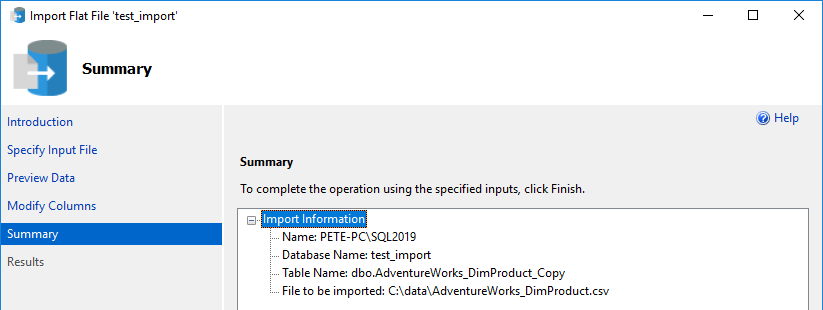
Step 6: Finish up the Import Flat File Wizard.
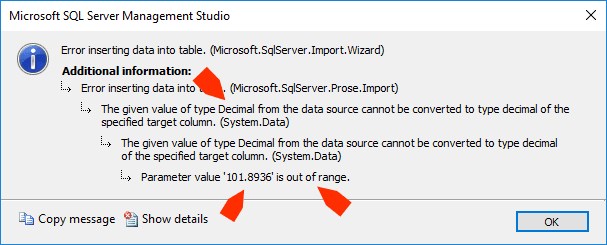
Uh-oh! You might see an error message like this.

Data type conversion errors are common when importing and exporting data. It is important to pay attention to any error messages that appear during the import process. In case of errors, you can search the .csv file for the value mentioned in the error message, to identify the column that needs to be modified.
Error inserting data into table. (Microsoft.SqlServer.Import.Wizard)
The given value of type Decimal from the data source cannot be converted to type decimal of the specified target column. (System.Data)
Parameter value '101.8936' is out of range.
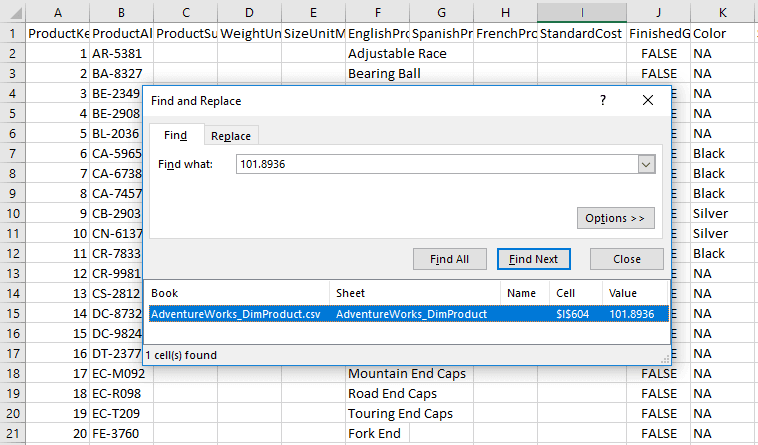
I’m now searching the CSV for this value.
Step 7: Go back in the wizard to Modify Columns and adjust the data type as needed (e.g., increase decimal precision).
Step 8: Now finish the wizard and hope for the best!
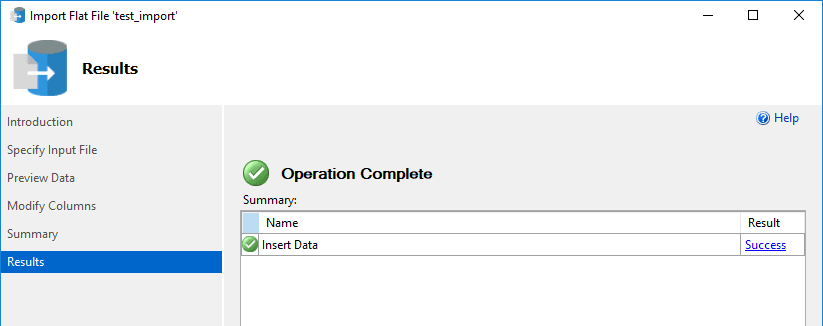
Step 9: Verify the data is accurate.

If the data isn’t good, you can try go back and review the data types within the wizard. We should really be using Import and Export Data Feature for the more complex file imports, or SQL Server Integration Services (SSIS).
I hope all this has been useful for you, and you have successfully imported a file to SQL Server!
-
Attaching SQL Databases Without Log Files
In a perfect world, you’d never lose a database log file. But when the unexpected happens and you urgently need the data from a database, knowing how to attach a SQL Server database without its log (.ldf) file can be a lifesaver.
This guide walks you through the process, covering three main parts:
1. Creating the Scenario:
Setting up a test database to simulate the issue.
2. Restoring the database without the log file:
Methods to reattach a database without its.ldffile.
3. Handling errors during the attach process:
Common errors and their solutions.
1. Creating the Scenario
To simulate attaching a database without its log file, follow these steps:
1. Create a test database:
Set up a test database in SQL Server.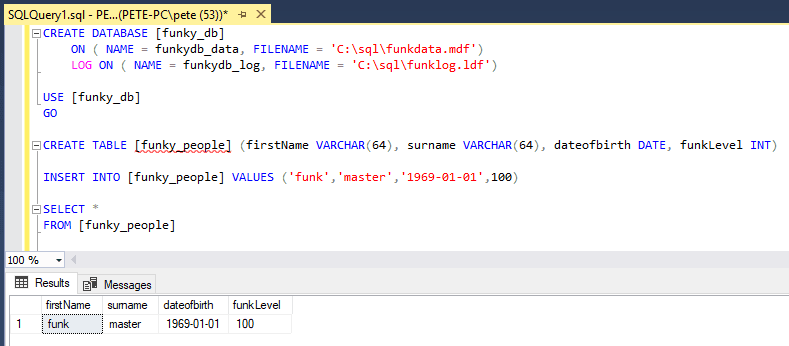
2. Disconnect active sessions:
Close SQL Server Management Studio (SSMS) or disconnect any active query sessions to the database.3. Stop the SQL Server service:
Temporarily shut down the SQL Server service to access database files directly.
4. Locate the database files:
Navigate to the directory containing the database’s.mdf(data) and.ldf(log) files.
5. Copy the
.mdffile:
Save a copy of the.mdffile (data file) to a safe location.
6. Start the SQL Server service:
Restart the service to restore normal operations.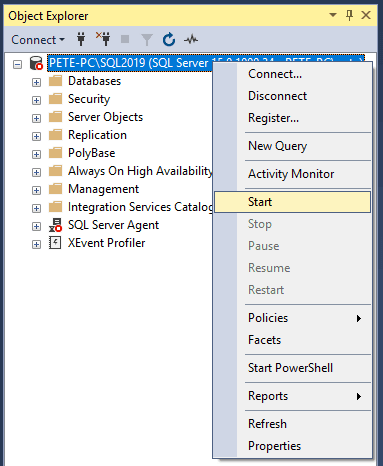
7. Drop the test database:
Remove the database from SQL Server, simulating the “missing log file” scenario.
8. Delete the original files:
Confirm the.mdfand.ldffiles are no longer present in their original directory.9. Restore the
.mdffile:
Copy the.mdffile back into the original directory, preparing it for reattachment.
Now, we’re ready to try attach this back into SQL!
2. Restoring the database without the log file
SQL Server provides two ways to attach a database without its log file:
Option 1: Using
FOR ATTACH(Recommended)This approach allows you to attach a database using only the
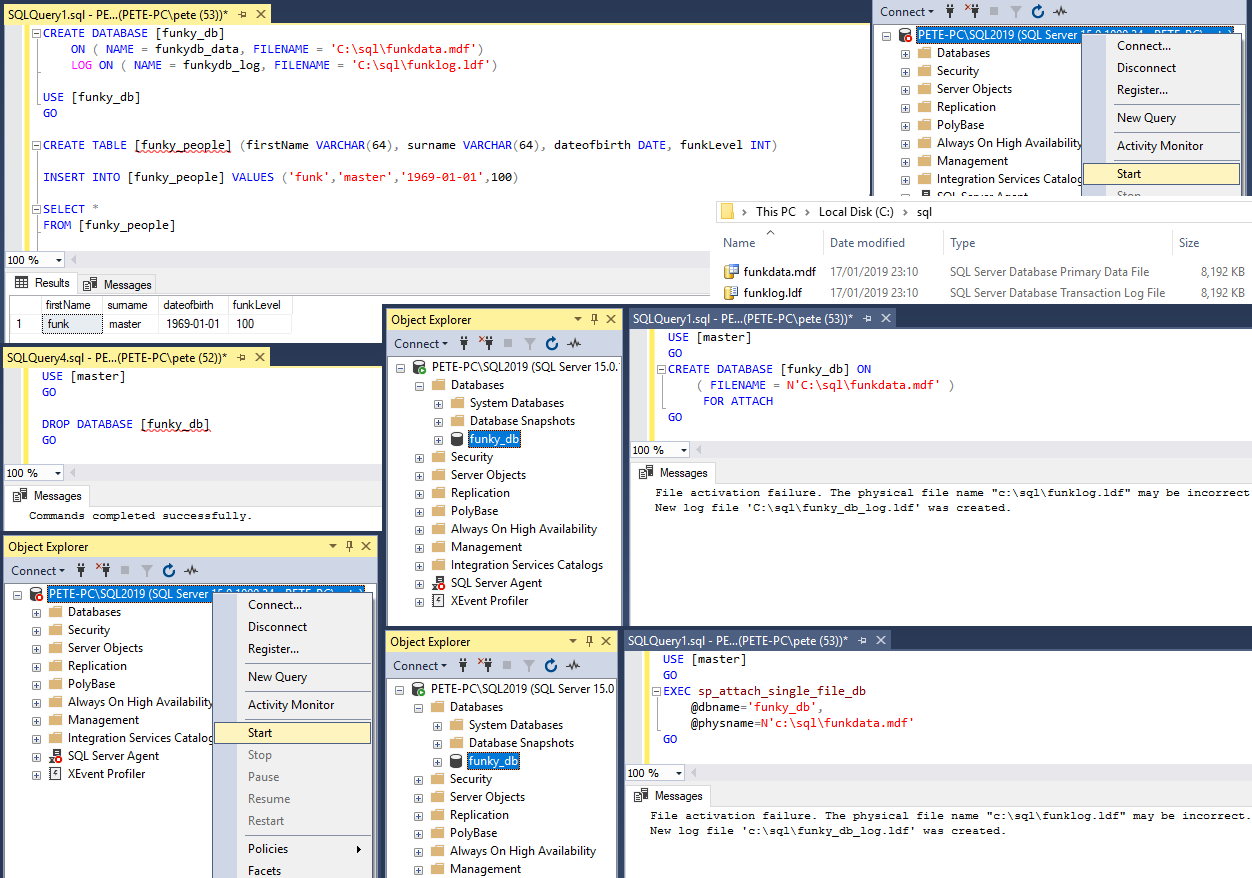
.mdffile. SQL Server automatically attempts to rebuild the missing log file.This uses the FOR ATTACH option when creating the database:
-- attached database without log file
CREATE DATABASE [YourDatabaseName]
ON (FILENAME = 'C:\Path\To\YourFile.mdf')
FOR ATTACH;
Option 2: Using
sp_attach_single_file_db(Not Recommended)The older
sp_attach_single_file_dbsystem stored procedure can also be used but is deprecated and not advised for production systems. It is better to use the modernFOR ATTACHmethod.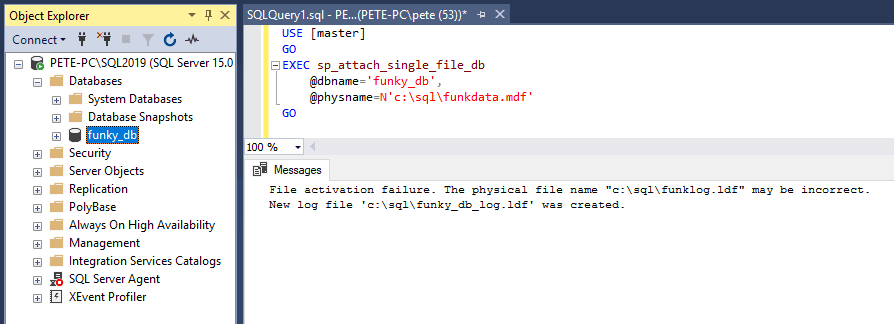
3. Handling errors during the attach process
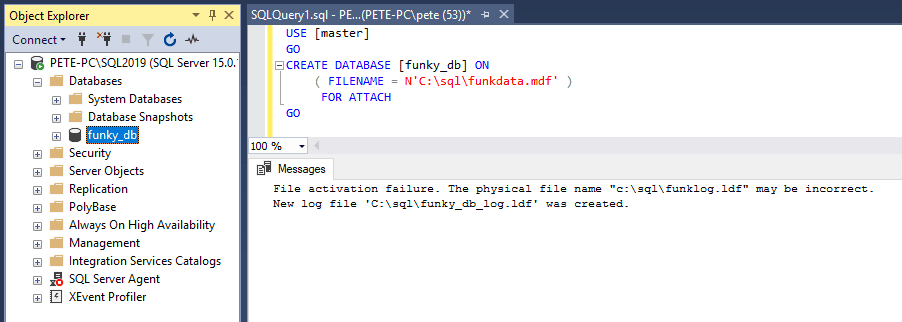
While attaching a database without its
.ldffile, you might encounter errors like this:File activation failure. The physical file name “c:\sql\funklog.ldf” may be incorrect.
The log cannot be rebuilt because there were open transactions/users when the database was shutdown, no checkpoint occurred to the database, or the database was read-only. This error could occur if the transaction log file was manually deleted or lost due to a hardware or environment failure.
Msg 1813, Level 16, State 2, Line 3
Could not open new database ‘funky_db’. CREATE DATABASE is aborted.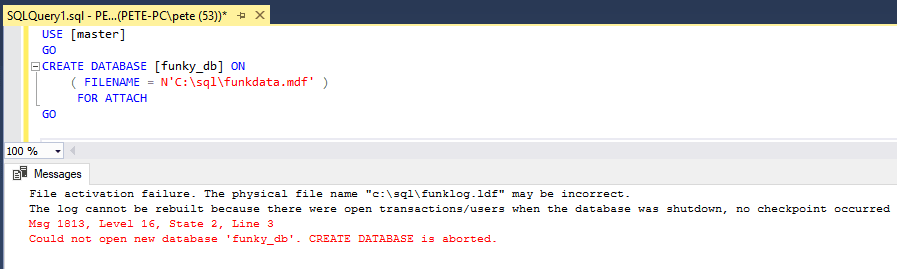
Common Causes and Fixes
> Open transactions/users during shutdown:
Ensure there are no active connections to the database before stopping the SQL Server service. Close all SSMS query windows or applications using the database.> Missing checkpoints:
If the database was not properly shut down, SQL Server may struggle to rebuild the log file. In such cases, consider restoring from a recent backup if available. -
SQL Server Backup & Restore WITH FILE Option
When you back up a SQL Server database, multiple backups can be stored in a single file. The
WITH FILE = Xoption allows you to choose a specific backup version from a single backup file.Here’s what happens:
–WITH FILE = 1: Restores the first backup stored in the file.
–WITH FILE = 2: Restores the second backup, and so on.This can be useful when you run consecutive backups without changing the file path and want to restore a specific version later.
In the demo below, I’ll walk you through how the
WITH FILE = Xoption functions when backing up or restoring a SQL Server database. This technique is particularly useful when dealing with multiple backups stored in a single media file. I’ll also inspect the backup file usingRESTORE HEADERONLYto show how that works too.Demo: Using WITH FILE to Restore Specific Backups
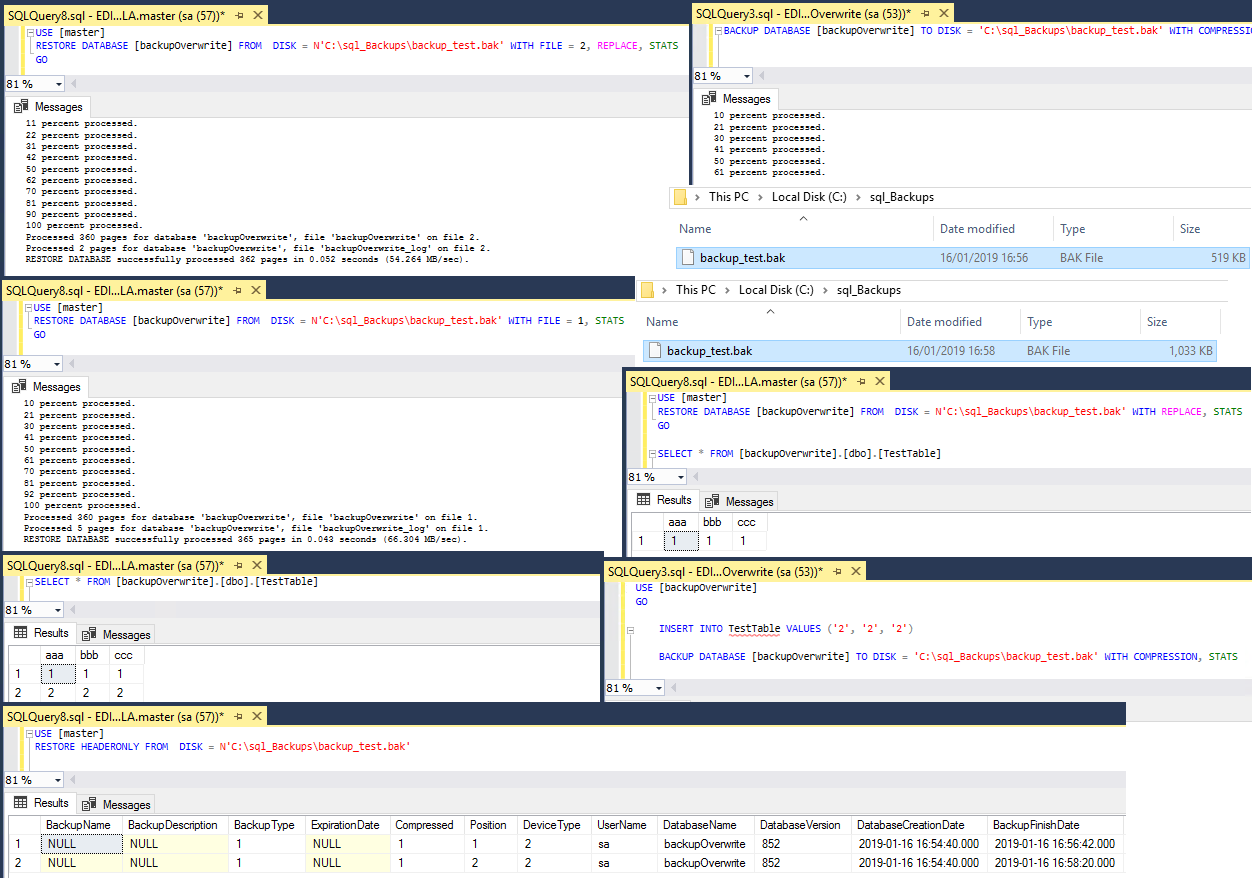
1. Create a Test Database and Insert Data

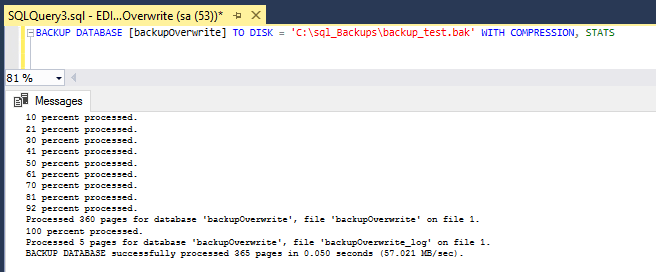
2. Perform the First Backup
-- backup database to file
BACKUP DATABASE TestDB TO DISK = 'C:\sql_Backups\backup_test.bak' WITH COMPRESSION, STATS;

3. Insert More Data and Backup Again
INSERT INTO TestTable VALUES ('2', '2', '2');
BACKUP DATABASE backupOverwrite TO DISK = 'C:\sql_Backups\backup_test.bak' WITH COMPRESSION, STATS;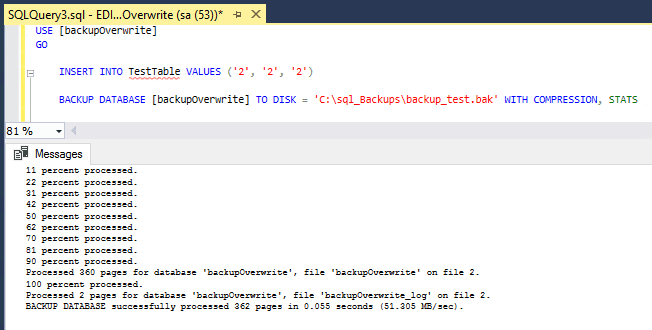

4. Inspect the Backup File
To see the backup versions inside the file, useRESTORE HEADERONLY:Look for the Position column. This shows
1for the first backup and2for the second:
5. Restore the First Backup (
WITH FILE = 1)I’m doing this restore using an additional option,
REPLACE, which means I don’t need to drop this test database before restoring.-- restore test database, first file in backup RESTORE DATABASE backupOverwrite FROM DISK = 'C:\sql_backups\backup_test.bak' WITH FILE = 1, REPLACE, STATS;
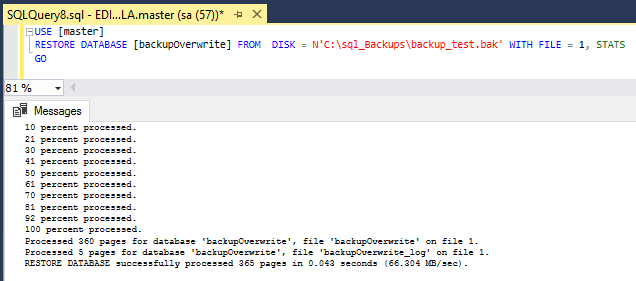
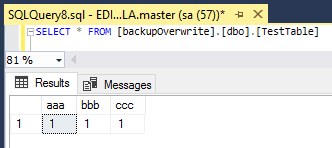
Verify the data:
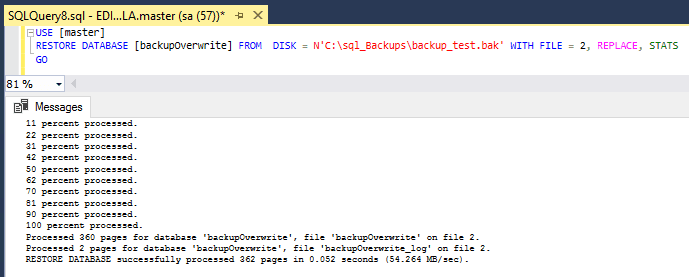
6. Restore the Second Backup (
WITH FILE = 2)Again, doing with replace to overwrite the last restored db.
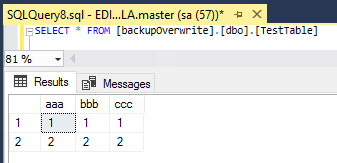
Verify the data again:
Conclusion
Using
WITH FILE = Xhelps you target specific backups from a single file, providing greater flexibility during database restoration. TheRESTORE HEADERONLYcommand is invaluable for identifying backup positions. Remember to useWITH REPLACEwhen restoring over an existing database without dropping it first.
