
If you need to remove a Linux distribution in WSL (Windows Subsystem for Linux), it’s easy to do using the wsl --unregister command.
Unregistering a distro will permanently delete all data, settings, and installed software associated with it. Make sure you back up any important files before proceeding. You can always reinstall the distro later from the Microsoft Store if needed.
In this post, I’ll demo the steps for how to uninstall a Linux distro in WSL, with some useful tips along the way.
Uninstalling a WSL Distro
1. Check Installed WSL Distributions
To view all the Linux distributions installed on your system, open PowerShell or Command Prompt and run the following command:
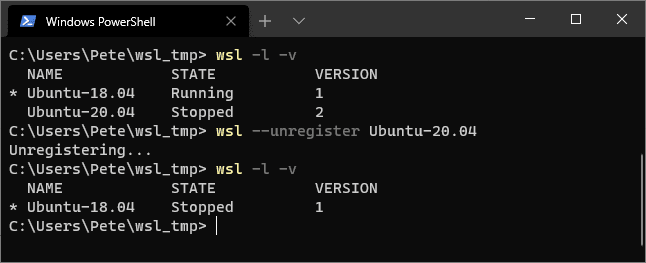
# show list of wsl distros
wsl -l -v
This will list all installed distros, showing their names, running status, and WSL version.
Take the distro name from this to use in the next command
2. Unregister and Uninstall the Distro
To remove the Linux distribution, use the wsl --unregister command with the name of the distro. For example, to uninstall Ubuntu-20.04, run:
# unregister a wsl distro
wsl --unregister <distro_name>
Note: This action is permanent, and you will not be able to recover the data unless you reinstall the distro. This command will unregister and remove all files, settings, and software associated with the chosen distro.
3. Verify the Distro Has Been Removed
To check that the distro has been successfully uninstalled, run the wsl -l -v command again:
# show list of wsl distros
wsl -l -v
The distro you uninstalled should no longer appear in the list.
Additional Tips for WSL Users
Uninstalling a Linux distribution from WSL is a simple process using the wsl --unregister command. Just remember that this action permanently deletes the distro and its data, so back up anything you want to keep.
If you decide to reinstall a Linux distro, simply go to the Microsoft Store or use the command wsl --install -d <distro-name> to install it again. You can also check out my other post on how to install WSL for more information.