-
Applying Data Retention to a SQL Table
In SQL Server, there’s often a need to delete old data from a database table. This could be for reasons like adhering to GDPR policies, managing oversized tables that are slowing down operations, staying within SQL Server Express’s 10GB limit, or simply cleaning up application logs and errors. Whether it’s a one-time task or a regular maintenance activity, how you approach it can vary depending on your needs. Here’s a straightforward guide to help you handle it.
Deleting Data in SQL Server
1. Set Up a Test Database
Always work on a test database first. Restore a backup copy of your production database to your SQL Server for safe testing.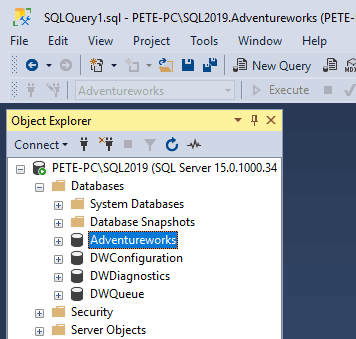
2. Identify a Large Table
Pick a table that has a lot of data. This is where you’ll focus your deletions.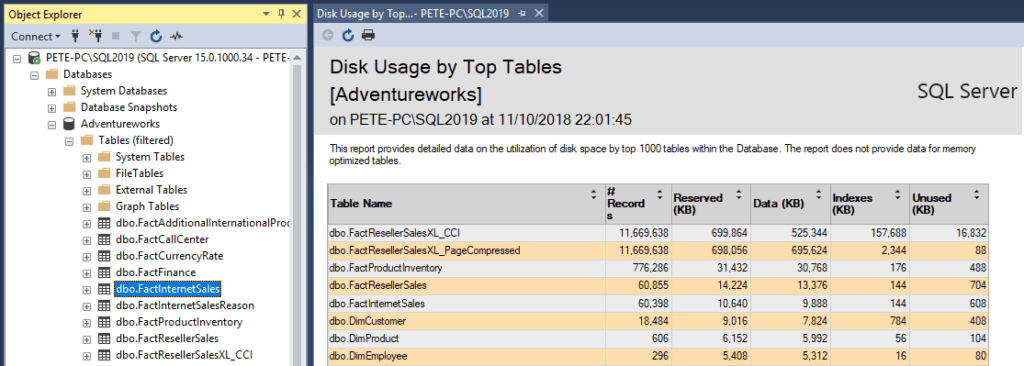
3. Count Rows by Date
Run a query to count rows grouped by date. Save this data into a temporary table to track your progress during the deletion process.SELECT COUNT(*) AS RowCount, CAST(DateColumn AS DATE) AS [Date] INTO #TempRowCounts FROM YourTable GROUP BY CAST(DateColumn AS DATE)

4. Perform Deletions in Batches
Avoid deleting large volumes of data in one go, as this can lock the table and cause performance issues. Use batching to delete smaller chunks of data.Batch Deletion Example:
DECLARE @BatchSize INT = 1000
WHILE EXISTS (SELECT 1 FROM YourTable WHERE DateColumn < '2012-01-01')
BEGIN
    DELETE TOP (@BatchSize)
    FROM YourTable
    WHERE DateColumn < '2012-01-01'

    -- Optional delay to reduce server load
    -- Remove the space after the first char of the wait command below
    -- I have to do this way to publish else it throws a JSON error :)
    W AITFOR DELAY '00:00:10'
END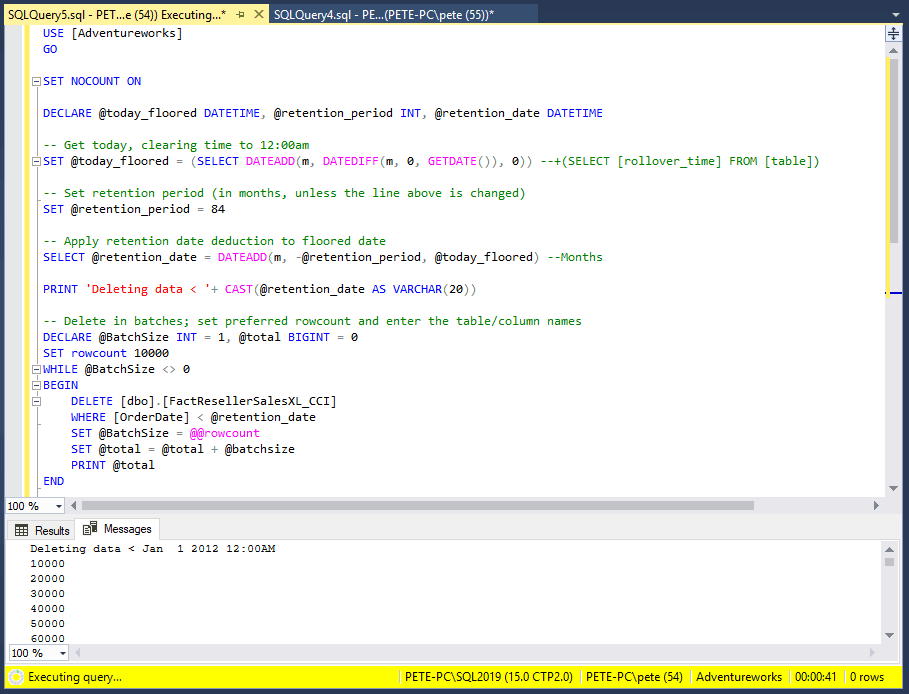
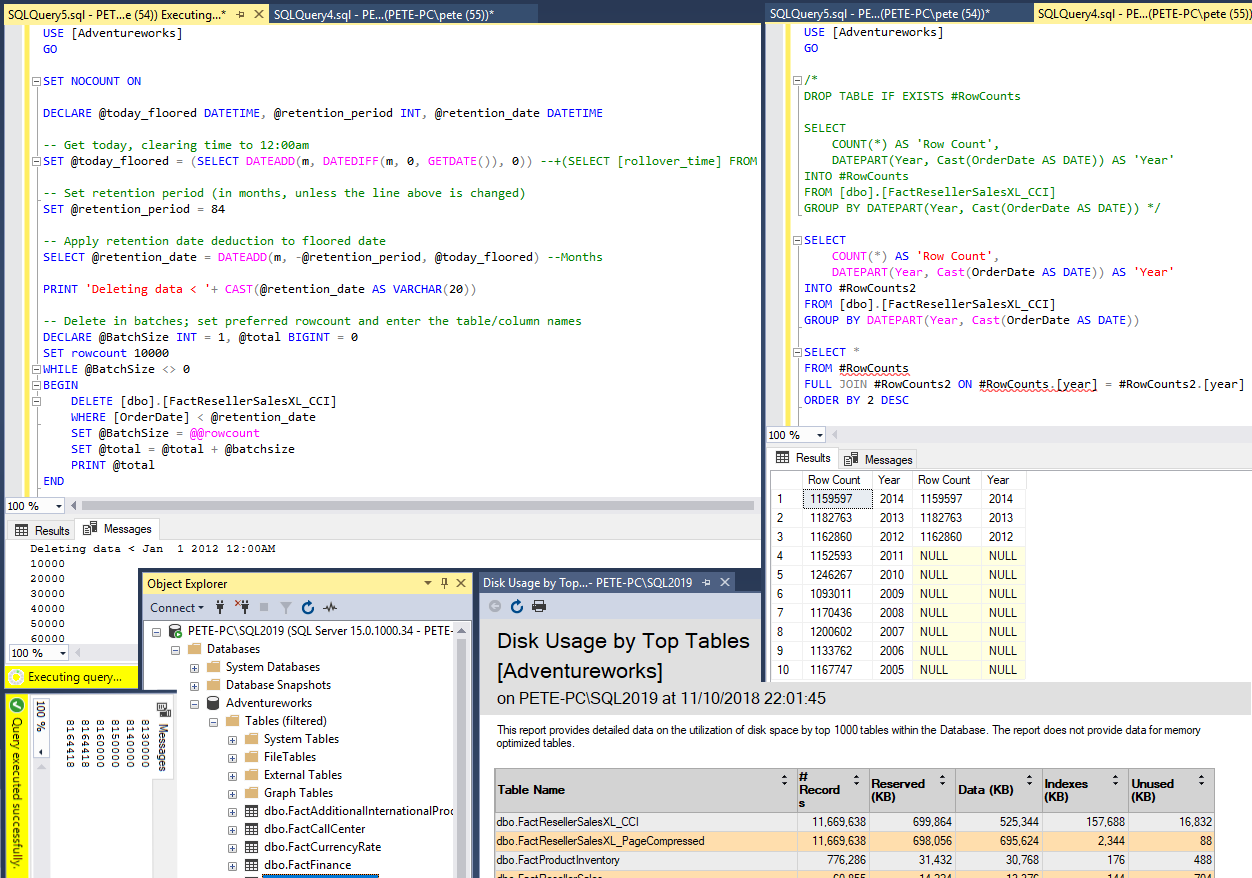
5. Verify Results
After each batch or the entire deletion process, check the row counts again. Compare them with your initial counts to ensure the data was removed as expected.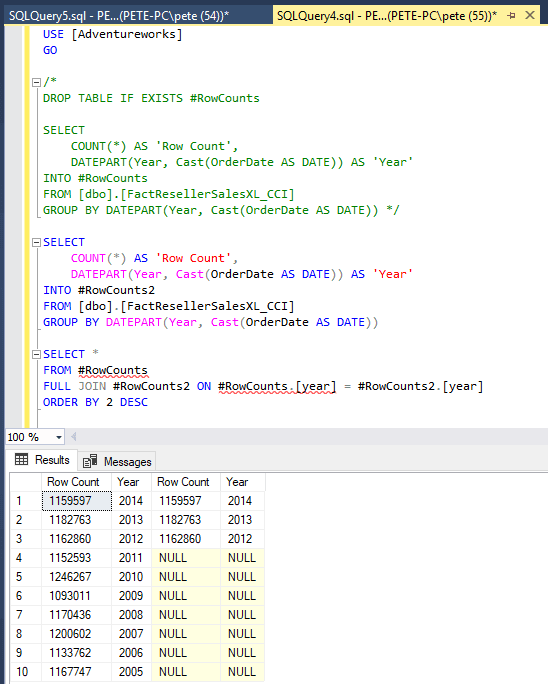
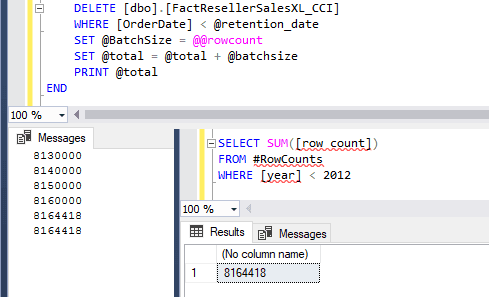
Looking good – All data on orders beyond 7 years
(< 1 January 2012 00:00)has been deleted.6. Schedule Maintenance.
Once you’ve cleaned up the table, you can set up a SQL Agent job to maintain it regularly. For example, you could schedule monthly deletions to keep the table within your data retention policies.Additional Tips
> Index Maintenance: After large deletions, rebuild or reorganize indexes to maintain query performance.
> Transaction Logs: Be aware that deleting large amounts of data can bloat your transaction logs. Monitor log size and back them up as needed.
> Testing First: Always test queries in a non-production environment to avoid accidental data loss.
> Off-Peak Hours: Schedule deletions during low-traffic times to minimize impact on users.
> Retention Policies: Confirm your organization’s data retention requirements before deciding what to delete.These steps and tips give you a simple way to manage data retention. Adjust your approach as needed to fit your database’s requirements.
-
How to Change Connection Colours in SSMS
SQL Server Management Studio (SSMS) is the go-to tool for running SQL Server queries. One of its handy features is the ability to change the colour of the query banner, providing a visual indicator of the server environment you are connected to. This feature can be especially beneficial when working across test, development, and production environments from the same host.
My choice of colour below stands out quite well:
Amending this is particularly useful when you are running queries in test, development & production environments from the same host. You want to have a visual warning/display to indicate clearly which MSSQL host you are running your next query on.
This is a feature that I find myself using from time to time, and I see others using it frequently.
Why Use Custom Connection Colours?
Amending the connection colour in SSMS offers several advantages:
– Environment Differentiation: Easily distinguish between test, development, and production environments.
– Error Prevention: Reduce the risk of accidentally running queries in the wrong environment.
– Increased Awareness: Maintain better awareness of which SQL Server instance you are working with at any given time.This feature is highly valuable and frequently used by many SQL Server professionals, including myself.
How to Change Connection Colours in SSMS
Follow these steps to set up custom connection colours for a specific SQL Server instance:
1. Connect to a SQL Server Instance:
Open SSMS and initiate a connection to the desired SQL Server instance.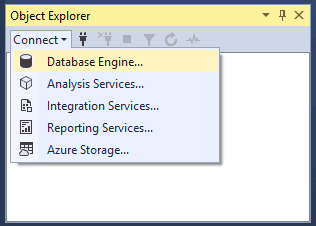
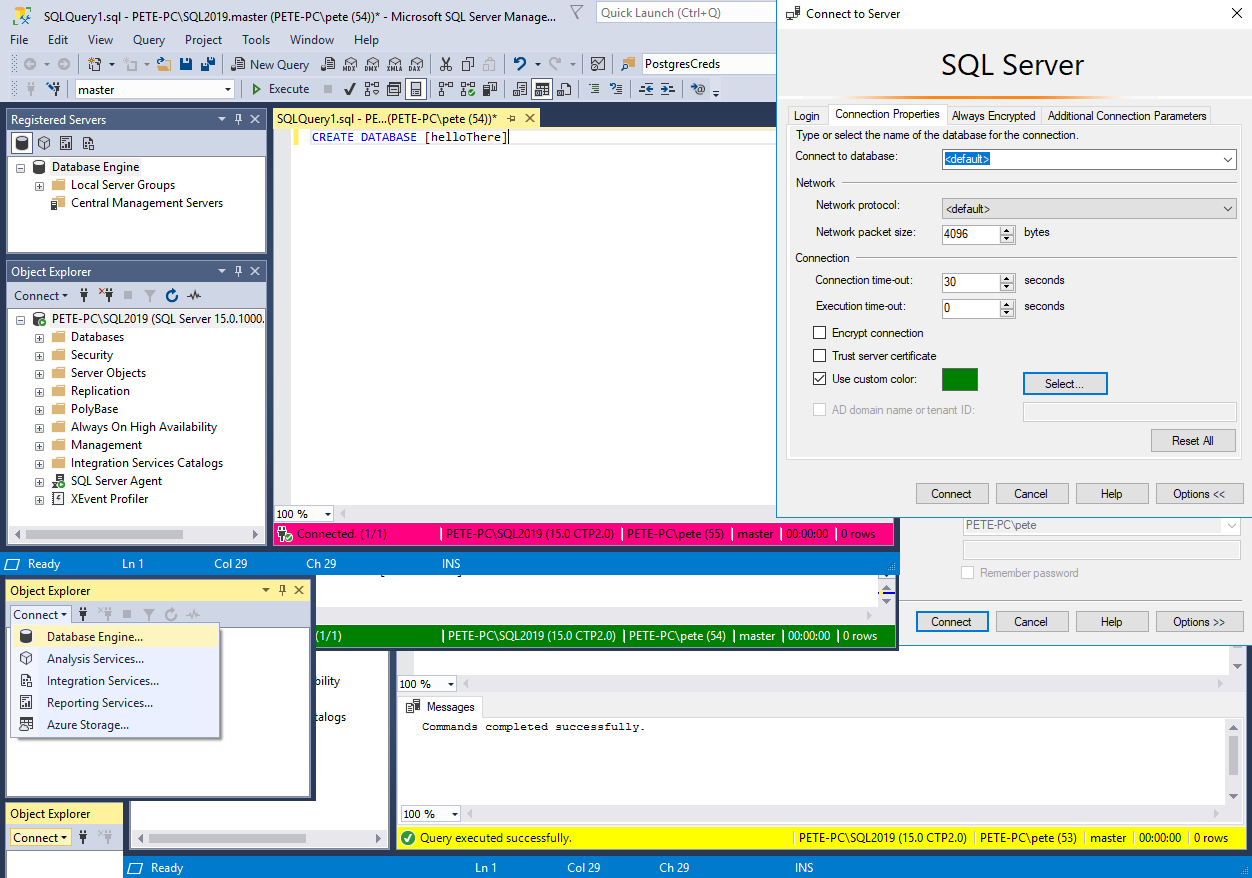
2. Click “Options”:
In the “Connect to Server” dialog box, select the Options button.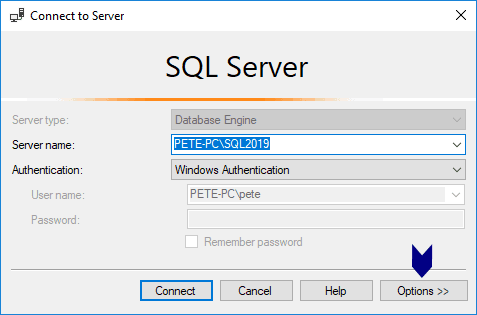
3. Set Custom Colours:
Within the Connection Properties tab, check the box labelled Use custom color and select your preferred colour from the palette.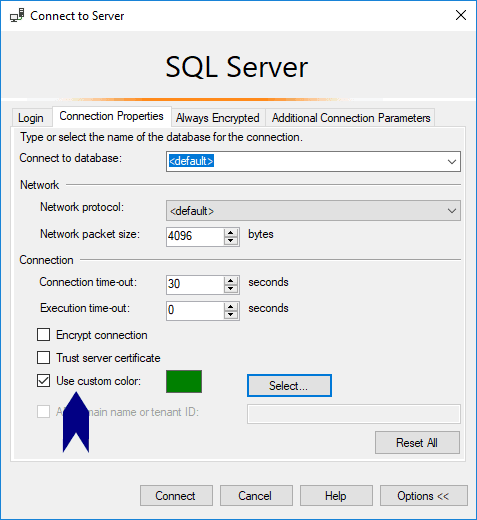
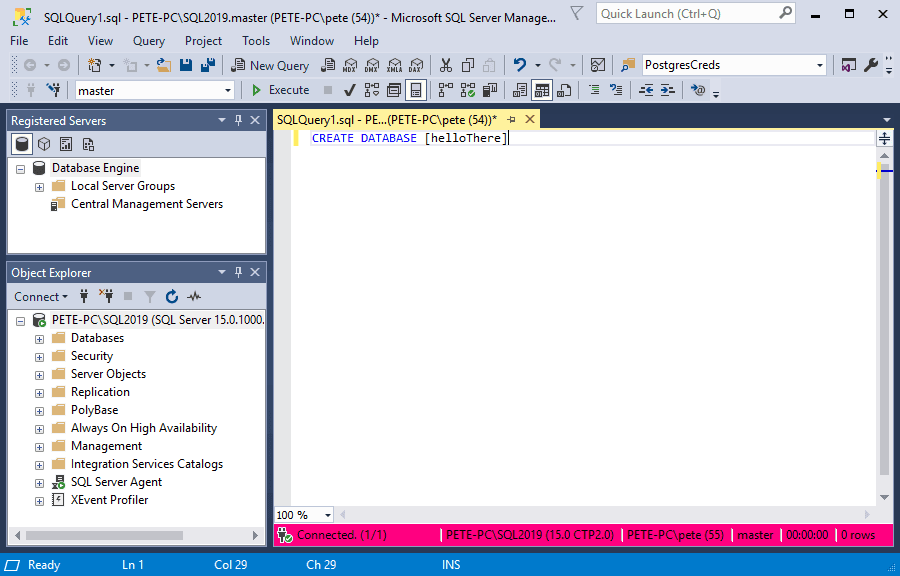
4. View the Change:
Open a new query window, and you will see the banner in your chosen colour.
Hope this guide was useful for you!
-

Counting Rows within CSV Files using PowerShell
This post contains a script that will help count rows within multiple CSV files using PowerShell. If you have a directory containing many CSV files, this’ll help you count the rows of each CSV file within the folder.
Counting rows within CSV files may be useful for verifying data from source to destination. For example, if you’re importing CSV files into SQL Server and you want to verify all rows were imported, by counting the rows in each CSV file and comparing it with the table row counts in the SQL table.
We’ll cover the following here:
1. Count Rows in Multiple CSV Files
2. Checking for Data Issues
1. Count Rows within Multiple CSV Files
First, open PowerShell ISE or any other terminal window so we have a place to paste the PowerShell command:

To count rows within CSV files, run the PowerShell below, but first amend to your specific directory:
# PowerShell Script to Count Rows in CSV Files
# Update the folder path to where your CSV files are stored
Get-ChildItem "C:\myfolder\" -Recurse -Filter "*.csv" |
ForEach-Object {
    $fileStats = Get-Content $_.FullName | Measure-Object -Line
    $linesInFile = $fileStats.Lines - 1 # Exclude the header row
    Write-Host "$($_.Name): $linesInFile rows"
}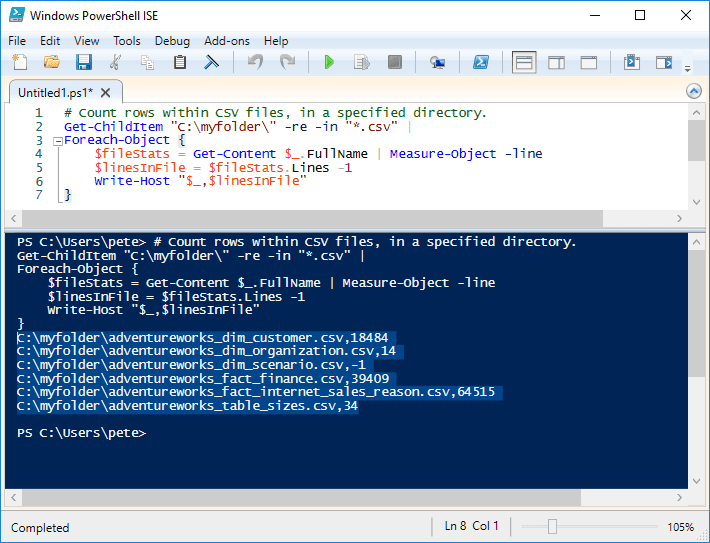
This script checks each CSV file in the specified folder, counts the number of rows, and subtracts 1 to exclude the header row. It will then display the file name along with the row count.
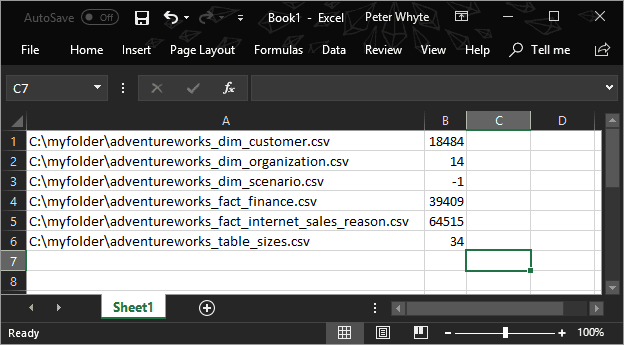
You can easily copy this output into Excel for further analysis. If needed, you can use the Text to Columns feature in Excel to format the data properly:
2. Checking for Data Issues
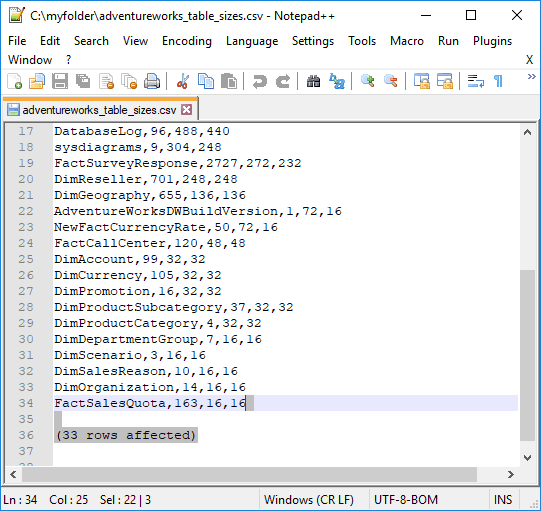
While running this script, you might come across issues that need attention. For example, if a file shows
-1rows, it likely means the file is empty or something went wrong with a process. In such cases, you can disregard these files or investigate them further.Another common issue occurs when exporting data from SQL Server. Sometimes, files will include the phrase “rows affected” at the end of the data, which could cause problems during import. The reason for this is that we need to include SET NOCOUNT within the SQL query when we use Results to Text option in SSMS.
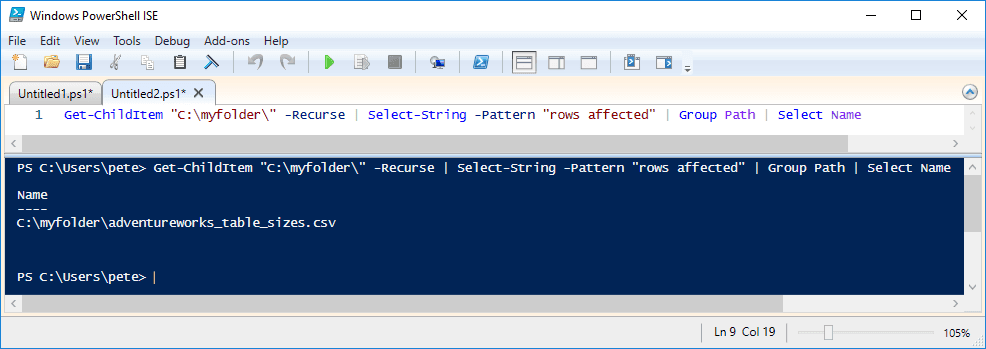
We can search for a particular phrase in a file using PowerShell by running the following:
Search for the phrase "rows affected" in all CSV files
Get-ChildItem "C:\myfolder\" -Recurse | Select-String -Pattern "rows affected" | Group-Object Path | Select Name
This will identify any CSV files that contain the “rows affected” string, allowing you to clean them up before importing the data.
One more tip to add, is that we can check for blank lines in a CSV file by running the following:
# check for blank lines in a csv file
Get-Content "C:\myfolder\yourfile.csv" | Where-Object {$_ -ne ""}
This will display only empty rows in the CSV file, helping you identify any unnecessary blanks. It could throw an error on data import processes. You could also amend this query to run for all CSV files, it’ll be similar to the command above in this post.
Hope all this is useful for you. Tune in for more tips like this, by clicking one of the links you see around you!
-
Exporting SQL Server Query Results to CSV
This guide explains how to export a SQL Server query results to a CSV file using SSMS.
SQL Server Management Studio (SSMS) is the primary tool used for managing SQL Server databases and running queries. By default, SSMS exports data in a
column-alignedformat, but to export data as a CSV, we need to adjust the export settings to becomma-delimited.Exporting Query Results to a File in SSMS
To begin the export process, we use the Results to File option instead of the default Results to Table. This method allows us to save the query output directly to a file.
1. Select ‘Results to File’:
In SSMS, click on the Results to File option as shown in the screenshot below.
2. Run the Query:
When you run the query, SSMS will prompt you to select a location and file name for saving the output.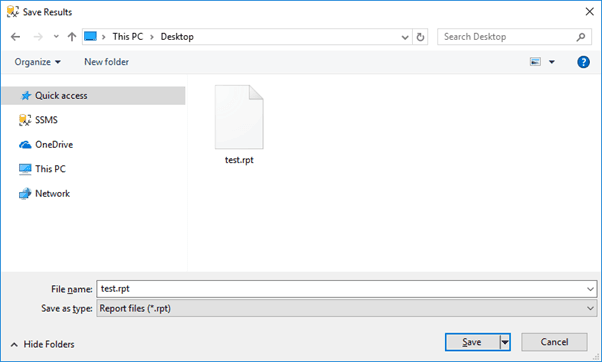
3. Default Output Format:
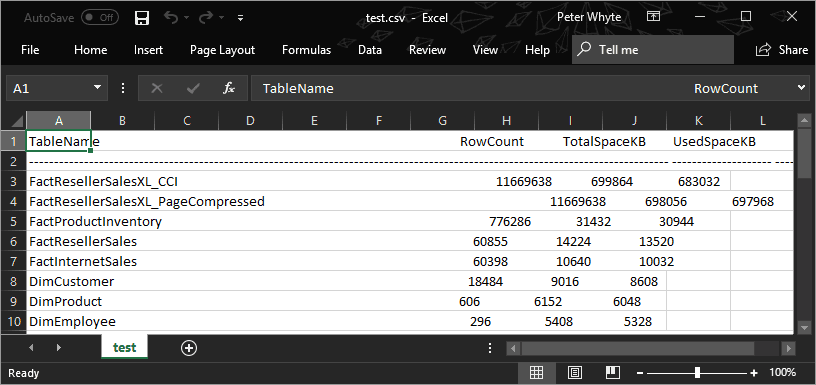
By default, the file will be saved with a.rptextension. If you open this file in a text editor like Notepad++, it will display the data in a column-aligned format.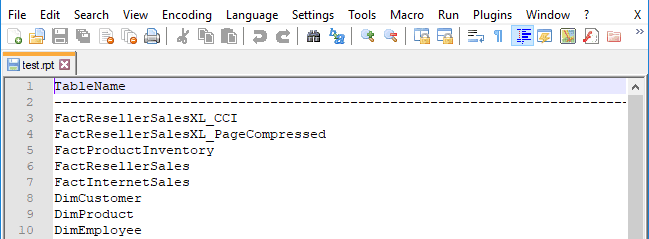
4. Save as CSV:
To save the file as CSV, you can change the file extension from.rptto.csv. However, this will still not format the output correctly for CSV use.
You will now likely want to change the delimiter after looking at this output file. This .rpt file should not be opened as CSV.
Modifying SSMS Output Format for CSV
The next step is to adjust SSMS’s default export settings to ensure that the output is in a proper comma-delimited format for CSV files.
1. Access SSMS Options:
Navigate to Tools > Options in SSMS.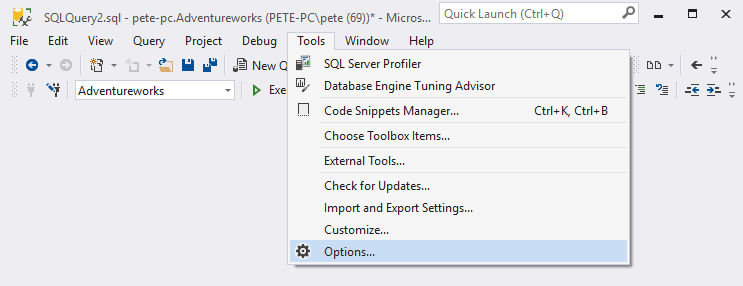
2. Change Query Output Settings:
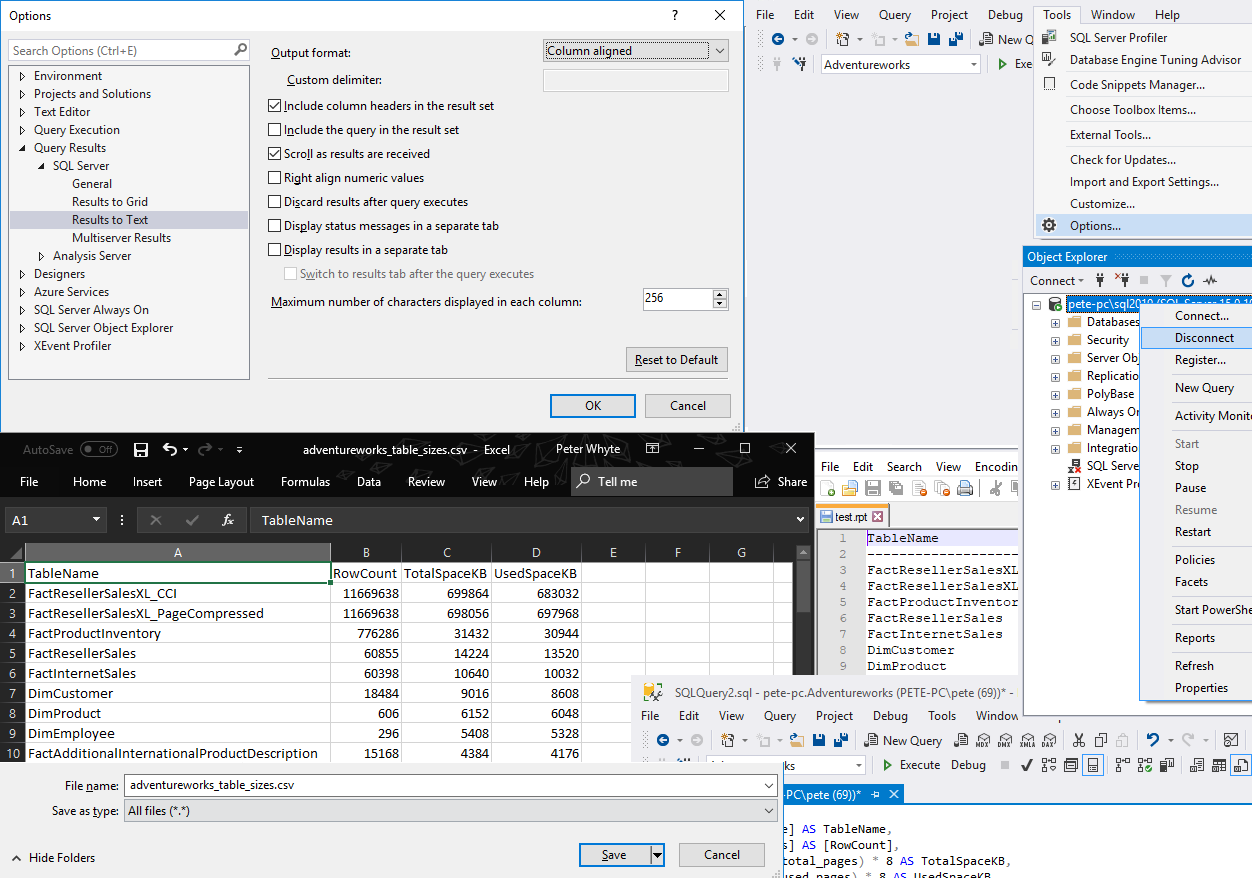
In the Options window, go to Query Results > SQL Server > Results to Text.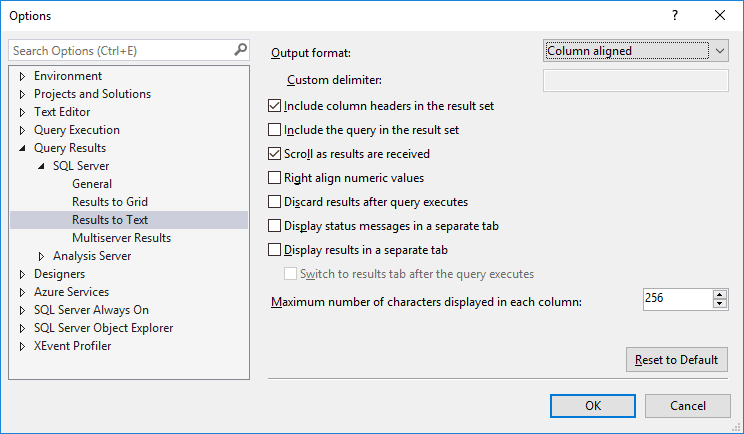
3. Set Delimiter to Comma:
By default, the output is set to “Column-aligned.” Change this to “Comma delimited.”
4. Reconnect to SQL Server:
After making these changes, disconnect from your current session in the SSMS Object Explorer and reconnect to the SQL Server instance.
5. Export Again:
Run your query again. This time, the output file will be formatted correctly for CSV, with values separated by commas.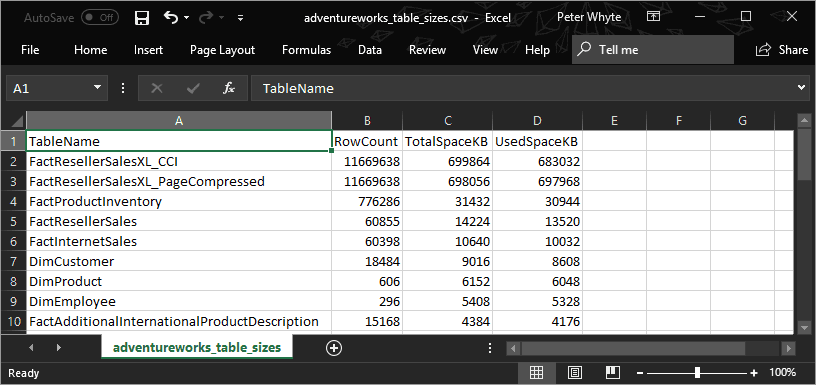
Note for SQL Server Devs/Admins:
You may encounter an issue with the exported CSV data, and it contains “rows affected” at the end of it. The reason for this is that we need to include SET NOCOUNT within the SQL query when we use Results to Text. I talk more about this in another one of my posts: Count Rows in CSV Files. -
How to Quickly Get Table Sizes in SQL Server
Monitoring table sizes in SQL Server is crucial for effective database management. For a detailed guide covering various methods, including built-in reports and custom scripts, please refer to my latest article on this: How to Check Table Sizes in SQL Server.
In this guide, we’ll show a few quick ways to show table sizes in MSSQL, including via GUI (SSMS) and sharing a SQL Script:
> Get Table Sizes in SSMS
> SQL Script to Get Table SizesSSMS Get Table Sizes in SSMS
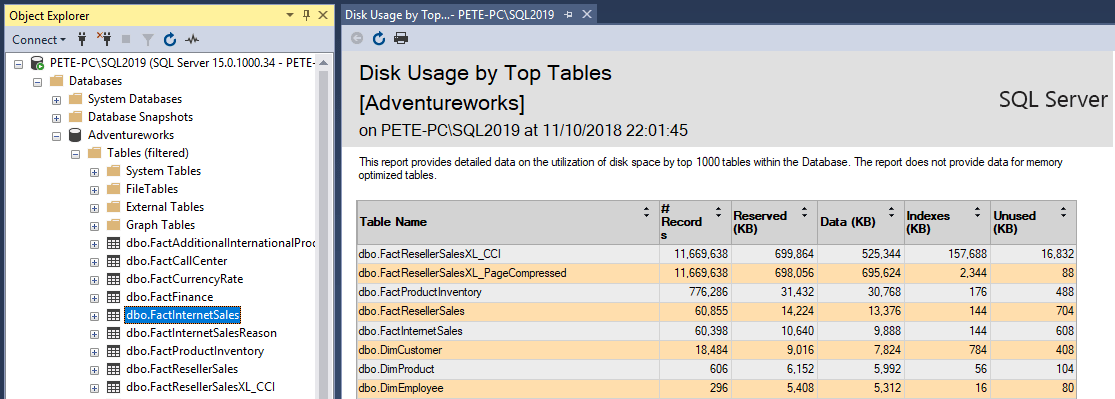
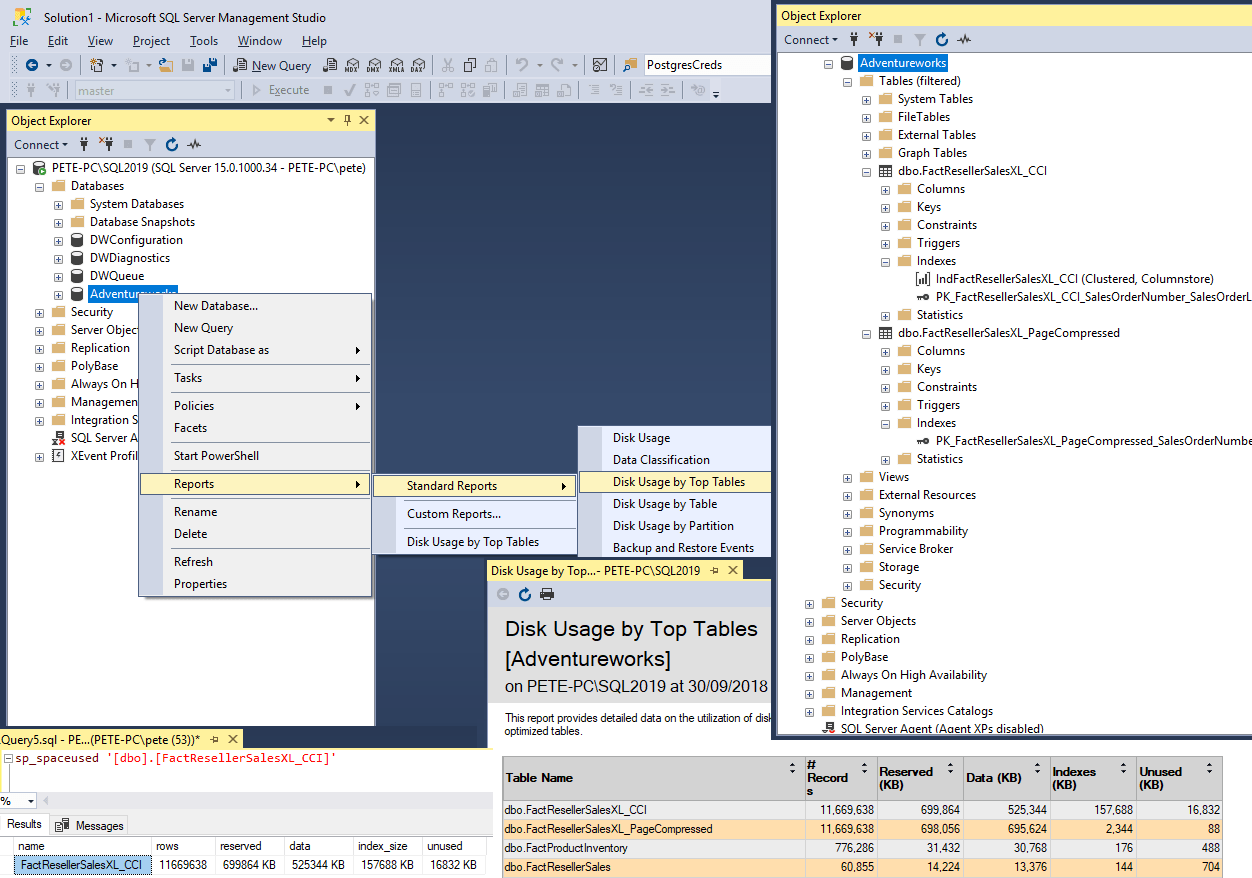
For a quick overview of table sizes, we can use the Disk Usage by Top Tables Report in SQL Server Management Studio (SSMS).
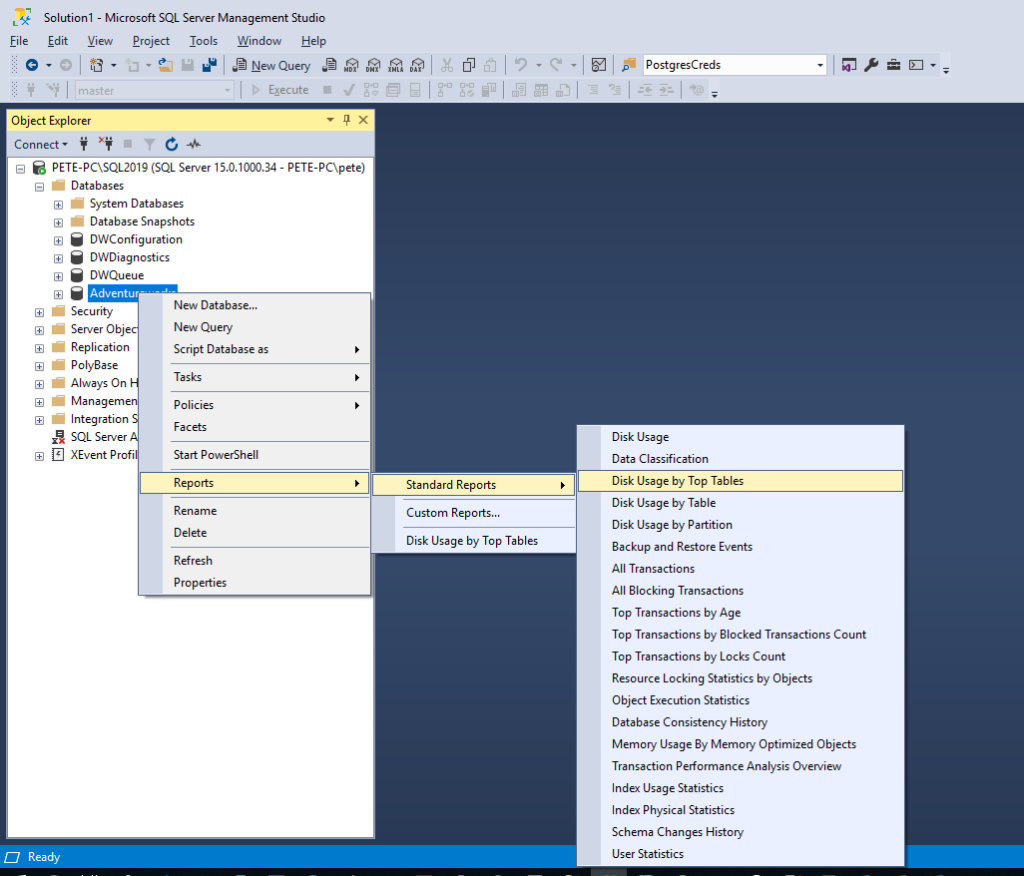
To open this built-in SSMS Report:
1. Open SQL Server Management Studio (SSMS).
2. Expand Databases.
3. Right-click the Database and select Reports > Standard Reports > Disk Usage by Top Tables
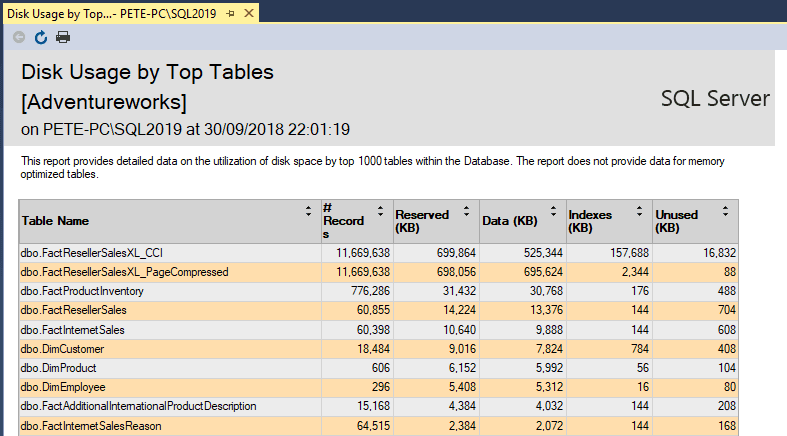
The report shows that this database has 2 tables close to 700MB in size, both containing the same number of rows but there are some differences in the indexes.
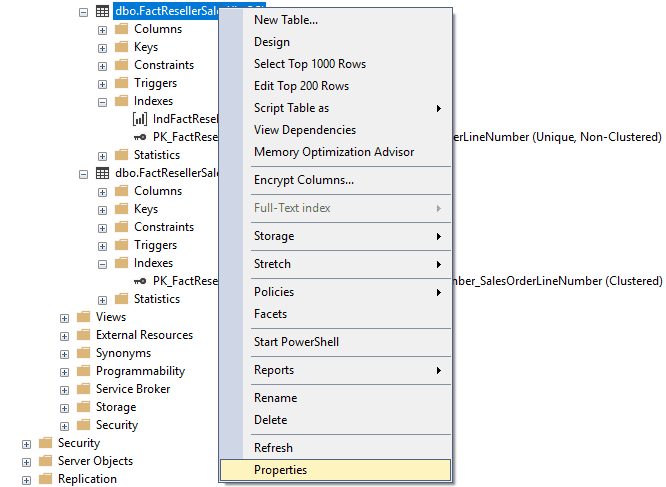
If you’re investigating a specific table, opening the Table Properties within SSMS Object Explorer is the way to do with via GUI.
To open the Table Properties Window, first expand the database and table objects within SSMS and find the table you’re looking for. You can add a filter to help find your table, if needed.
Next, right-click the table and select Properties:
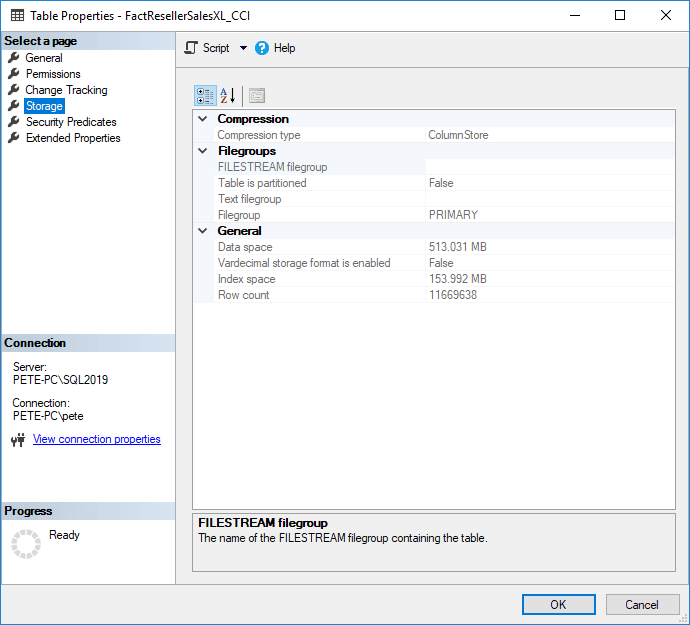
Open the Storage tab on the left-hand sidebar. It may take a second for the window to load, but this will show the index space, data space usage and the table row count:
Both of the above ways to get table info within SSMS are very useful, however they’re not practical ways for exporting data for comparison, or automation (monitoring).
SQL Script to Get Table Sizes
For detailed information across all tables, including schema info, row count, and space usage, run this query:
-- Get Table Size SQL Server Script
SELECT
    t.NAME AS TableName,
    s.Name AS SchemaName,
    p.rows AS RowCounts,
    CAST(ROUND(((SUM(a.total_pages) * 8) / 1024.00), 2) AS NUMERIC(36, 2)) AS TotalSpaceMB,
    CAST(ROUND(((SUM(a.used_pages) * 8) / 1024.00), 2) AS NUMERIC(36, 2)) AS UsedSpaceMB,
    CAST(ROUND(((SUM(a.total_pages) - SUM(a.used_pages)) * 8) / 1024.00, 2) AS NUMERIC(36, 2)) AS UnusedSpaceMB
FROM
    sys.tables t
INNER JOIN
    sys.indexes i ON t.OBJECT_ID = i.object_id
INNER JOIN
    sys.partitions p ON i.object_id = p.OBJECT_ID AND i.index_id = p.index_id
INNER JOIN
    sys.allocation_units a ON p.partition_id = a.container_id
LEFT OUTER JOIN
    sys.schemas s ON t.schema_id = s.schema_id
WHERE
    t.NAME NOT LIKE 'dt%'
    AND t.is_ms_shipped = 0
    AND i.OBJECT_ID > 255
GROUP BY
    t.Name, s.Name, p.Rows
ORDER BY
    TotalSpaceMB DESC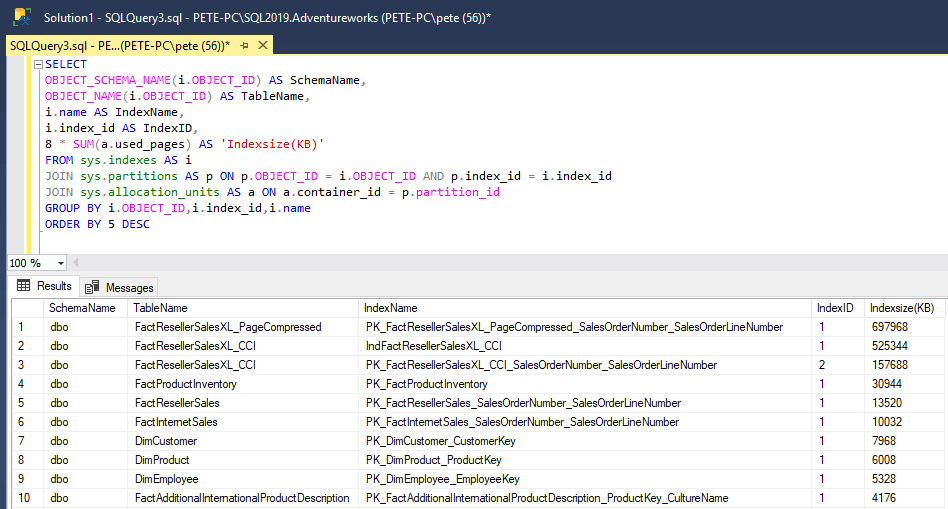
Why this method?
> Comprehensive results for all tables
> Easily exportable to CSV, Excel, or reports
> Ideal for database administrators (DBAs) needing insights for capacity planningIf you’re a DBA or developer working on capacity planning or performance tuning, this SQL script is the most flexible method. For quick checks we can use SSMS, as we have that open all day as DBA’s anyway!