Tag: SQL Tips

  • Temp Tables in SQL Server

    Temp Tables in SQL Server

    Temp tables in SQL Server can improve the efficiency and performance of complex queries by breaking them down into smaller pieces, storing intermediate results in memory, and eliminating unnecessary data.

    In SQL Server, temporary tables are tables that are created for a specific purpose and are only available for the duration of the connection that created them. They can be created using either the # symbol or the ## symbol, with each symbol having slightly different behaviours.

    Local Temp Tables
    Temp tables created using the “#” symbol are known as local temp tables. These tables are only available to the connection that created them, and they are automatically dropped when the connection is closed. Local temp tables are commonly used and useful when you need to store and manipulate intermediate results within a query or stored procedure.

    Global Temp Tables
    These tables are available to any connection, and they are not automatically dropped when the connection that created them is closed. Global temp tables are useful when you need to share data between different connections or when you want to store data that needs to persist beyond the lifetime of a single connection or session.

    Below I’ll demo how to perform the following on Temp Tables in SQL Server:
    Create a Local Temp Table
    Insert Rows into Temp Table
    Create an Index on Temp Table
    Select From Temp Table
    Drop Temp Table

    Create a Local Temp Table

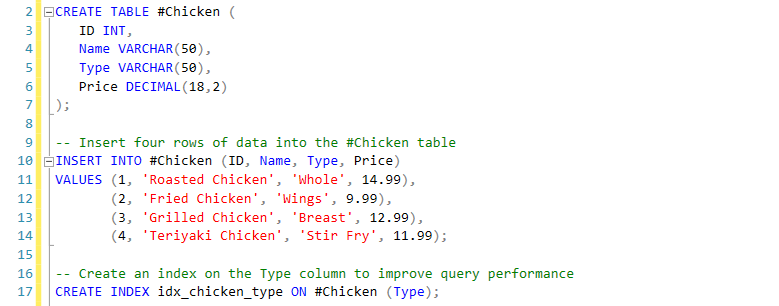
    This statement creates a temporary table called #Chicken in a local scope:

    -- Create a local temp table called #Chicken
    CREATE TABLE #Chicken (
       ID INT,
       Name VARCHAR(50),
       Type VARCHAR(50),
       Price DECIMAL(18,2)
    );
    

    This temp table will be short-lived as it exists only for the duration of my current SSMS session. It is only accessible from the session in which it was created and is automatically dropped when the session ends (when I close the query window or it disconnects).

    Insert Rows into Temp Table

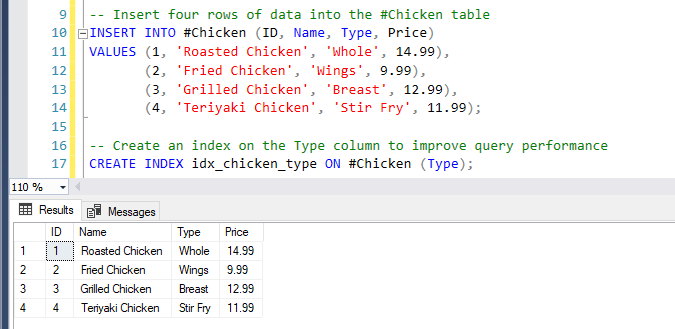
    This statement inserts four rows of data into the temporary table #Chicken:

    -- Insert four rows of data into the #Chicken table
    INSERT INTO #Chicken (ID, Name, Type, Price)
    VALUES (1, 'Roasted Chicken', 'Whole', 14.99),
           (2, 'Fried Chicken', 'Wings', 9.99),
           (3, 'Grilled Chicken', 'Breast', 12.99),
           (4, 'Teriyaki Chicken', 'Stir Fry', 11.99);
    

    Create an Index on Temp Table

    In this next statement, I’m creating an index on the #Chicken temporary table to improve query performance:

    -- Create an index on the Type column to improve query performance
    CREATE INDEX idx_chicken_type ON #Chicken (Type);
    

    An index in MSSQL is a data structure that allows faster search and retrieval of data from a table. By creating an index on the Type column of the #Chicken table, the database engine can more efficiently locate and retrieve rows based on the values in that column.

    Select From Temp Table

    This statement retrieves all rows from the temporary table #Chicken:

    -- Retrieve all rows from the #Chicken table
    SELECT * FROM #Chicken;
    
    Create Temp Table SQL Server

    Drop Temp Table

    This statement drops a temporary table called #Chicken.

    -- Drop local temp table (also happens on session disconnect)
    DROP TABLE #Chicken;
    

    When a temporary table is no longer needed, it can be removed using the DROP TABLE statement. Dropping a temporary table removes it from the database and frees up the space it occupied.

    We should give global temp tables more attention for this clean-up part. Global temp tables are visible to all connections which means they are not automatically dropped. It is important to drop global temp tables when they are no longer needed to prevent clutter and ensure efficient use of resources.

  • How to Check SQL Server Version

    How to Check SQL Server Version

    Checking your SQL Server versions is a common task, as most database administrators will know how important it is to keep the software on the host up to date. This post is here to help you to check the version of SQL Server instances.
    You may have many instances running on the same host server all running on different versions. To check if you have more than one MS SQL Instance, open SQL Server Configuration Manager or Services.msc on your host. If it’s a multi-tenant MSSQL host there will be more than one SQL Server Service and the same for other SQL Services like the SQL Agent Service.

    As ever, there are many ways to get such metadata information from SQL Server. Here are a few example ways to check your SQL Server version:
    # TSQL – SELECT @@VERSION / SERVERPROPERTY
    # SSMS GUI – SQL Server Options

    When you have your SQL Server versions noted, you’ll then want to check how up-to-date you are. There are base SQL Server Build numbers (16.0..) and then minor version numbers (0.700.4). You can learn more about determining the version of your SQL Server with the help of Microsoft Docs.

    SQL Query – SELECT @@VERSION / SERVERPROPERTY

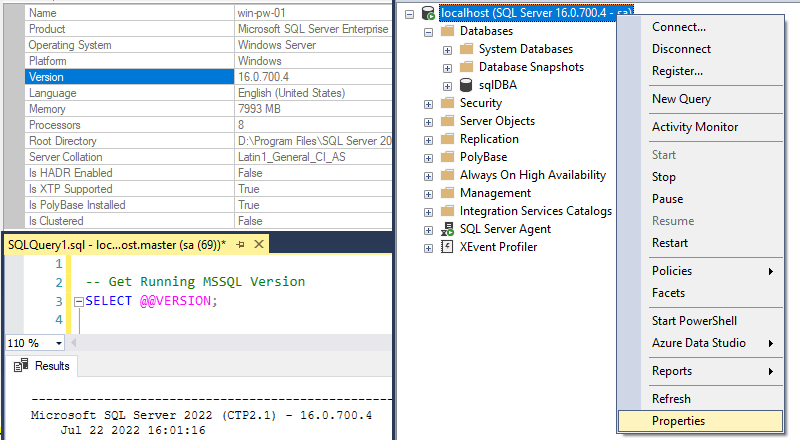
    One of the quickest ways to get the SQL Server version is to use the @@VERSION in-built TSQL function, as shown in the example below.

    -- Get Running MSSQL Version
    SELECT @@VERSION;
    check sql server version

    Running this will show your MS SQL Major version number, Microsoft SQL Server 2022 (CTP2.1) in this case. It also shows the build version number, 16.0.700.4, which I can cross-check with this sqlserverbuilds website to verify I’m running the latest SQL Server version available. Also, note the Microsoft Docs link provided at the top of this post.

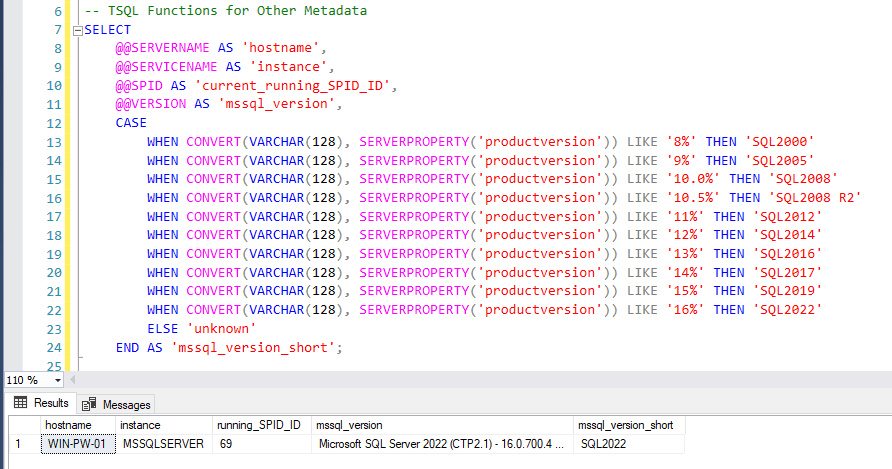
    We can also get this SQL Server version information using another built-in Function, and I’m including other examples for system metadata collection for diagnostics.

    -- TSQL Functions for Other Metadata
    SELECT 
    	@@SERVERNAME AS 'hostname',
    	@@SERVICENAME AS 'instance',
    	@@SPID AS 'current_running_SPID_ID',
    	@@VERSION AS 'mssql_version',
    	CASE
            WHEN CONVERT(VARCHAR(128), SERVERPROPERTY('productversion')) LIKE '10.0%' THEN 'SQL2008'
            WHEN CONVERT(VARCHAR(128), SERVERPROPERTY('productversion')) LIKE '10.5%' THEN 'SQL2008 R2'
            WHEN CONVERT(VARCHAR(128), SERVERPROPERTY('productversion')) LIKE '11%' THEN 'SQL2012'
            WHEN CONVERT(VARCHAR(128), SERVERPROPERTY('productversion')) LIKE '12%' THEN 'SQL2014'
            WHEN CONVERT(VARCHAR(128), SERVERPROPERTY('productversion')) LIKE '13%' THEN 'SQL2016'
            WHEN CONVERT(VARCHAR(128), SERVERPROPERTY('productversion')) LIKE '14%' THEN 'SQL2017'
            WHEN CONVERT(VARCHAR(128), SERVERPROPERTY('productversion')) LIKE '15%' THEN 'SQL2019'
            WHEN CONVERT(VARCHAR(128), SERVERPROPERTY('productversion')) LIKE '16%' THEN 'SQL2022'
    		ELSE 'unknown'
    	END AS 'mssql_version_short';
    MS SQL SERVERPROPERTY

    SSMS GUI – SQL Server Options

    The other way to get your SQL Server Version information is to do it in SQL Server Management Studio (SSMS).

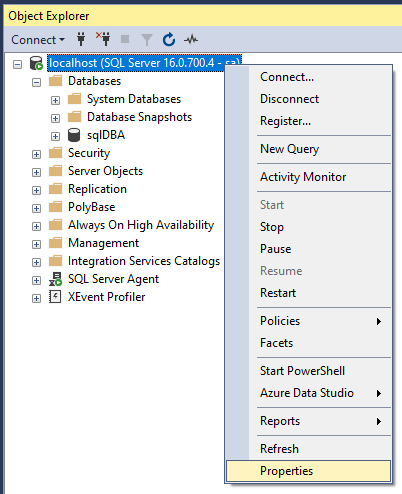
    In SSMS Object Explorer, right-click the server at the top then select Properties, as shown in the example below.

    SSMS SQL Server Properties

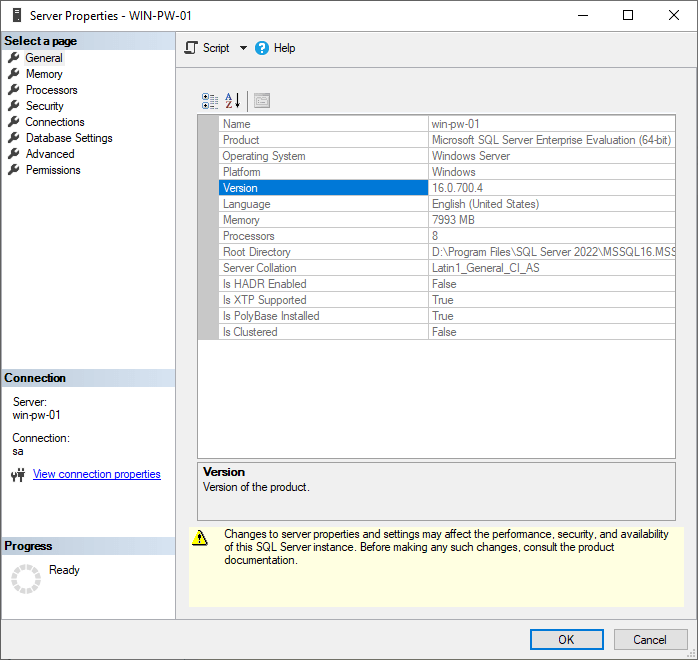
    This will open up the SQL Server Properties window where we are able to see the MS SQL version.

    SQL Version

    I hope this guide has given you the information you need to check SQL Server build numbers and MS SQL versions. Feel free to check out my SQL Tips tag for more random MSSQL tips from a SQL DBA.

  • Add Columns to a Table in SQL Server

    Add Columns to a Table in SQL Server

    Adding new columns to tables in SQL Server is a common task for anyone developing and/or maintaining databases, usually driven by the need for new features on an application/script procedure.

    As ever, before you get started with MSSQL changes, have a look at the relevant Microsoft Documentation – Add Columns to a Table

    If the SQL Server instance has Replication configured have a look at MS Docs: Considerations for Schema Changes & Replicate Schema Changes
    By default, if we add a column it will be propagated through to Subscribers. If you are adding default values you should be mindful of Replication Latency.

    The following is included in this post:
    # Add Column to Table
    # Add Column to Table with Default Value

    Add Column to Table MSSQL

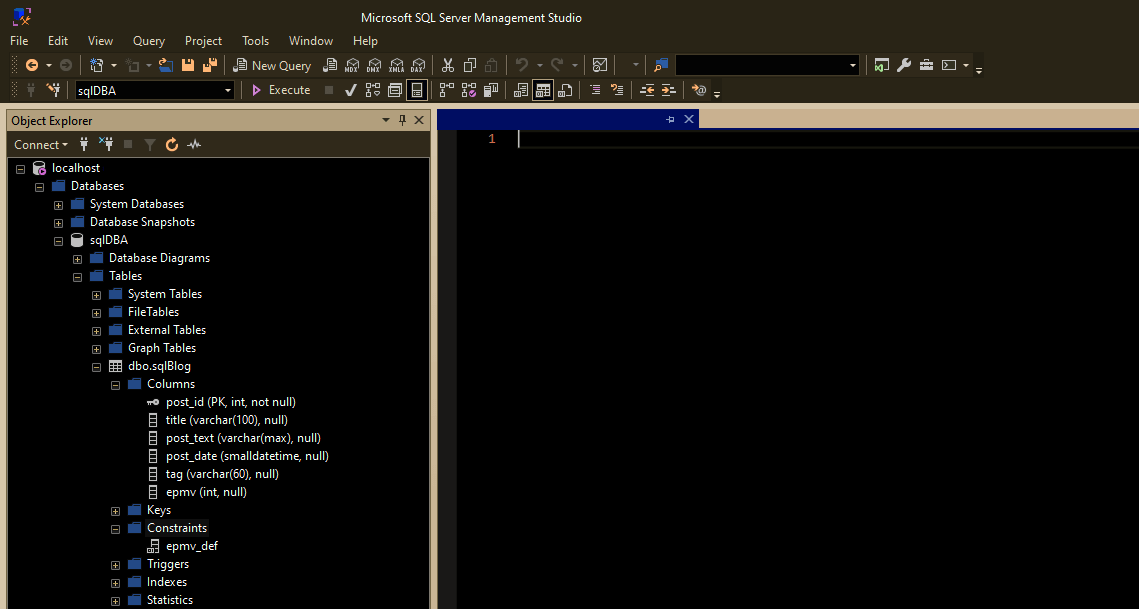
    Adding a column to a table is done using the ALTER TABLE statement. Here is an example of adding a column with the VARCHAR Data Type. The new column must allow NULL values or include a default constraint.

    -- Add column to table ms sql
    ALTER TABLE sqlBlog ADD tag VARCHAR(60);
    SQL Server Add Column

    We can run a quick SELECT TOP 1 * on the table to verify the new column exists. If this table contains sensitive data then we can also query sys.columns.

    Add Column to Table with Default Value

    As mentioned above in this post, if the SQL Server instance has Replication configured we should refer to Microsoft Docs prior to making this change. If you are adding columns with default values, you should also be mindful of Replication Latency and Transaction Log file sizes.
    The following shows adding a column with the default INT value of ‘12345’. Before doing this I inserted some more rows into the demo table.

    -- Add column to table with default value
    -- CONSTRAINT = Optional constraint name
    ALTER TABLE sqlBlog ADD epmv INT CONSTRAINT epmv_def DEFAULT 12345 WITH VALUES;
    Add Column to Table with Default Value

    Each existing row has had this ‘epmv’ value added as displayed above.

  • Disabling Change Data Capture in SQL Server

    Disabling Change Data Capture in SQL Server

    This post contains a demo on how to disable CDC (Change Data Capture) in SQL Server 2022. The sp_cdc_disable_table and sp_cdc_disable_db in-built MSSQL SPs are what we should use to disable CDC in SQL Server which is explained more below.

    The sp_cdc_disable_table and sp_cdc_disable_db are the in-built MSSQL SPs to do this which are explained below.

    Disabling CDC can be a common task for a SQL DBA as we need to do this each time a new column is created on the source table. We run sp_cdc_enable_table to add all columns in a table to CDC, but then when a new column is created we need to drop CDC on the table and re-enable it in SQL.

    My previous blog post explains how to enable CDC in SQL Server and will show you how to enable CDC. This post is a guide for the CDC disable action.

    Before proceeding with a change like this on a production SQL environment, we should read Microsoft Docs on Enabling & Disabling CDC, and test the change to get familiar enough with CDC.

    How to Disable CDC SQL Server

    Disabling CDC for a table in MSSQL will drop all existing captured change data. If you are intending on performing this on a production SQL Server, you should verify whether we need to back up & copy existing CDC data.

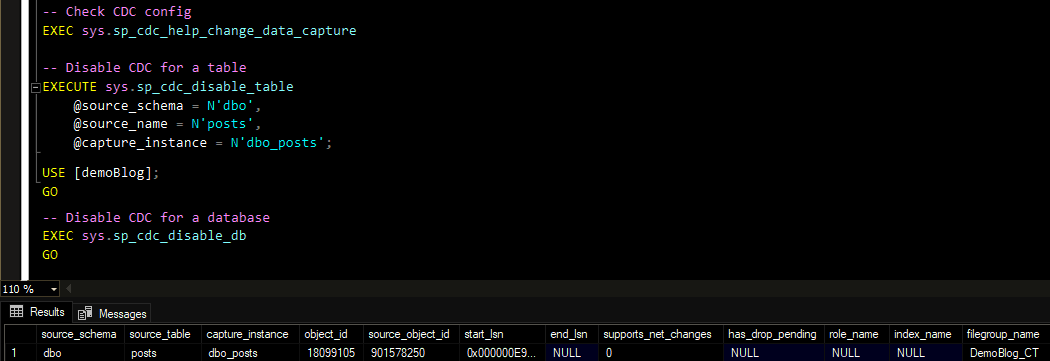
    To disable Change Data Capture on a table in SQL Server, we should first check for existing CDC configuration information by running sp_cdc_help_change_data_capture. Using this info we can populate the parameters for sp_cdc_disable_table, particularly the capture_instance name.

    USE [demoBlog];
    GO
    
    -- Check current CDC config
    EXEC sys.sp_cdc_help_change_data_capture 
    
    -- Disable CDC for a table
    EXECUTE sys.sp_cdc_disable_table
    	@source_schema = N'dbo',
    	@source_name = N'posts',
    	@capture_instance = N'dbo_posts'
    CDC Disable Table

    If you are removing CDC from all tables permanently, we can disable CDC on the database too.

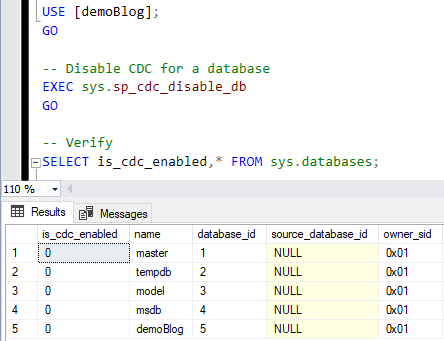
    Run sp_cdc_disable_db to disable CDC on a database in MS SQL as per the example below.

    USE [demoBlog];
    GO
    
    -- Disable CDC for a database
    EXEC sys.sp_cdc_disable_db
    GO
    
    -- Check if CDC is enabled on databases
    SELECT is_cdc_enabled,* FROM sys.databases;
    sp_cdc_disable_db

  • How to Enable CDC in SQL Server

    How to Enable CDC in SQL Server

    This is a post on how to enable Change Data Capture (CDC) in SQL Server. Enabling this on a database and table will allow the recording of activity when tables and rows have been modified. This is a feature available for us to configure within SQL Server and Azure SQL out of the box.

    CDC uses the SQL Agent to record inserts, updates and deletes that happen on a table. Enabling this might be useful to help give a business insight on changes to Personal Identifiable Information (PII) over time for GDPR requirements. Or, another example could be real-time tracking of orders for pricing updates to a product.

    For more examples and information on what CDC is, we can refer to MS Docs : What is change data capture (CDC)?

    If you are considering enabling this feature, as always we should test and read through the software documentation to ensure all potential impacts and limitations have been reviewed. Some main considerations on the systems side with this one include the additional disk space your CDC tables will need, and performance depending on the number of tables/changes happening.

    The demo below covers the following:
    # Enable CDC for a Database
    # Enable CDC for a Table

    Enable CDC for a Database

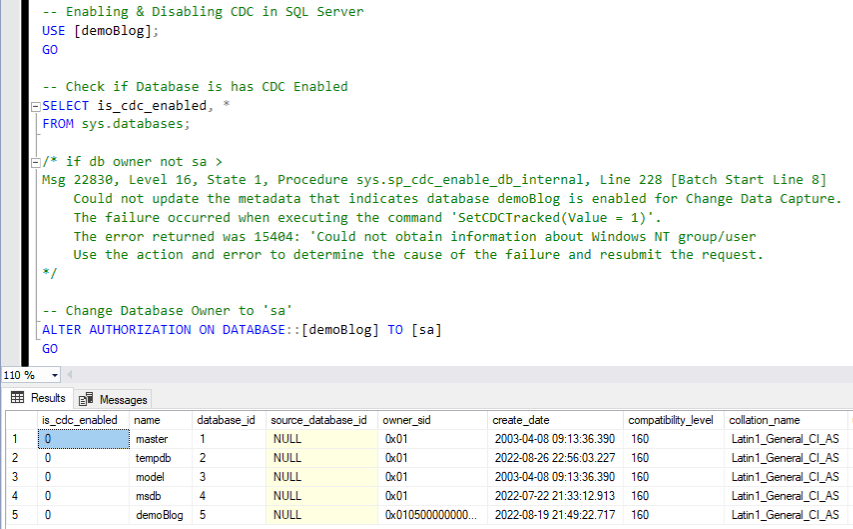
    Before enabling CDC on a database we want to first check if it’s already enabled, and also check if the database owner is set to something other than ‘sa’, else you’ll receive an error message when enabling.

    In the demo TSQL below we’re checking the sys.databases system table is_cdc_enabled column, and we have to change the DemoBlog database owner :

    -- Check if Database is has CDC Enabled
    SELECT is_cdc_enabled, *
    FROM sys.databases;
    
    -- (IF_REQUIRED) Change Database Owner to 'sa'
    -- Error if <> 'sa' = "Could not update the metadata that indicates database demoBlog is enabled for Change Data Capture"
    ALTER AUTHORIZATION ON DATABASE::[demoBlog] TO [sa]
    GO
    CDC Check if Enabled

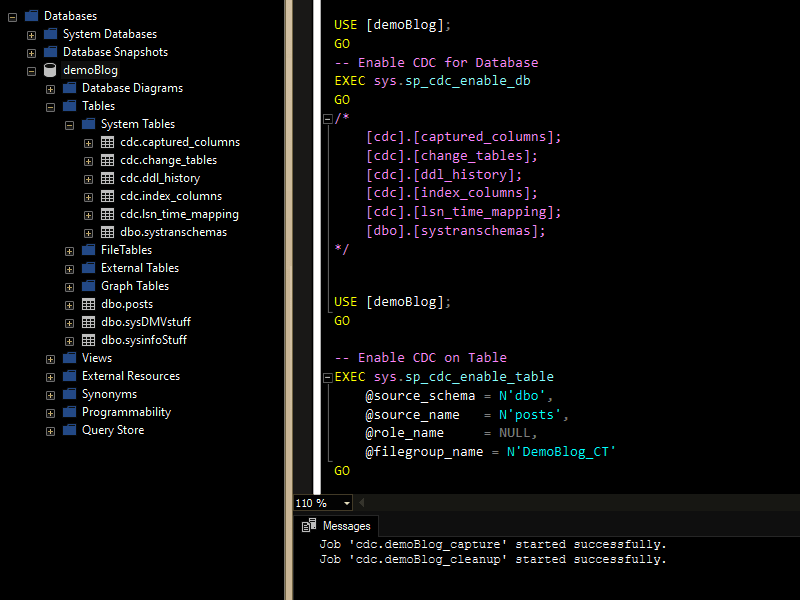
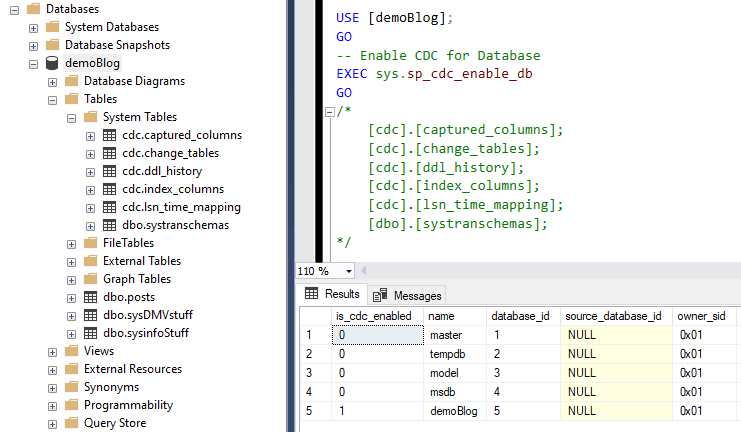
    Enabling CDC for a SQL Server database is done using the sys.sp_cdc_enable_db system stored procedure, as shown in this example :

    USE [demoBlog];
    GO
    -- Enable CDC for Database ms sql
    EXEC sys.sp_cdc_enable_db
    GO
    /* New system tables > 
    	[cdc].[captured_columns];
    	[cdc].[change_tables];
    	[cdc].[ddl_history];
    	[cdc].[index_columns];
    	[cdc].[lsn_time_mapping];
    	[dbo].[systranschemas];
    */
    Enable CDC

    We can see our new CDC system tables in the screenshot above, and I’ve re-run the sys.databases query to show the changes there too.

    Enable CDC for a Table

    I’ve just enabled CDC on this demo database, so I know there are no tables already enabled. We can check the is_tracked_by_cdc column in the sys.tables system table, similar to the check we did before enabling it on the database.

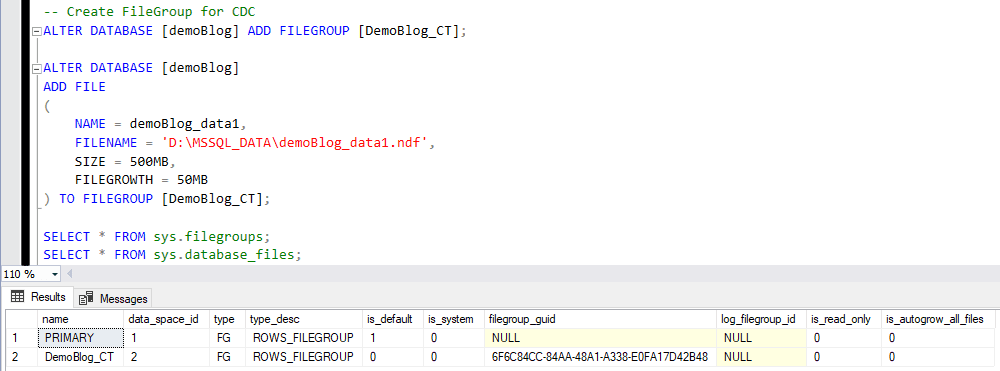
    To control the placement of change table data, we can create Filegroups ahead of enabling CDC on tables. Microsoft recommends we do this so that our change tables are separate from source tables.

    -- Create FileGroup for CDC
    ALTER DATABASE [demoBlog] ADD FILEGROUP [DemoBlog_CT];
    
    ALTER DATABASE [demoBlog]
    ADD FILE
    (
        NAME = demoBlog_data1,
        FILENAME = 'D:\MSSQL_DATA\demoBlog_data1.ndf',
        SIZE = 500MB,
        FILEGROWTH = 50MB
    ) TO FILEGROUP [DemoBlog_CT];
    
    SELECT * FROM sys.filegroups;
    SELECT * FROM sys.database_files;
    SQL Server Add FileGroup

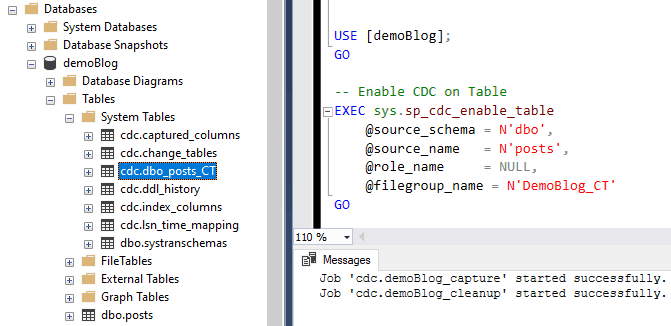
    We use sys.sp_cdc_enable_table to enable CDC on a table, as per the example below. When a table is enabled for CDC, a record will be logged in the transaction log for each DML operation applied to the table from this point onwards.

    USE [demoBlog];
    GO 
    
    -- Enable CDC on Table
    EXEC sys.sp_cdc_enable_table
    	@source_schema = N'dbo',
    	@source_name   = N'posts',
    	@role_name     = NULL,
    	@filegroup_name = N'DemoBlog_CT'
    GO
    -- Job 'cdc.demoBlog_capture' started successfully.
    -- Job 'cdc.demoBlog_cleanup' started successfully.
    CDC Enable Table

    Our new SQL Agent jobs for the CDC Collection are as per the screenshot below.

    Interesting note, “If both CDC and replication are enabled for a database, the log reader handles the population of the CDC change tables.” – Microsoft Docs

    CDC Agent Jobs

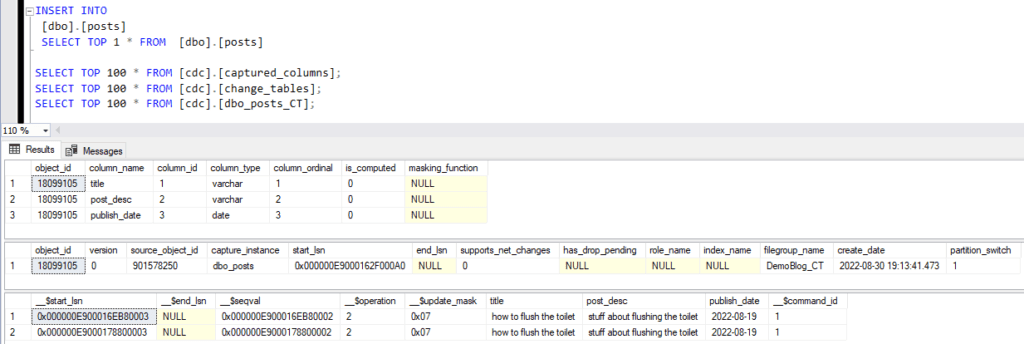
    For demo purposes, here is an example insert of a row into our table, and then a query of CDC data.

    Verify CDC is working

    My next post covers Disabling CDC, which may be useful if you receive errors along the way during testing.

  • How to Rename a Computer that Hosts SQL Server

    How to Rename a Computer that Hosts SQL Server

    When changing the hostname of a computer that is running SQL Server, we have to update system metadata so that remote connections and applications do not lose connectivity. The hostname system metadata is stored in sys.servers and reported by @@SERVERNAME.

    This post is a guide on how to update MS SQL metadata after a hostname change. This is often needed soon after a fresh SQL Server installation – you’ve installed SQL but then realise you need to change the Windows Server Computer Name.

    Considerations when changing a SQL Server hostname include:
    # Failover Clusters, the renaming process differs.
    # If Replication is configured on the host, I’d question why you are doing this.
    # If Mirroring, turn off Mirroring pre-change and then re-establish with new computer name. This could be high risk.
    # If the host is running SSRS, a configuration change may be required.
    # Hardcoded hostnames for all scripts/apps will have to be updated.

    This is all as described on Microsoft’s Documentation page. As always, give MS Docs a proper read and test your changes before performing in a Production environment. Hopefully, this is a new install and a single instance host you’re renaming.

    The demo below includes:
    # Change Windows Computer Name
    # Update MSSQL with the new Hostname
    # Verify Change

    Change Windows Computer Name

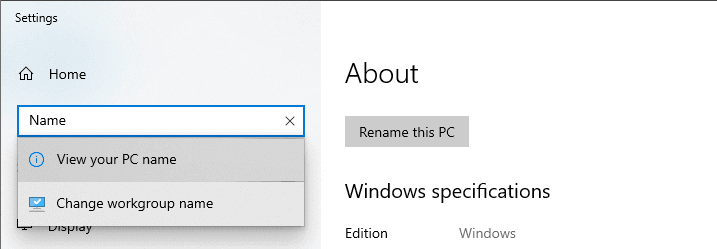
    To change the hostname of a Windows computer, we can do it via GUI or command (PowerShell).

    Rename Computer

    The PowerShell cmdlet for this is Rename-Computer, ensure you are running PowerShell as Administrator:

    PowerShell Rename-Computer

    A reboot is required post-change as per the warning on the terminal.

    See MS Docs as linked above for parameters required if you are connected to a Domain, or for an example of renaming remote hosts.

    Update MSSQL with the new Hostname

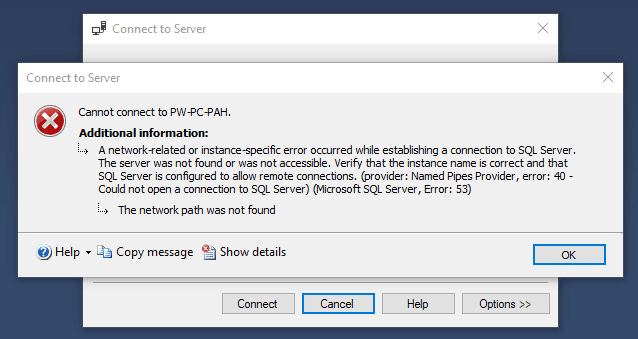
    Now that the computer has been renamed, when we try login into SQL Server via SSMS using the old hostname, the following error will appear:

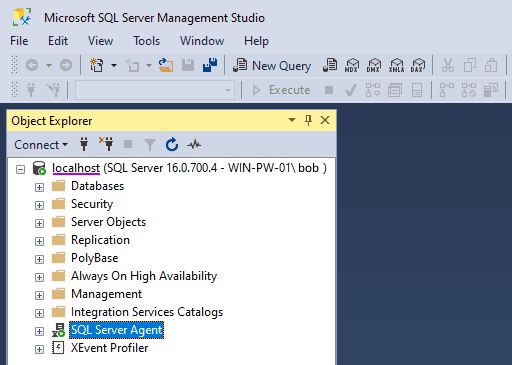
    We need to change the server name to ‘localhost‘ or the new server name for us to get connected.

    SSMS Localhost

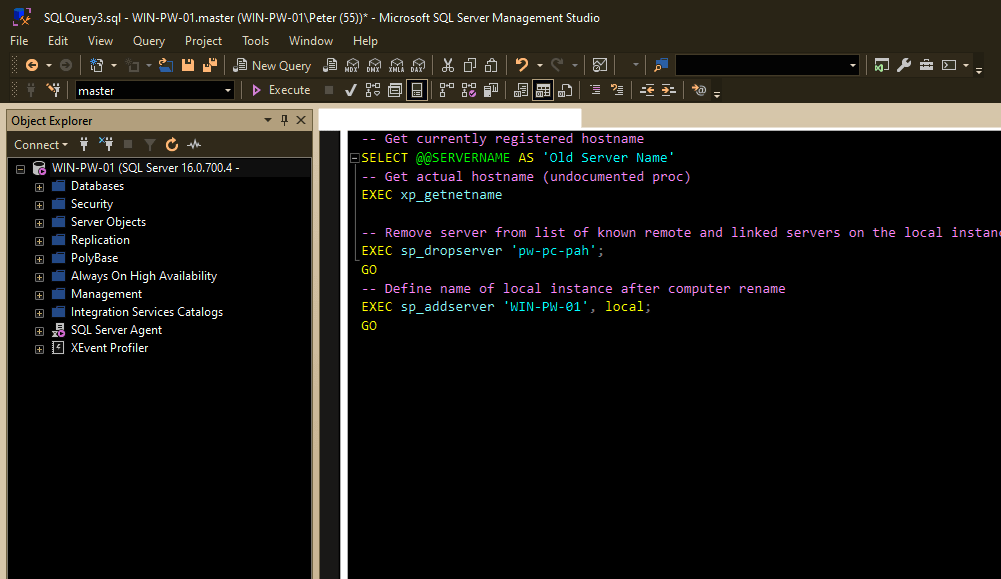
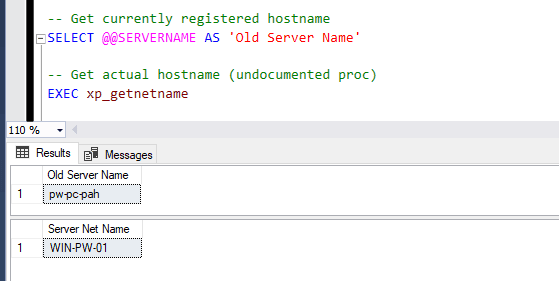
    Next, I’m going to run a new query to get the currently registered hostname and actual hostname.

    -- Get currently registered hostname 
    SELECT @@SERVERNAME AS 'Old Server Name' 
    
    -- Get actual hostname (undocumented proc)
    EXEC xp_getnetname
    Get Hostname SQL Server

    Next, drop the currently registered name (sp_dropserver) and then register the new hostname (sp_addserver).

    -- Remove server from list of known remote and linked servers on the local instance
    EXEC sp_dropserver 'pw-pc-pah';  
    GO
    
    -- Define name of local instance after computer rename
    EXEC sp_addserver 'WIN-PW-01', local;  
    GO
    SQL Server Rename Host Procedure

    For the change to be applied, we need to restart the SQL Server service.

    Verify Change in SQL Server

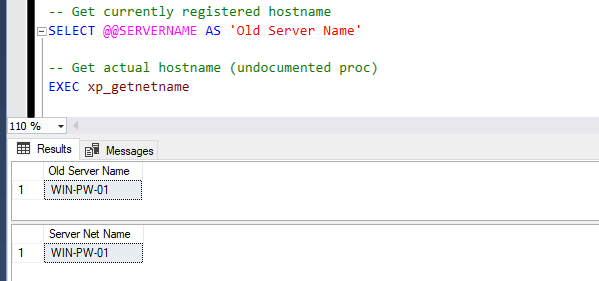
    Once the SQL Server Engine has been restarted, run the same command as before to return the currently registered hostname. It should display the new computer name:

    SQL Server Hostname Change

    Now you can verify any other apps or MSSQL features as per your test plan. Any existing connection strings will need to be updated with the new hostname if using it.

    I hope this all worked out for you if you followed along.

  • Get All Database Sizes in SQL Server

    Get All Database Sizes in SQL Server

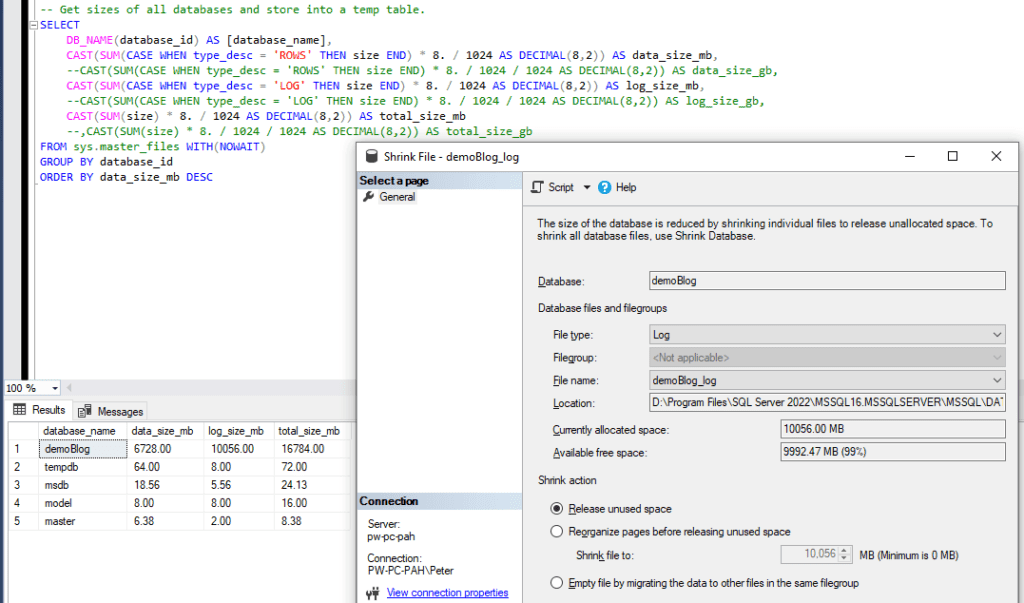
    Measuring databases is important for knowing how much disk space a SQL Server requires today, as well as the future growth of the database files. It takes more than one run of a script to know all your disk provisioning needs. The script below in this post helps give a quick look at the database sizes on a SQL Server instance.

    There are many ways to get this information, but personally, I have always preferred to run a script like this to get database sizes in SQL Server throughout my career. You’ll spend a lot of time querying sys.databases and be familiar enough with this as a DBA too.

    Script to Show Database Sizes in SQL Server

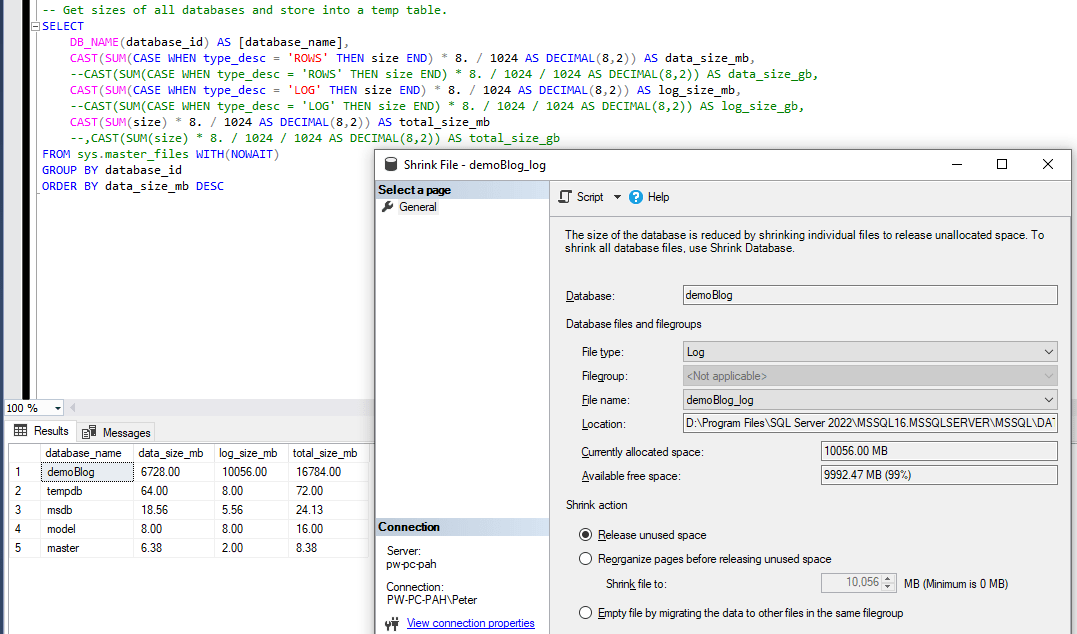
    The script below will return all databases sizes in SQL Server –

    Get Database Sizes SQL Server

    I often bring up the Shrink File window in SSMS to view the database and log file sizes from there, as shown in the screenshot above. If checking one database this is a good way.

    For more information on this MS SQL Database sizes, have a look at the Measuring Databases Tag.

  • How to Backup a SQL Server Database

    How to Backup a SQL Server Database

    This post contains a demo on how to backup a SQL Server Database and includes some information on the types of backups available in MS SQL.

    The 3 types of backups that will be covered in this post are:
    # MS SQL Full Backup
    # MS SQL Transaction Log Backup
    # MS SQL Differential Backup

    Before backing up a database, you should verify the disk the backup is going to has enough space to hold the backup. You may also want to check when your databases were last backed up, to ensure running a backup is necessary at this time, or for general review.

    There’s a lot to understand with backups in SQL Server. Always refer to MS Docs when performing a change to a Production environment. This is just demo & information sharing.

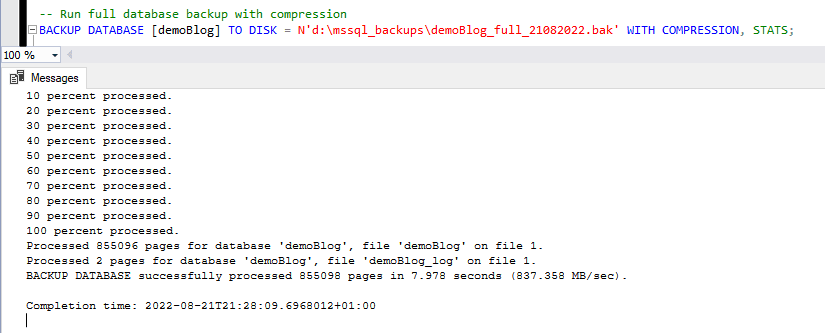
    MS SQL Full Backup

    A Full Database Backup is a backup that will contain the whole database, all of the data included until the point in time the backup was taken. This is our main Restore Point.

    By running the command below, we are able to run a Full Backup of the database, with compression.

    Amend the database name in [square-brackets] and location/name on disk in ‘quotes’ –

    -- Run full database backup with compression
    BACKUP DATABASE [demoBlog] TO DISK = N'd:\D:\mssql_backups\demoBlog_full_01082022_1300.bak' WITH COMPRESSION, STATS;
    SQL Server Database Backup

    Backing up a database can sometimes take a very long time. It depends on various factors why a backup takes longer, but one common factor is, that the bigger your database gets, the longer it will take to backup & restore.

    I’ve seen a Full Backup in a Production environment take more than a day to complete (multi-terabyte). This is why a script to check estimated backup & restore time comes in useful for a DBA.

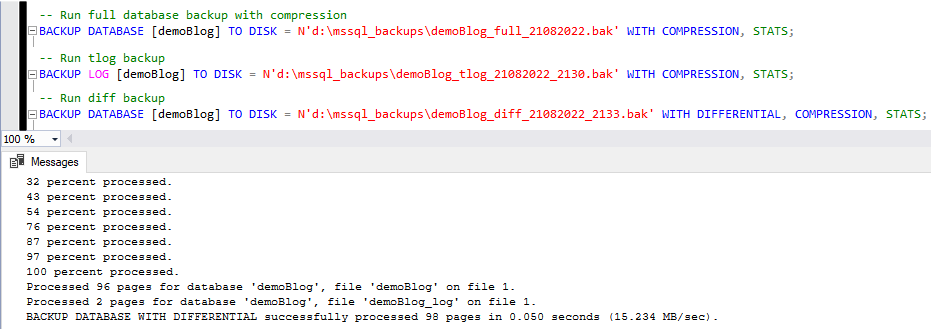
    MS SQL Transaction Log Backup

    Transaction Log Backups in SQL Server help log & store transactions that are made in your database which can then be used to bring databases back online to a point in time, in a disaster scenario.

    When running the command below we want to have an associated Full Backup that chains to this Transaction Log Backup. That means, having a Full Backup you performed, and your LSN chain hasn’t been broken by a manual Full Backup without including the Copy_Only parameter.

    To run a Transaction Log Backup –

    -- Run tlog backup 
    -- (amend database name & location/file on disk)
    BACKUP LOG [demoBlog] TO DISK = N'd:\mssql_backups\demoBlog_tlog_21082022_2130.bak' WITH COMPRESSION, STATS;
    SQL Transaction Log Backup

    Using the above Transaction Log backup, we can restore data that happened after the last Full Backup up until the point in time this Transaction Log backup was initiated.

    The reasoning behind using Transaction Log backups generally comes down to your business’s desire to ensure High Availability in your SQL Server environment. If you don’t need a recent restore point and can live with (e.g.) daily Full Backups, Transaction Logs are not for you.

    MS SQL Differential Backup

    Differential Backups capture only the data that changes since the last Full Backup has run. A Full backup can be considered the base of a Diff Backup (except for Copy_Only backups).

    The Differential Backup is one I see rarely in Production environments. A major benefit of Diffs is that they are quick to run. The size of a Diff Backup depends on the volume of data that has changed since its last rebase (last Full Backup).

    In the example below I’m running a simple Differential Backup of my demoBlog Database –

    -- Run diff backup
    BACKUP DATABASE [demoBlog] TO DISK = N'd:\mssql_backups\demoBlog_diff_21082022_2133.bak' WITH DIFFERENTIAL, COMPRESSION, STATS;
    SQL Differential Backup

    That’s us done, a quick review of the main types of database backup in SQL Server. For backup tips, check out the Database Backups tag.

  • Get Estimated Backup Restore Time in SQL Server

    Get Estimated Backup Restore Time in SQL Server

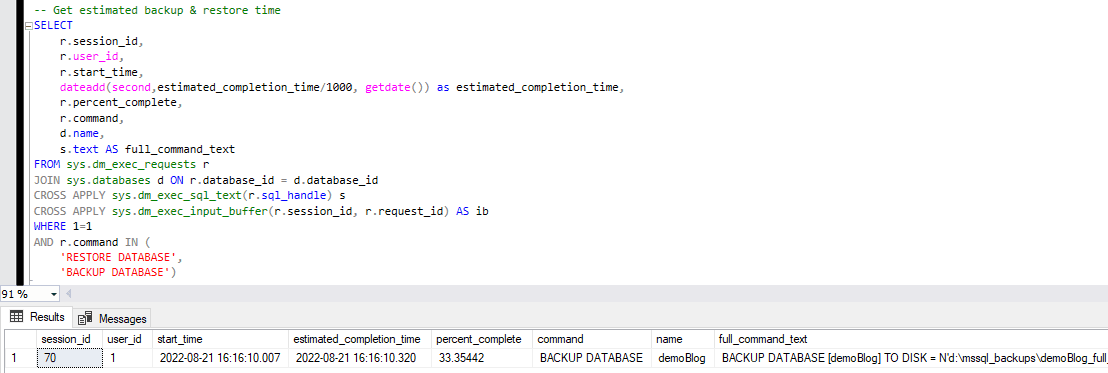
    This post contains a SQL script to get estimated completion times and process information for your currently running database backups & restores in SQL Server.

    Backing up a database can often take a very long time. It depends on various factors why a backup can take longer to complete. One more obvious reason is, that the bigger your database gets, the longer it will take to backup & restore.

    Other backup performance considerations include whether your server is busy with transactions/queries, or you may be running on old hardware, and I’ve seen having fragmented heaps cause extended backup runtimes too.

    Get Estimated Database Backup or Restore Time MSSQL

    When you’re waiting on a database backup or restore to complete in SQL Server, we can run the script below to get an estimated time of how long the backup has left to go –

    SQL Estimated Database Restore Time

    We have one 5GB database here currently being backed up at the time of executing the DMV script. The backup progress is at 27% and is due to complete 1 minute after the backup was initiated.

    This script will also be useful for getting the full command of the currently running SQL process on your SQL Server Instance, by removing the filter (WHERE Clause) on the query.

  • Drop Table if Exists in SQL Server

    Drop Table if Exists in SQL Server

    The DROP TABLE command in SQL Server will do as it suggests and drops a table. This post is to show an example of using this command, including the IF EXISTS argument.

    DROP TABLE IF EXISTS in MS SQL allows us to conditionally drop the table, meaning it does not cause an error if the database does not exist.

    DROP TABLE IF EXISTS works on SQL Server 2016 and above.
    For more information on this, as ever you should check out the Microsoft Documentation on anything and everything you do on their products.

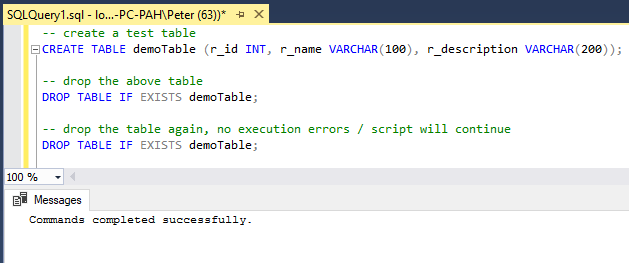
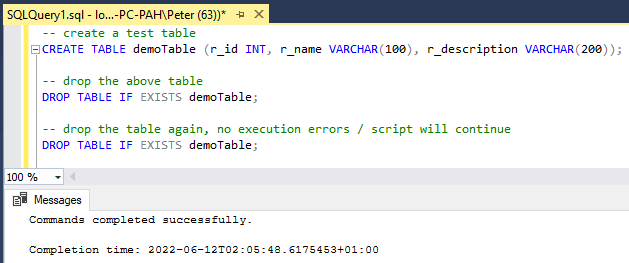
    In the following example, I’m creating a new table followed by running the DROP TABLE IF EXISTS command. I run the DROP statement twice to show & explain the execution error part.

    # create a test table ms sql
    CREATE TABLE demoTable (r_id INT, r_name VARCHAR(100), r_description VARCHAR(200));
    
    # drop the above table
    DROP TABLE IF EXISTS T1;
    
    # drop the table again, no execution errors / script will continue
    DROP TABLE IF EXISTS T1;
    Drop Table if Exist MS SQL

    You can also get information from system tables to verify if a SQL Object exists or not. For example, having an IF statement based on a sys.tables query to check if the table exists, before running the create table statement.