
-
How to Silently Install SSMS
This is a note on how to silently install SQL Server Management Studio (SSMS) via command (PowerShell).
SSMS is a tool most people use when working with SQL Server. If you need to install SSMS on multiple computers, you may want to use the silent installation feature for automating the process.
This ‘silent‘ installation allows you to install SSMS without any user interaction, making it quick and easy to deploy on multiple computers. In this demo, we are using the /quiet Command-Line Option.
Installing SSMS Silently
To install SSMS silently, you will need a copy of the SSMS installation files which can be downloaded here.
Once you have a copy of the latest SSMS version:
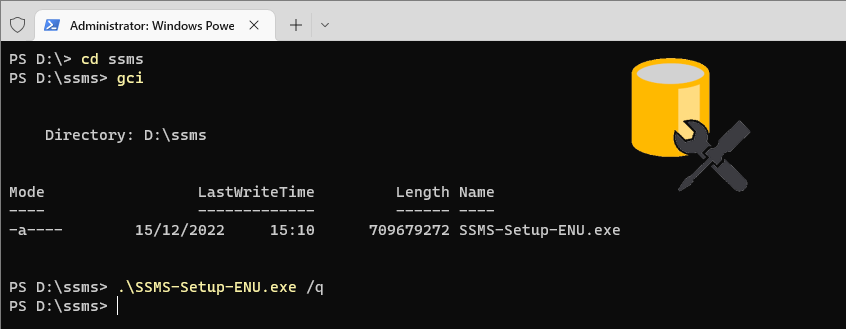
1. Open your PowerShell terminal as Admin.
2. Navigate to the directory you have placed the SSMS install media.
3. Type in the SSMS.exe filename and add in the /q parameter, as shown below.# Navigate to directory with ssms download cd ssms gci # Install SSMS (silently) .\SSMS-Setup-ENU.exe /q
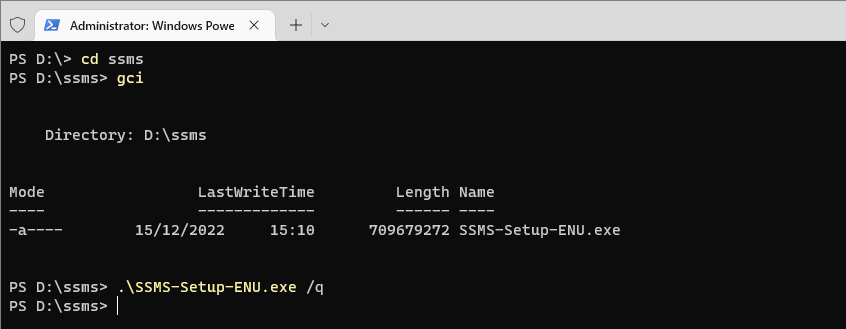
Using the /q parameter means that SSMS can install in the background and your command prompt will return to a command-ready state when the installation has been completed.
Hope this helps! Feel free to check out my other post, Download & Install SSMS which includes added tips!
-

How to Increase Maximum Characters Displayed in SSMS
In this post I’m showing you how to increase the maximum characters displayed in SQL Server Management Studio (SSMS).
By default, the max number of characters displayed in a single column of a query in SSMS when outputting as text is 256 characters. This means sometimes if we run a specific procedure or query, the output will be truncated and we won’t get the full output.
Topics covered:
– Changing Query Output to Results to Text
– Increasing SSMS Maximum Characters for Results To TextChanging Query Output to Results to Text
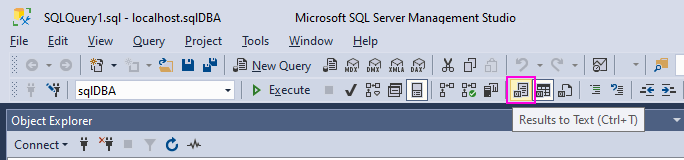
We can amend our query outputs in SSMS to Results to Text, rather than the default grid layout. Sometimes this is useful, particularly if we want to copy the text output to somewhere else.
Changing to Results to Text can be done by clicking the top bar menu button as shown in the screenshot below:
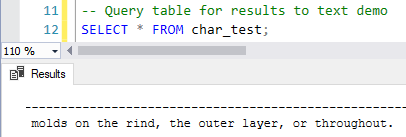
If using text output rather than grid, you may encounter issues with truncated query outputs if a column contains more than 256 chars. The screenshot below shows an example of this, displaying 256 out of 550 characters in the column contents:
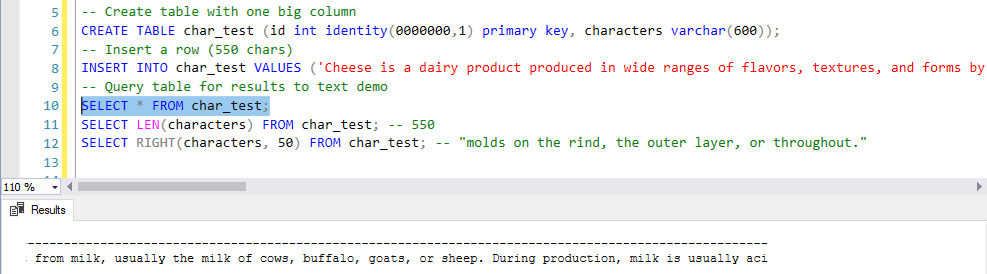
The steps below in this post will help for fixing this issue if you encounter it, by increasing the characters allowed for output.
Increasing SSMS Maximum Characters for Results To Text
To increase your SSMS Maximum Characters for Results to Text, follow these steps.
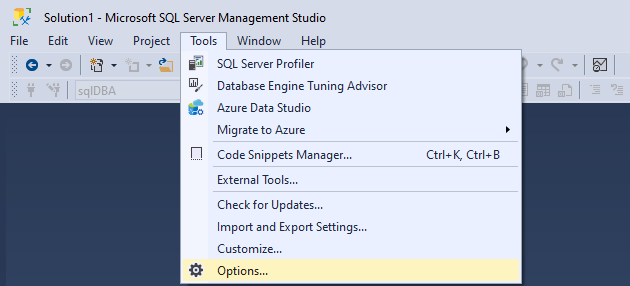
1. Click Tools at the top menu bar and select Options.
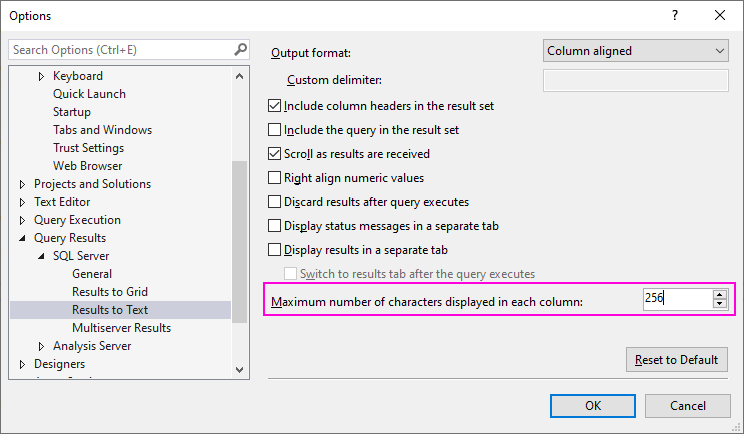
2. Navigate to Query Results > SQL Server > Results to Text.
3. Open a new query Window and re-run your query or procedure.
This should be all go for you now!
There’s one particular example that comes to mind for when I need to enable this. It’s for when I need to run
sp_scriptdynamicupdprocwhich generates a script to run to change the way Replication works for a specific table/article. The output script for this SP always needs much more than the default character output for SSMS. -
How to Delete Files in PowerShell
This is a post on how to delete files in PowerShell, which will be useful when you need to delete files as part of a script in Windows.
This post covers the following:
> PowerShell: Delete a File
> PowerShell: Delete a Folder
> PowerShell: Delete Files in Subfolders RecursivelyPowerShell: Delete a File
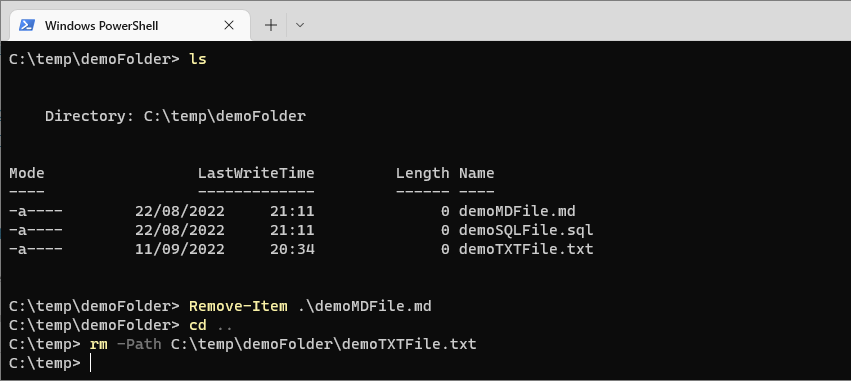
Remove-Itemis the cmdlet to remove a directory or file in PowerShell. We can delete files within the current directory, or add the path parameter.I’m showing some syntax variations below. If you are passing a directory with spaces in the name then you will have to add quotes to the path.
# Delete file in current directory
Remove-Item -Name testFile.txt

# Delete file in specified directory
rm -Path C:\temp\demoFolder\testFile.txt

# Delete all files in specified directory with .tmp file extension
rm "C:\temp\*.tmp"
PowerShell: Delete a Folder
We do not need to change any parameters to delete a file, just run the same command as above. The consideration when deleting folders is the files within them.
The following demo script first deletes a folder within the current directory, and the second part checks if folders exist before deleting them.
# Delete a folder in current directory
rm .\demoFolder\

# Delete folder if exists, force delete all files in folder
# Does not delete files in sub-directories
$path = "c:\temp\demoFolder"
If((Test-Path $path) ){
    rm $path -Force -Recurse
}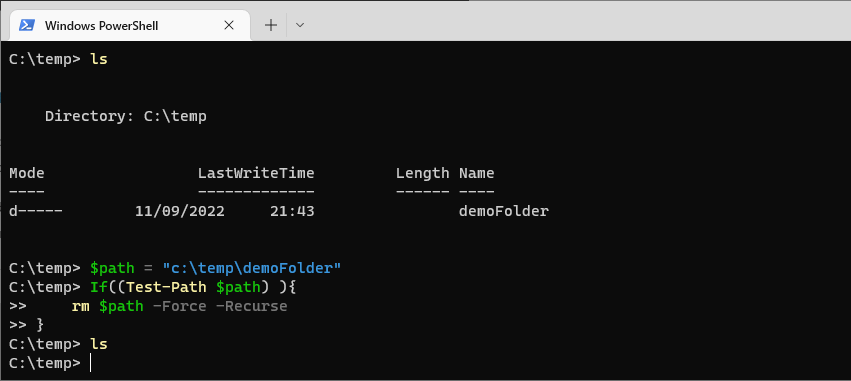
PowerShell: Delete Files in Subfolders Recursively
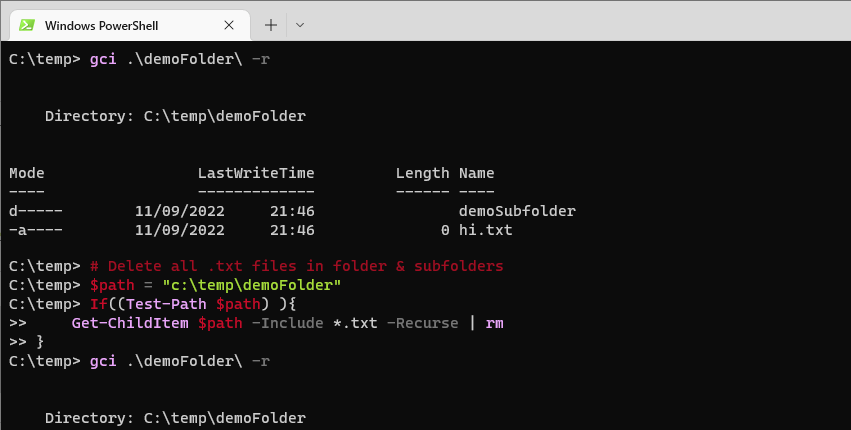
For when you need to delete files in a folder and subfolders, the script below should help. Amend path and file type wildcard as needed.
# Delete all .txt files in folder & subfolders
$path = "c:\temp\demoFolder"
If((Test-Path $path) ){
    Get-ChildItem $path -Include *.txt -Recurse | rm
}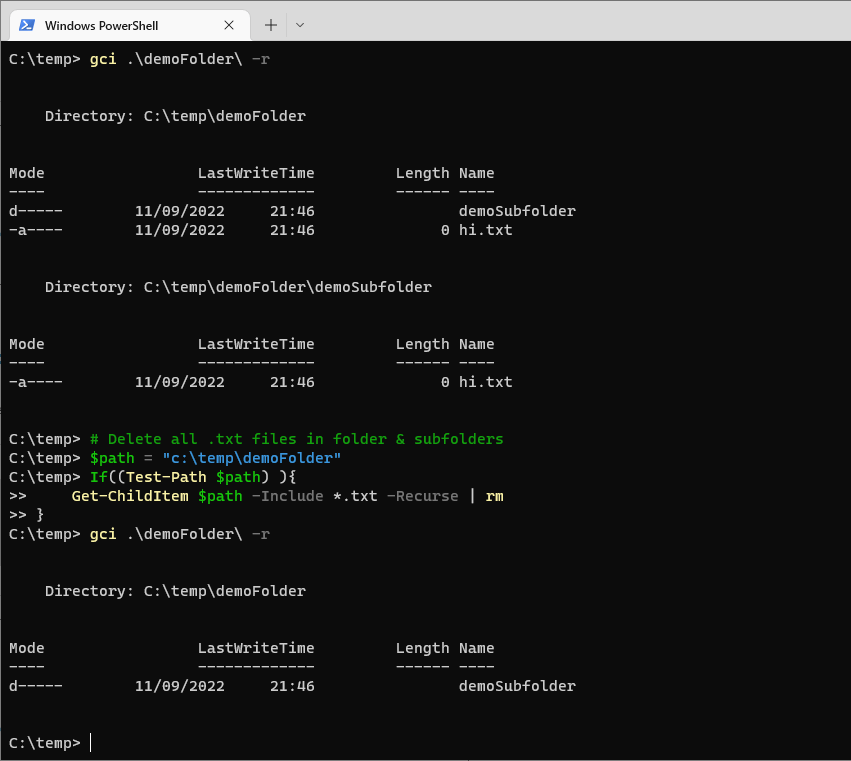
Last additional note on this, I haven’t used
gciwithin any of the PowerShell scripts above in this post. It’s an Alias of Get-ChildItem. -
How to Add Columns to Tables in SQL Server
This post contains a guide on how to add columns to tables in SQL Server, with tips and links to Microsoft Documentation along the way.
As a SQL Server DBA, adding new columns to tables is a routine and simple task, often driven by evolving business requirements or application enhancements. However, when working with larger tables, replication and/or default values, special care is required to manage (potential) performance impacts and maintain system stability.
🗎 Read this before starting (Microsoft Docs)
1. How to Add Columns to a Table
2. Considerations for Schema Changes
3. How to Replicate Schema Changes
1. How to Add a New Column to a Table
To add a column to a table in SQL Server, use the
ALTER TABLEstatement. Here’s a simple example of adding aVARCHARcolumn that allowsNULLvalues:-- Add column to table mssql ALTER TABLE sqlBlog ADD tag VARCHAR(60);
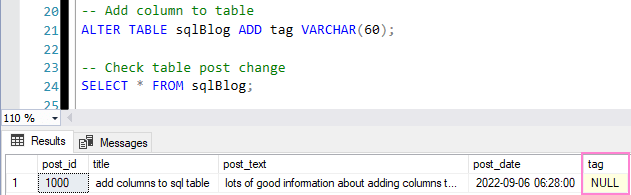
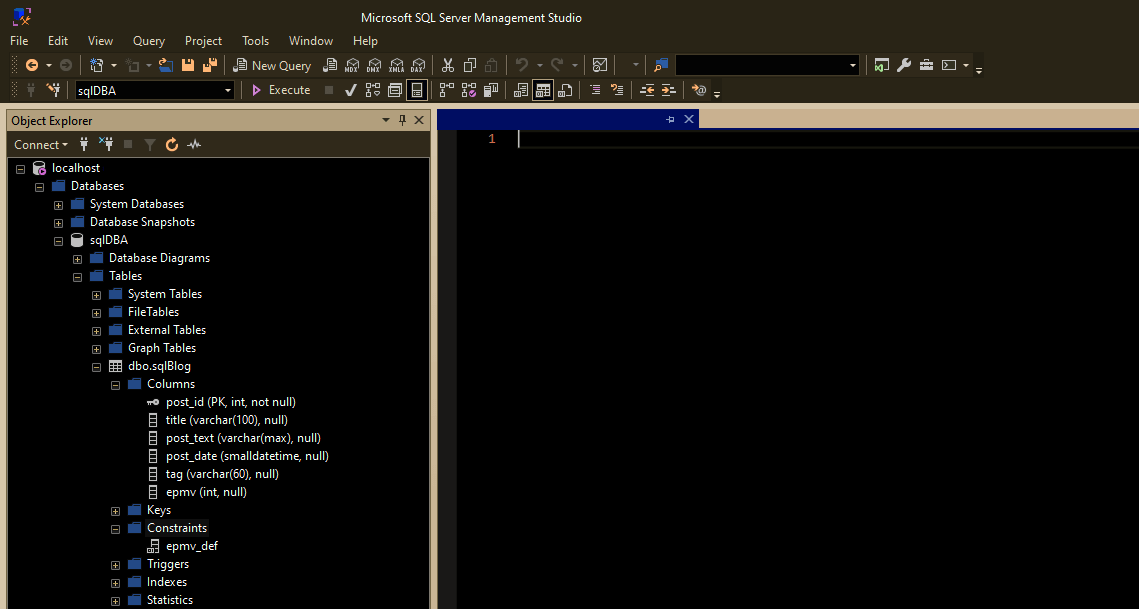
After execution, confirm the new column by querying the
sys.columnssystem table. If we use this rather than running aSELECT Top 1on the table we can avoid querying sensitive data.2. Adding Columns to Tables with Default Values
Adding a column with a default value requires additional planning. SQL Server applies the default to all existing rows, which can trigger updates that affect performance and replication latency.
Here’s an example of adding a column with a default
INTvalue:-- Add column to table with default value -- CONSTRAINT = Optional constraint name ALTER TABLE sqlBlog ADD epmv INT CONSTRAINT epmv_def DEFAULT 12345 WITH VALUES;
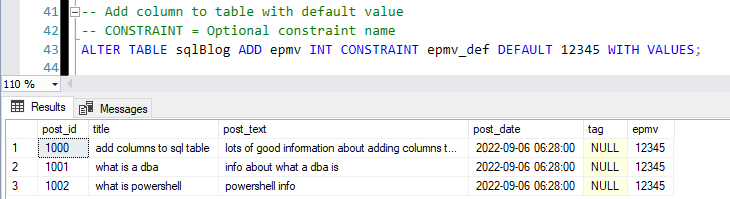
Explanation:
–CONSTRAINT: Specifies an optional name (epmv_def) for the default constraint.
–WITH VALUES: Applies the default value (12345) to all existing rows immediately after adding the column.3. Tips for Dealing with Business Critical Tables
Consider the following when adding columns to tables that are critical to application functionality:
1. Check for Exclusive Locks
Changes to tables that are frequently being locked can cause the add column update to take a long time, or never complete. We can check for exclusive locks for a database in SQL Server using the script provided in my other blog post.2. Managing Large Tables & Default Values
Adding columns with default values to large tables can lead to prolonged updates and transaction log growth. We can update values separately and not include it in the add column statement.3. Monitor Replication Latency
In replication setups, schema changes automatically propagate to subscribers. Monitor latency closely using Replication Monitor or a custom script to keep track of delays at the distributor and subscribers.4. Schedule Maintenance Windows
Communicate downtime and perform the operation during off-peak hours to minimize user impact. -

How to Create a New Firewall Rule with PowerShell
In this bog post I’m sharing a guide on how to create a new Firewall Rule with PowerShell. We’ll create a new inbound rule using a PowerShell script for the local Windows Firewall, to allow SQL Server (port 1433).
Script to Create a New Firewall Rule for SQL Server
The PowerShell script below creates a new inbound rule on the local server which allows port 1433 (default Microsoft SQL Server port). It ensures that only devices from a specific subnet (e.g., 10.19.24.0/24) can access SQL Server.
Before running the script, make sure to open PowerShell as Administrator, otherwise the script won’t execute.
# Define the allowed IP range (Modify as needed)
$AllowedIPRange = "10.19.24.0/24"

# Check if the rule already exists; if not, create it
if (-not (Get-NetFirewallRule -DisplayName "Allow Inbound SQL (1433)" -ErrorAction SilentlyContinue)) {
    New-NetFirewallRule `
        -DisplayName "Allow Inbound SQL - 1433" `
        -Direction Inbound `
        -Protocol TCP `
        -LocalPort 1433 `
        -Action Allow `
        -RemoteAddress $AllowedIPRange
}
This script is checking if the Firewall Rule already exists before creating it.
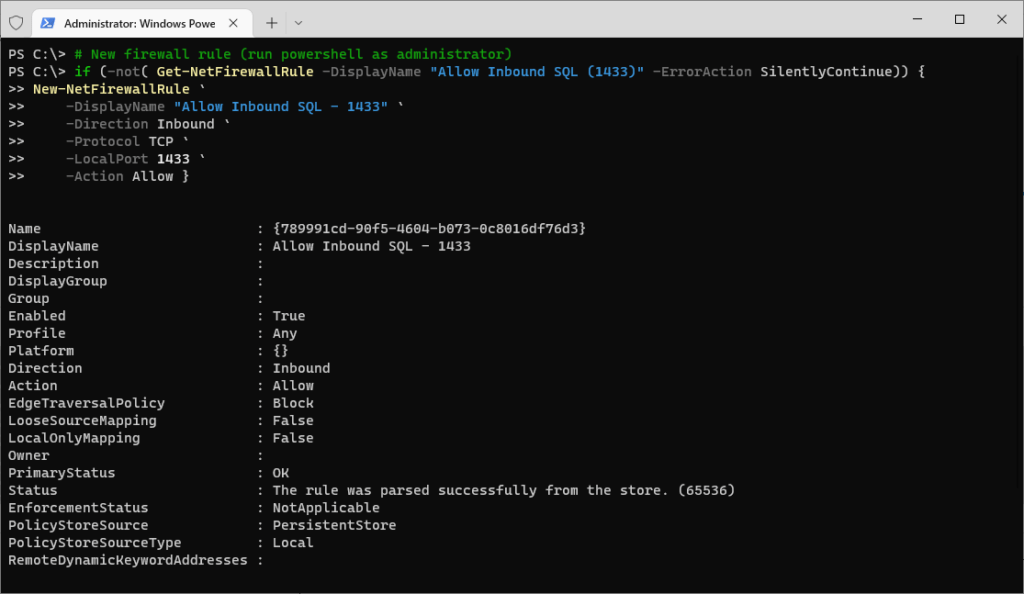
For better security, always restrict firewall rules to trusted IP ranges instead of allowing all inbound traffic. The screenshot shows allowing all IPs on 1433, if troubleshooting an issue you could temporarily disable the Windows Firewall and quickly perform your connection test.
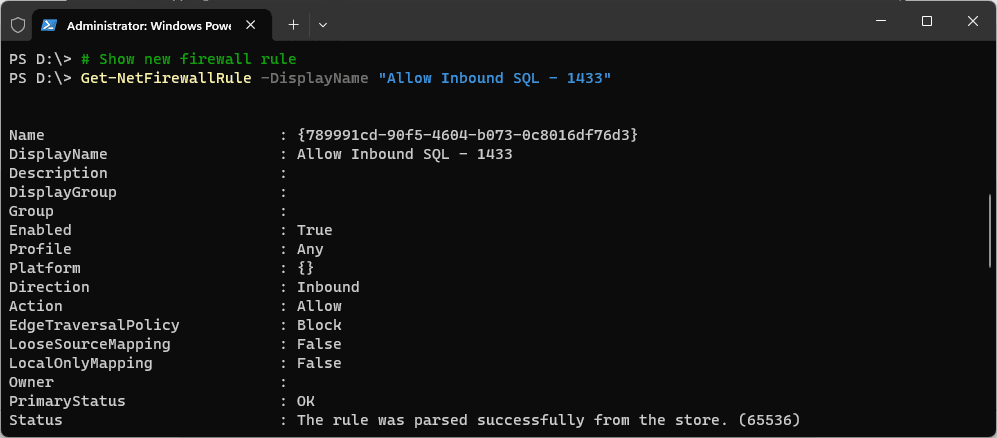
To view your newly created Firewall rule, we can use the Get-NetFirewallRule cmdlet:
Relevant MS Docs:
–New-NetFirewallRule
–Set-NetFirewallRule
–Remove-NetFirewallRuleI seem to write about the Windows Firewall often enough for it to have a blog tag on here. Feel free to check out my other Firewall related posts for more info as linked!
One other thing to add to this is, if you’re working within a Corporate environment, you might need to ask network teams to open up network flow between servers. For more information on this, checkout my other blog post: How to Test Connectivity to Remote Server Ports with PowerShell
