Tag: PowerShell Tips

  • How to Disable Windows Firewall with PowerShell

    How to Disable Windows Firewall with PowerShell

    This post contains a demo on how to disable Windows Firewall with PowerShell on a Windows computer.

    Disabling the Local Firewall on Windows is not a recommended move, and it will ultimately make your computer less secure. Sometimes it’s necessary though, for example, during troubleshooting a difficult issue you might want to disable it for a quick test to rule the FW out as being the root cause. But in this example, you will have already tried to ensure the Firewall Rule exists before turning it off completely.

    Anyway, disabling Windows Firewall with PowerShell can be done by going through the following steps:

    # Understanding Firewall Profiles in Windows
    # Get Status of Windows Firewall with PowerShell
    # Disable Windows Firewall with PowerShell

    Understanding Firewall Profiles in Windows

    Before running any command or script on your machine, it’s important for us to understand everything that it’s doing. In the command below we are disabling all 3 profiles:

    # Domain – For when you are connected to a Domain Controller (computer connected to AD).
    # Private – For your home or private networks.
    # Public – For public WIFI locations such as coffee shops etc.

    For more information on this, see this link – Microsoft Docs: Windows Firewall Profiles

    Also remember, all of this can be viewed and changed via GUI to help with understandings >
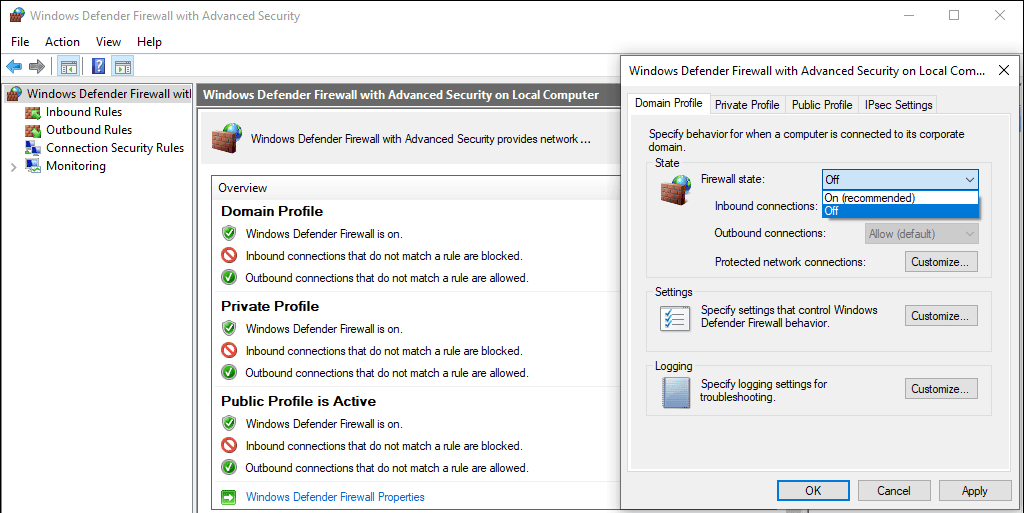
    Disable Windows Firewall via GUI

    Get Status of Windows Firewall with PowerShell

    PowerShell commands follow standards and use verb-noun pairs for cmdlets. The verb at the start of the command describes the action the cmdlet performs, and the noun part is the action being performed. Here’s a list of Common Verbs, another Microsoft Docs link. The place of truth as I call it.

    In this demo, we’re running Get-NetFirewallProfile with Format-Table
    We’re getting the Firewall Profile status, and also formatting it into a table after a pipe ‘|’ –

    # get local firewall status
    Get-NetFirewallProfile | Format-Table Name, Enabled
    Get-NetFirewallProfile

    Disable Windows Firewall with PowerShell

    We’re switching the cmdlet we ran above from Get to Set here (following on from verb-noun cmdlet descriptions).

    To be able to run this; we have to open PowerShell or Windows Terminal as Administrator.

    Set-NetFirewallProfile is being executed below, which disables all Profiles of the Local Windows Firewall –

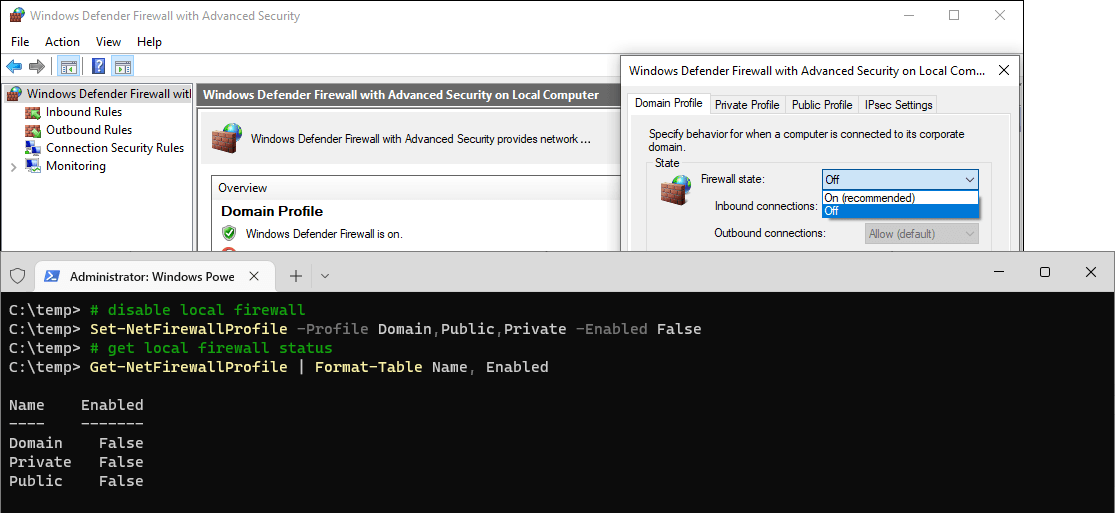
    # disable local firewall ps1
    Set-NetFirewallProfile -Profile Domain,Public,Private -Enabled False
    
    # get local firewall status ps1
    Get-NetFirewallProfile | Format-Table Name, Enabled
    Set-NetFirewallProfile

    I followed the change by another run of Get-NetFirewallProfile to verify the change.

    If this is a temporary change for you, to re-enable the Windows Firewall, amend the ‘-Enabled False‘ statement to ‘-Enabled True‘.

  • PowerShell Create Folder If Not Exists

    PowerShell Create Folder If Not Exists

    In this post, I share a script that will help you create folders and sub-folders with PowerShell if they do not already exist. We use Test-Path in our PS scripts to check if objects exist before executing the create command.

    This is one small part of a more detailed blog post I have on creating files and folders using PowerShell. My other post, How to Create New Files & Folders in PowerShell also covers more details on the differences between creating files vs creating folders.

    Create New Folder (if not exists) in PowerShell

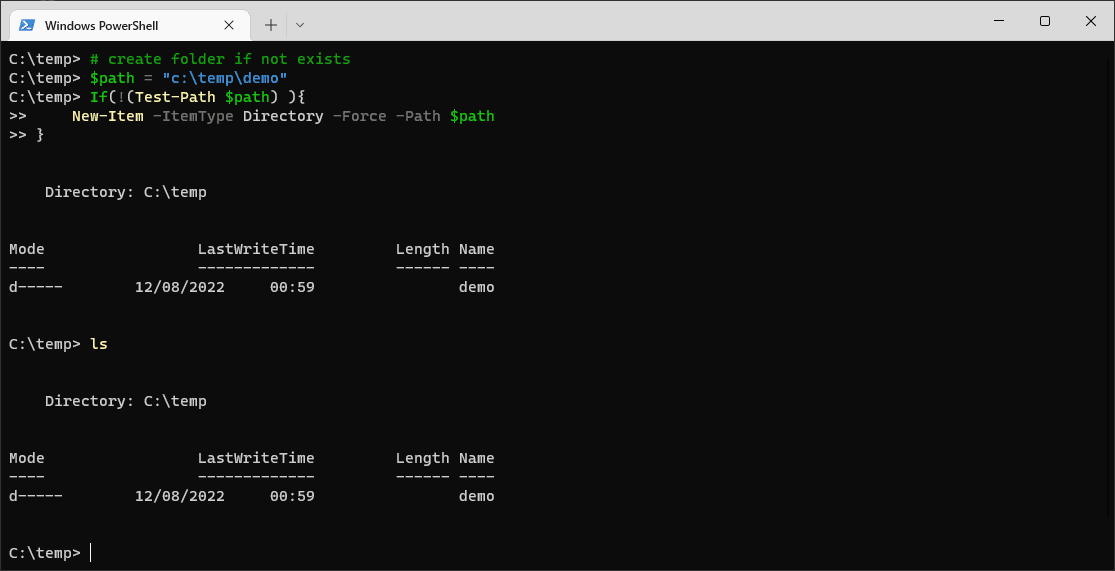
    We’re creating a new folder, only if it doesn’t already exist – “C:\temp\demo”

    The create folder command is New-Item, which runs conditionally depending on the Test-Path true/false result. When we run this script it also creates your C:\temp directory if it doesn’t already exist.

    # create folder if not exists .ps1
    $path = "c:\temp\demo"
    If(!(Test-Path $path) ){
        New-Item -ItemType Directory -Force -Path $path
    }

  • Delete Files Older Than in PowerShell

    Here is an example of how to use PowerShell to delete files older than a specified date:

    # Set the path to the folder containing the files you want to delete
    $folder = "C:\myfolder"
    
    # Set the maximum age of the files in days
    $maxAge = 30
    
    # Get the current date and subtract the maximum age to get the cutoff date
    $cutoffDate = (Get-Date).AddDays(-$maxAge)
    
    # Get all the files in the folder that are older than the cutoff date
    $files = Get-ChildItem $folder | Where-Object { $_.LastWriteTime -lt $cutoffDate }
    
    # Delete the files
    $files | Remove-Item
    

    This script will delete all files in the specified folder that have the last write time older than 30 days from the current date. You can adjust the $maxAge and $folder variables to customize the behaviour of the script.

    Note that this script does not move the deleted files to the recycle bin, so be careful when using it to avoid accidentally deleting important files. It’s always a good idea to test the script on a small, non-critical folder before running it on a larger folder or system.

  • Get-Command in PowerShell

    Get-Command in PowerShell

    Get-Command is a cmdlet in PowerShell that allows us to retrieve a list of commands that are available to use in the current session. This cmdlet is useful for discovering new commands and learning more about their usage & capabilities.

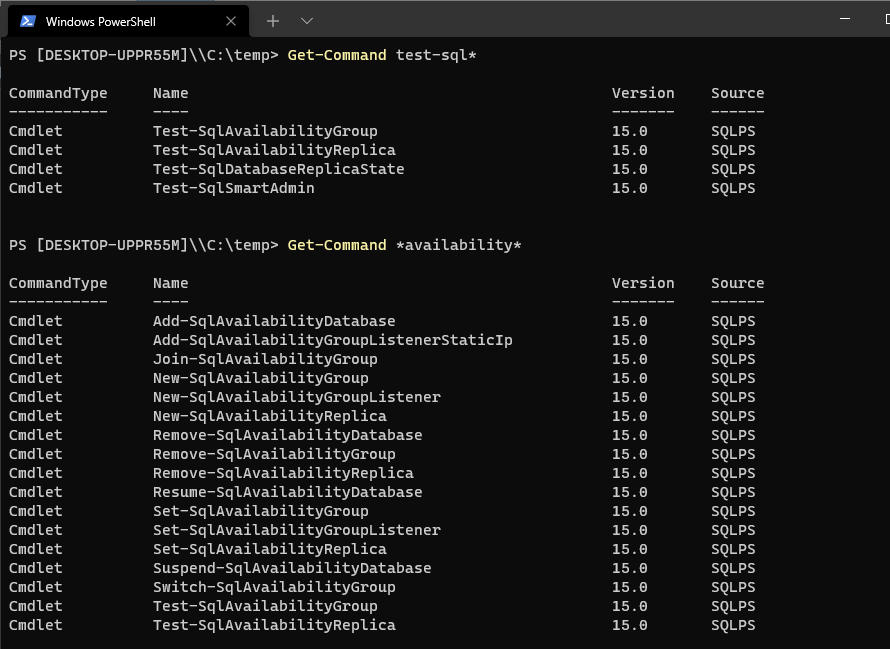
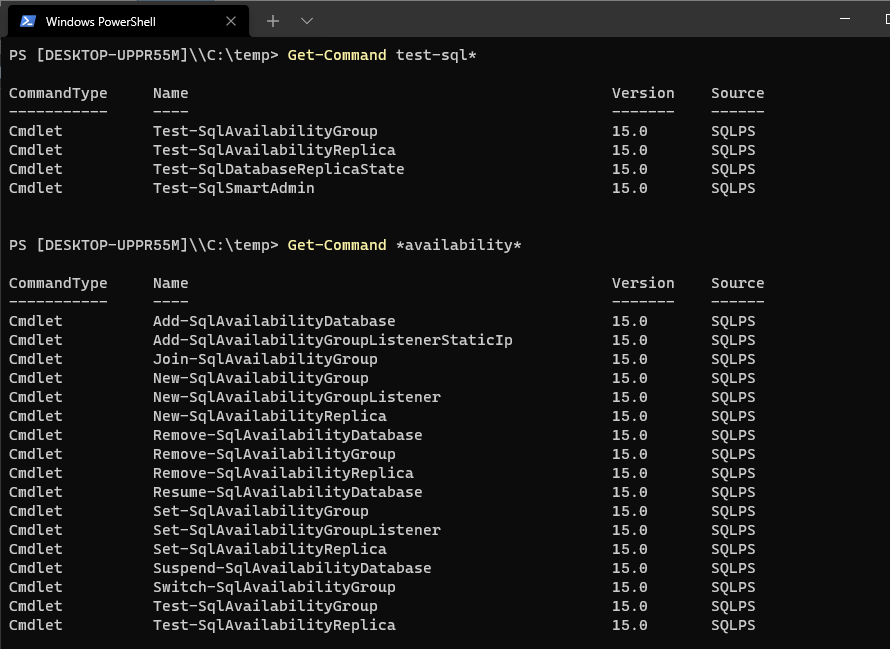
    We can query commands using wildcards as displayed in this example:

    # get-command, better use wildcards *
    Get-Command test-sql*
    PowerShell Get Command Wildcard

    We can list commands that belong to a specific PowerShell module, or that have a specific verb or noun in their name. For example, run Get-Command Test-* to retrieve all PowerShell cmdlets with the ‘Test’ prefix.

    If you found this tip useful, you may be interested in checking out my other PowerShell Tips. I regularly publish new content on my blog, including helpful tips and tricks for working with PowerShell.

  • Create Folder If Not Exists in PowerShell

    Create Folder If Not Exists in PowerShell

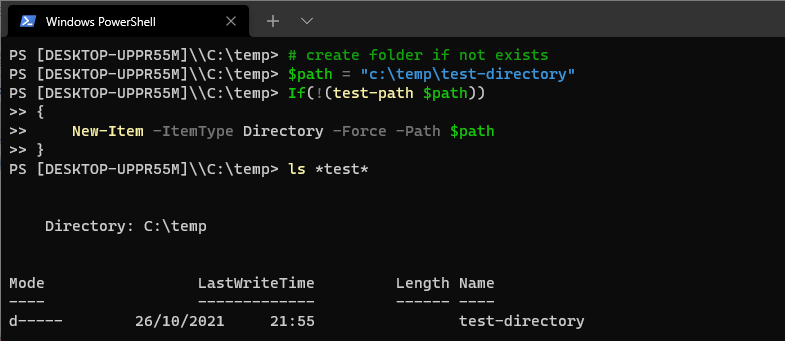
    The PowerShell script included in this blog post checks if a specific folder exists and then creates it if it does not already exist.

    It does this by using the Test-Path command to check for the existence of the folder and the New-Item command to create it if it doesn’t exist. The script can be modified to check for and create any desired folder by changing the specified path.

    The following is included in this PowerShell demo:
    Using Test-Path to Check if a Folder Exists
    Creating a Folder with New-Item
    Modifying the Script for Others

    Using Test-Path to Check if a Folder Exists

    The first step in this script is to use the Test-Path command to check if the desired folder already exists. The Test-Path command returns a boolean value indicating whether the specified path exists.

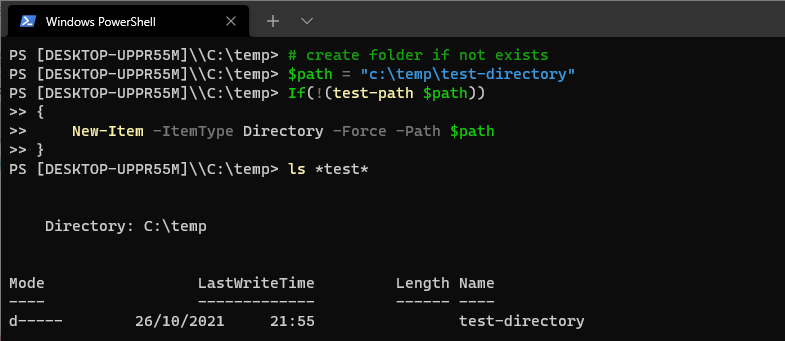
    To check if a folder exists using PowerShell, we can use the following syntax:

    # Check if folder exists
    $path = "c:\temp\"
    If(!(test-path $path))

    Here, we are storing the path of the folder we want to check in the $path variable. The ! operator negates the boolean value returned by Test-Path, so the If statement will only execute if the folder does not exist.

    Creating a Folder with New-Item

    To create a new folder, we can use the New-Item command with the -ItemType parameter set to Directory. The -Force parameter ensures that the command will overwrite any existing files with the same name and the -Path parameter specifies the location where the new folder will be created.

    # create a new folder 
    New-Item -ItemType Directory -Force -Path $path

    Modifying the Script for Others

    To use this script to check for and create a different folder, simply modify the $path variable to the desired location. For example, to check for and create the c:\myfolder\ folder, you would use the following script:

    # create folder if not exists
    $path = "c:\myfolder\"
    If(!(test-path $path))
    {
        New-Item -ItemType Directory -Force -Path $path
    }
    

    By modifying the $path variable, you can use this script to check for and create any folder you need.

    PowerShell Create Folder if Not Exist

  • Get-TimeZone in PowerShell

    Get-TimeZone in PowerShell

    The Get-TimeZone command in PowerShell returns the current Time Zone of a computer, or it can be used to list all available Time Zones which will be useful if you’re planning on making changes to timezones.

    In this post I’m showing 2 examples of how to check Timezone with PowerShell:

    # Get the Time Zone of a Local Computer in PowerShell
    # Script to Output Available Time Zones to a Local CSV File

    Get the Time Zone of a Local Computer in PowerShell

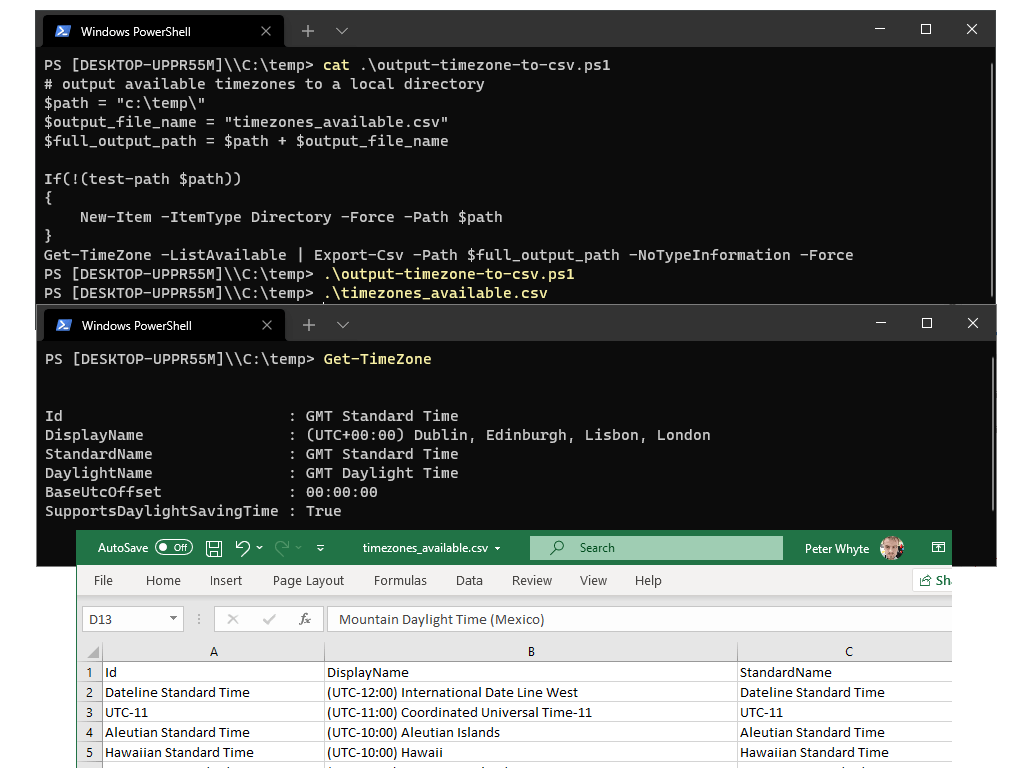
    Running Get-TimeZone in PowerShell will return the currently set timezone of the local Windows Computer.

    # get timezone powershell
    Get-TimeZone
    Get timezone PowerShell
    The above shows we are on GMT Standard Time, UTC+00:00.

    Script to Output Available Time Zones to a Local CSV File

    The PowerShell script below will output all available timezones to a local directory.

    # output available timezones to a local directory
    $path = "c:\temp\"
    $output_file_name = "timezones_available.csv"
    $full_output_path = $path + $output_file_name
    
    If(!(test-path $path))
    {
        New-Item -ItemType Directory -Force -Path $path
    }
    Get-TimeZone -ListAvailable | Export-Csv -Path $full_output_path -NoTypeInformation -Force
    

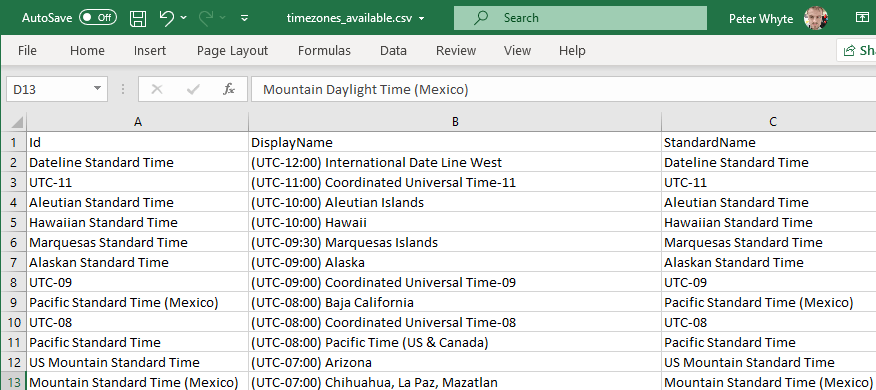
    I saved this script to my c:\temp and ran:

    The CSV will contain all timezones available, which is useful if amending timezones. The Set-TimeZone Microsoft Documentation page will help with this task.

    As ever, I hope this guide has been a useful one. Feel free to check out my PowerShell Tips page for more random PowerShell informational guides.

  • Show Event Logs in PowerShell

    Show Event Logs in PowerShell

    In this post, we will explore how to use PowerShell to view event logs. We will use the Get-EventLog command to accomplish this. Specifically, we will cover the following:
    List Event Types Available
    Get Most Recent Events
    Get Events Between a Date Range

    List Event Types Available

    To list the available event log types on a system using the Get-EventLog command, you can run the following:

    # Get event types PowerShell
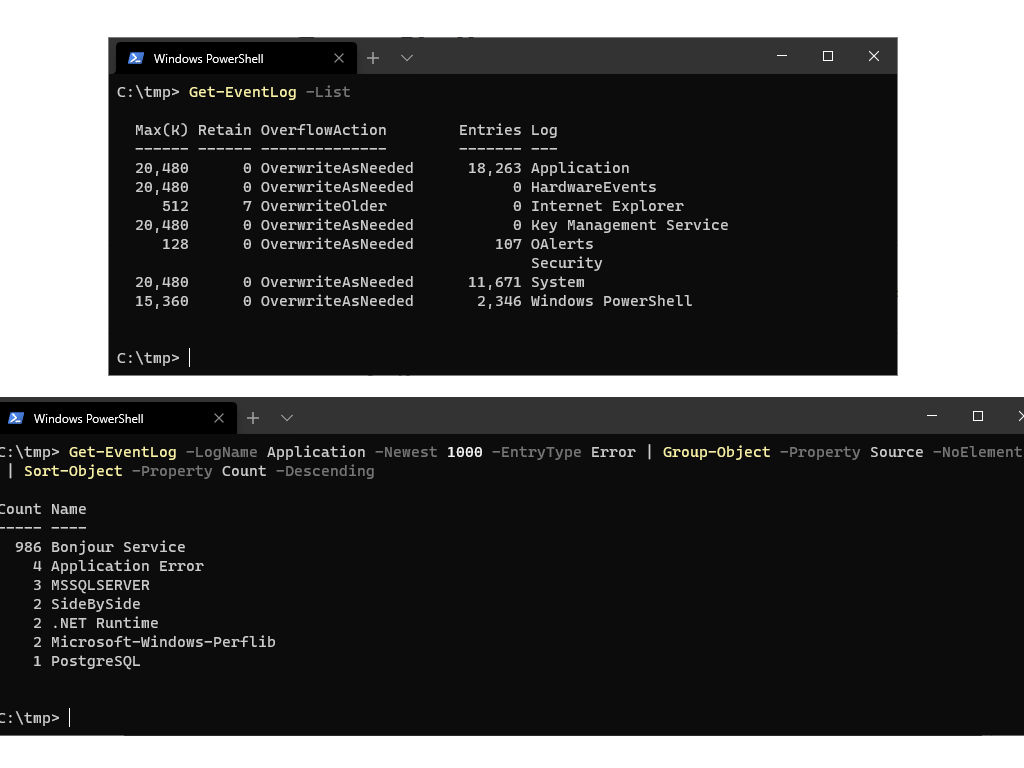
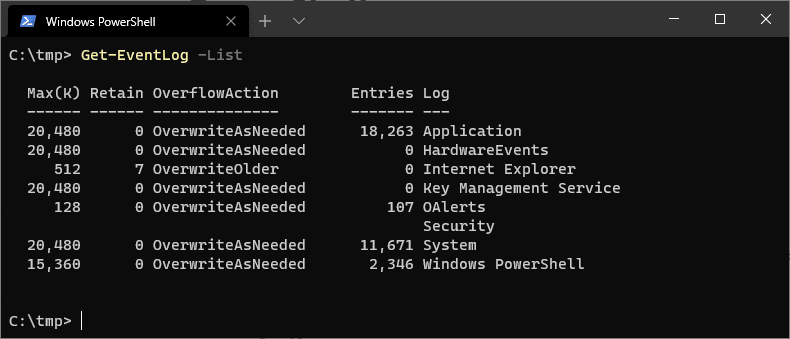
    Get-EventLog -List
    Get-EventLog -List

    This will return a list of event log types that are available on the system, such as System, Security, and Application. We can then use the -LogName parameter with Get-EventLog to specify a specific event log type to work with.

    Get Most Recent Events

    To return the most recent Windows events for investigating an error that occurred, you can use the following PowerShell command:

    # Get most recent Windows events PowerShell
    Get-EventLog -LogName System -Newest 100
    

    This command will retrieve the 100 most recent events from the System event log, which is where many critical errors and warnings are logged by Windows and other applications.

    In the next example below I am bringing back the newest 1000 error events, grouping by event name and count of error occurrences. This can give a high-level view of frequent events and recent events on the host.

    # Get most recent application events by count
    Get-EventLog -LogName Application -Newest 1000 -EntryType Error | Group-Object -Property Source -NoElement | Sort-Object -Property Count -Descending

    Get Events Between a Date Range

    Here is a PowerShell script that will get all critical and error events from the Windows event logs between a specified date range. The start and end dates can be passed as parameters to the script:

    param(
        [DateTime]$StartDate,
        [DateTime]$EndDate
    )
    
    # Get all critical and error events from the Windows event logs
    Get-WinEvent -FilterHashtable @{
        LogName = 'System, Application';
        Level = 1, 2;
        StartTime = $StartDate;
        EndTime = $EndDate
    }
    

    To run the script, you can use the following command, replacing START_DATE and END_DATE with the actual start and end dates:

    .\Get-CriticalAndErrorEvents.ps1 -StartDate '2021-01-01' -EndDate '2021-12-31'
    

    This script uses the Get-WinEvent cmdlet to retrieve events from the Windows event logs. It filters the events by log name (System and Application), level (critical and error), and date range (using the start and end date parameters). It then outputs the resulting events to the console.

  • Create New Files and Folders in PowerShell

    Create New Files and Folders in PowerShell

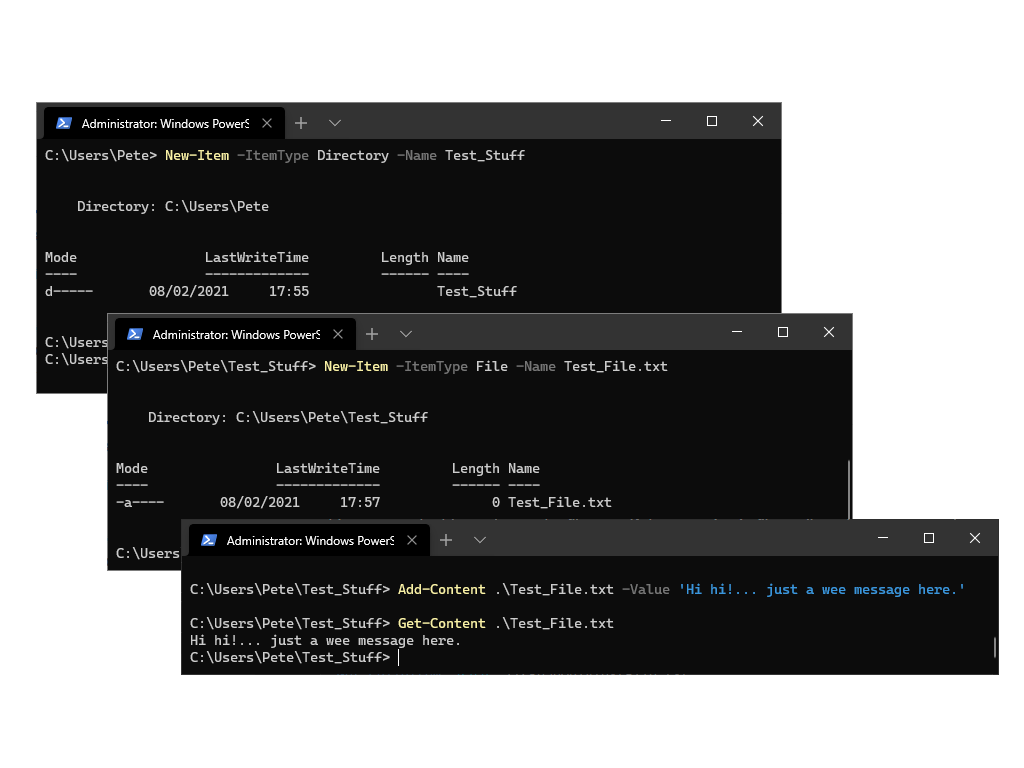
    The New-Item cmdlet will create new files or folders in PowerShell. Amend the -ItemType parameter to File or Directory and include a Name for the file or folder.

    This blog post will walk through the process of creating a new file and a new folder using PowerShell. I add an extra tip at the end on adding text to a file with PowerShell too.

    For more examples and up-to-date information on creating files with New-Item, we can refer to Microsoft Documentation. They have PowerShell New-Item command examples for creating PowerShell profiles and symbolic links.

    As described, the following is contained within this demo:
    # Create New Folder in PowerShell
    # Create New File in PowerShell
    # Add Text to File PowerShell

    Create Folder PowerShell

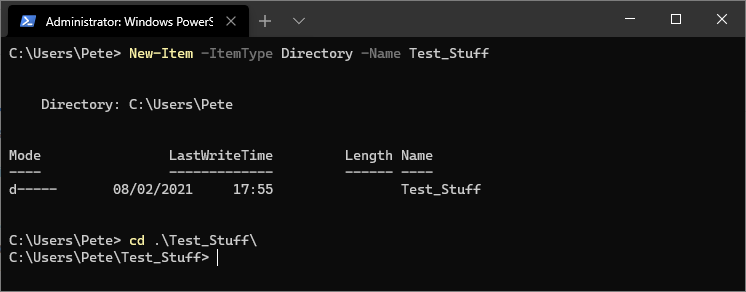
    To create a new folder in PowerShell, run New-Item -ItemType Directory -Name dirName, amending the name as desired.

    This will create a folder in the directory you are currently navigated to within the PowerShell Terminal. So for the example below, the new folder is being created in c:\users\pete\

    # PowerShell create new folder
    New-Item -ItemType Directory -Name Test_Stuff
    Create New Folder PowerShell

    Create File PowerShell

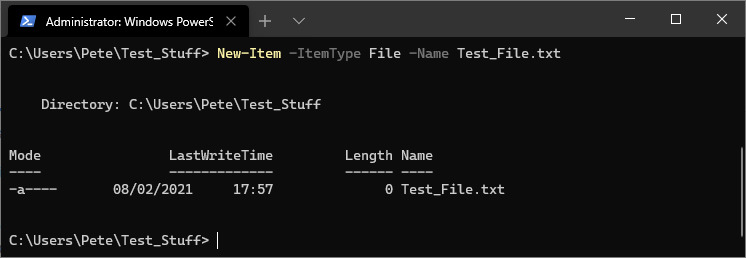
    To make a new file in PowerShell, run New-Item -ItemType File -Name testFile amending the name as desired. This creates a file within your current working terminal directory.

    This is the same command we ran above to create a folder, but this time changing the ItemType parameter.

    # PowerShell new file
    New-Item -ItemType File -Name Test_File.txt
    Create File PowerShell

    Add Text to File PowerShell

    Now for a bonus PowerShell tip that you did not search or ask for. How to add text to a file in PowerShell.

    To add text to a file in PowerShell we can use the Add-Content cmdlet, and we can verify with Get-Content to check the text in a file.

    # PowerShell add text to file
    Add-Content .\Test_File.txt -Value 'Hi hi!... just a wee message here.'
    
    # PowerShell show file content
    Get-Content .\Test_File.txt
    PowerShell Add Data to File
  • Testing Connectivity to Remote Server Ports with PowerShell

    Testing Connectivity to Remote Server Ports with PowerShell

    All admins need a tool to test connectivity to remote servers on TCP ports. In Windows, this is commonly done using PuTTy or PowerShell.

    This post is a note on my favourite way of testing remote TCP connections in Windows, which is using PowerShell:
    # Check a Port is Open (Pre Win08/Svr2012)
    # Check a Port is Open (Test-NetConnection)
    # Troubleshooting Remote Ports

    Important ports to remember in the life of a DBA may include:
    # SQL Server (1433)
    # RedShift (5439)
    # PostgreSQL (5432)
    # MySQL (3306)
    # Oracle (1521)

    Check a Port is Open (Pre Win08/Svr2012)

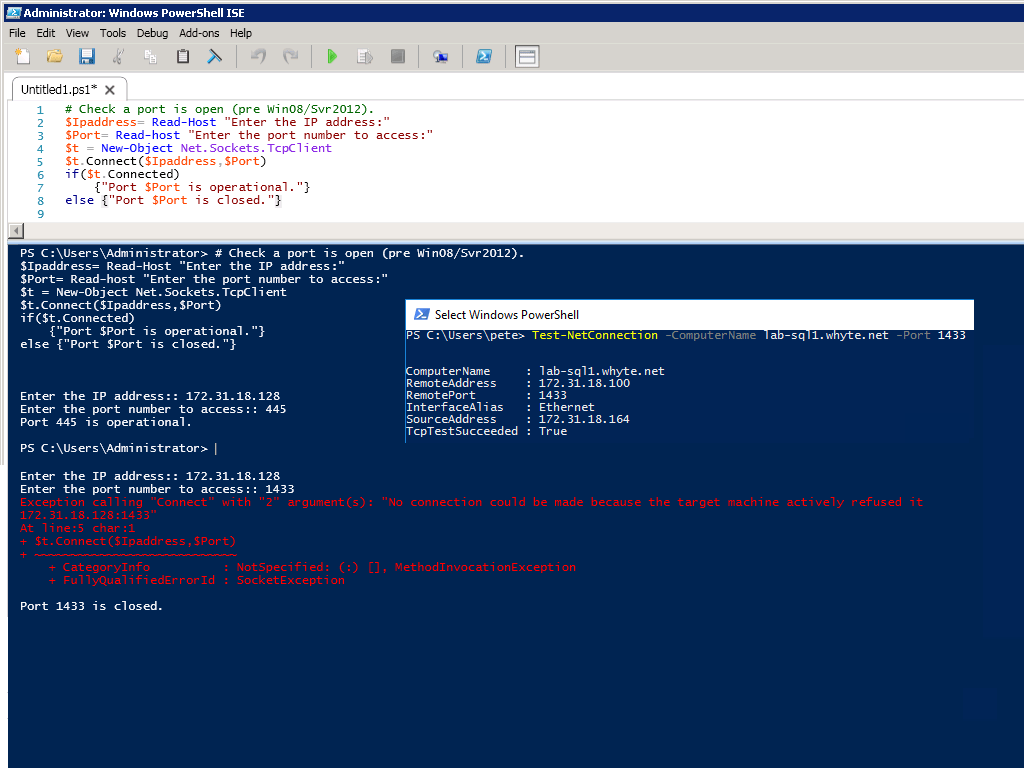
    This is for when you’re on a legacy server running an old version of PowerShell. I managed to spawn a Windows Server 2008 R2 box from the AWS Marketplace for this demo.

    # Check a port is open (pre Win08/Svr2012)
    $Ipaddress= Read-Host "Enter the IP address:"
    $Port= Read-host "Enter the port number to access:"
    $t = New-Object Net.Sockets.TcpClient
    $t.Connect($Ipaddress,$Port)
    if($t.Connected)
        {"Port $Port is operational."}
    else {"Port $Port is closed."}

    Enter IP address and port number when prompted.  

    Test-NetConnection PowerShell

    Below is an example of no connectivity, it’s failing to connect on port 1433. The server I’m testing does not have SQL Server installed, so there was nothing listening on that port.

    TCP Port Test PowerShell

    Check a Port is Open (Test-NetConnection)

    I’ve used Test-NetConnection frequently for years. It’s built-in to recent Editions of Window Server and is easier to use. We can also use ‘tnc’ as displayed in the example code below.

    # Test remote port is open
    Test-NetConnection -ComputerName lab-sql1.whyte.net -Port 1433
    
    # Same as above command using alternative syntax/ip
    tnc 172.31.18.100 -port 1433
    Test-NetConnection

    We can see from the screenshot above this test passed as TcpTestSucceeded came back true.

    Note:
    The traffic between you and another server may be flowing through various components that can include; local/internal/external firewalls, NAT Gateways, Security Groups/NACLs, load balancers & more.
    Diagnosing connectivity issues can be very complex. This is a simple test and might not be reflected in certain network traffic logs – if you’re troubleshooting maybe run your second port test with Putty.

    Troubleshooting Remote Ports

    If connectivity is failing, a few things to check may include:
    # There has to be something ‘listening’ on the remote server port.
    # Network (Inc. DNS) configurations & Security Groups.
    # Firewalls (at the Infrastructure level or local host config).

  • Count Rows within CSV Files using PowerShell

    Count Rows within CSV Files using PowerShell

    This post contains a script that will help count rows within multiple CSV files using PowerShell. If you have a directory containing CSV files, this demo will walk you through how to count the rows of all CSV files within a folder.

    Counting rows within CSV files may be useful for verifying data from source to destination. For example, if you’re importing CSV files to a SQL Server database, you may want to verify all rows were imported by counting the number of rows in each CSV file and comparing it with the table row counts in SQL.

    # Count Rows in Multiple CSV Files PowerShell
    # Check for Other Data Issues in CSV Files (Additional-Optional)

    Count Rows within CSV Files

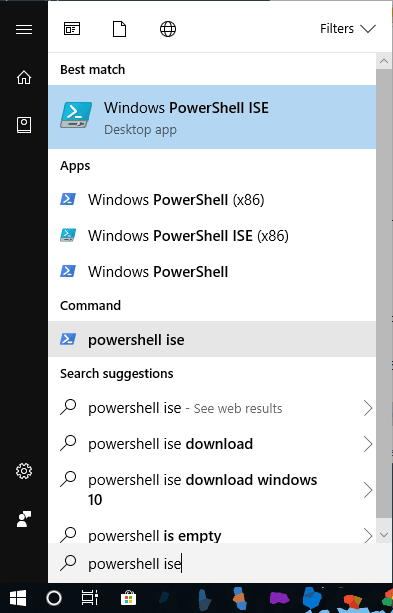
    First, open PowerShell ISE so we have a place to paste the PS script.

    Open PowerShell ISE Windows

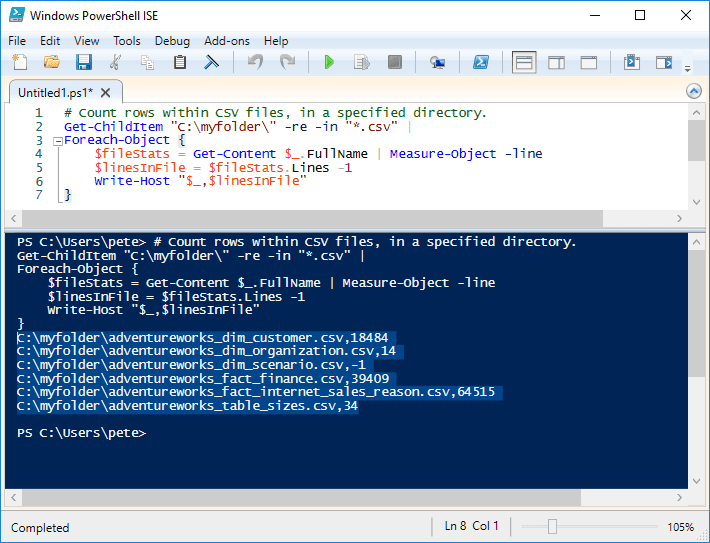
    Copy and paste the PowerShell script below into the PowerShell ISE window.

    Amend the directory (c:\myfolder) to the folder containing your CSV files, then Save/Run the PowerShell Script.

    # Count rows in CSV files PowerShell
    #  > set directory to folder containing csv files
    
    Get-ChildItem "C:\myfolder\" -re -in "*.csv" |
    Foreach-Object { 
        $fileStats = Get-Content $_.FullName | Measure-Object -line
        $linesInFile = $fileStats.Lines -1
        Write-Host "$_,$linesInFile" 
    }
    Count Rows within CSV Files using PowerShell

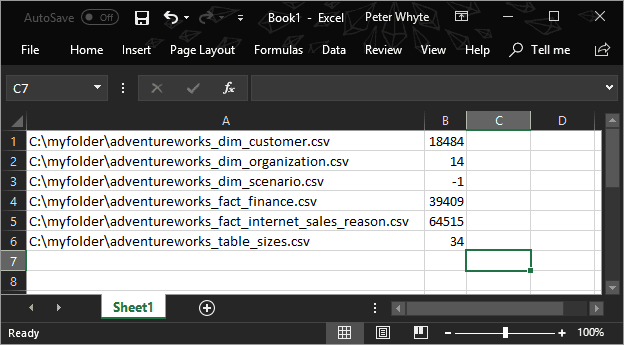
    We can copy this output information into Excel, but if doing so run Text to Columns and choose delimiter to format it correctly.

    CSV File Counts

    Verify Data / Check for Issues

    We can see in the screenshot above, one of the files has a row count of -1. This indicates that the file has no data, so we can throw ignore the CSV File. That’s one data issue out of the way.

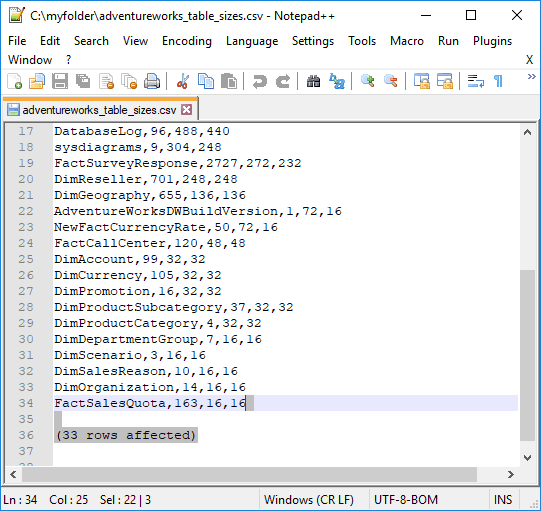
    Next up, I’m going to check for an issue whereby the CSV files contain “(12345 rows affected)” at the end of it. This is a common issue you may find when Exporting SQL Server Query Results to CSV.

    This is our example data issue. You wouldn’t want to attempt to import this CSV to SQL Server, as that gap in the row will create some bad data in the table.

    Notepad++ Adventureworks Table Rows

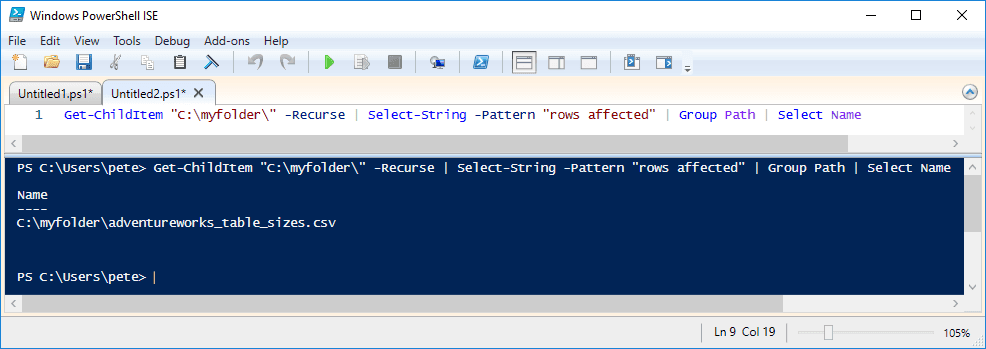
    We can run the PowerShell below to identify files with the string/phrase “rows affected“, checking all CSV files within a folder.

    # find string in csv files powershell
    Get-ChildItem "c:\myfolder\" -Recurse | Select-String -Pattern "rows affected" | Group Path | Select Name
    Find String in CSV Files PowerShell

    The script shows that one file has this “rows affected” string. We can manually remove this from the CSV file. To stop the “rows affected” MS SQL Server issue, we should export the data from SQL ensuring SET NOCOUNT ON has been added to the SQL Results to File query.