If C: is nearly full, a new WSL distro is the last thing it needs. By default wsl --install puts the distro’s virtual disk under your user profile on C:, and that disk only grows. Current WSL lets you pick the folder at install time instead:
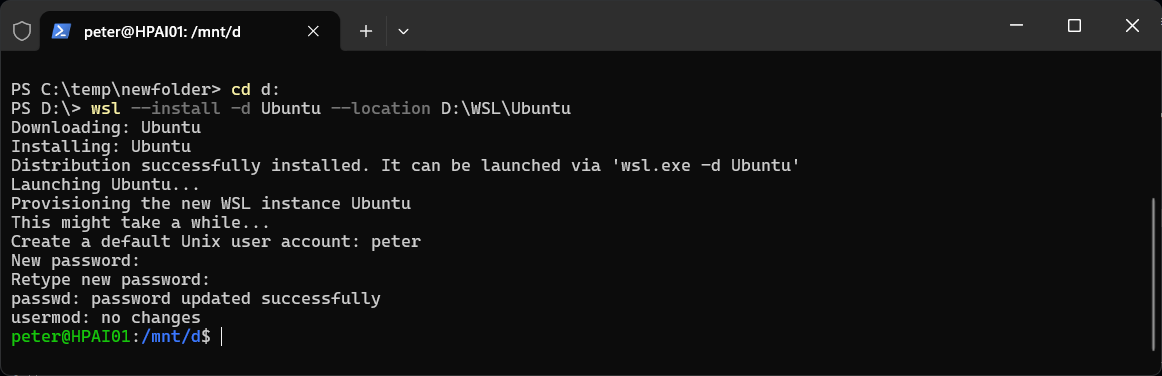
wsl --install -d Ubuntu --location D:\WSL\Ubuntu
That is the exact command I ran on 15 November 2026. My C: drive had already hit 0 bytes free on 25 October, which stopped every write on the machine, and I was not putting another virtual disk on it.
Check Your WSL Version First
--location is an option of the Store version of WSL, and older builds do not have it. Check what you are running, and confirm the flag is listed under --install in the help text:
wsl --version
wsl --help
If --location is missing from the help, update WSL and look again. The capture above is from WSL 2.7.10 on Windows 11.
wsl --update
Run the Install
List the distros you can install, then install the one you want into a folder on the other drive. Give each distro its own folder, because the folder ends up holding that distro’s ext4.vhdx.
# what is available
wsl --list --online

# install Ubuntu onto D:
wsl --install -d Ubuntu --location D:\WSL\Ubuntu
-d takes a name from the online list and --location takes the folder. WSL downloads the distro, installs it, launches it and asks you to create a Unix username and password. When you land at the Linux prompt, it is done. Type exit to get back to PowerShell.
Confirm Where It Landed
Do not take the install on trust. Ask WSL what is registered, then ask the registry where each distro lives:
wsl -l -v

Get-ChildItem HKCU:\Software\Microsoft\Windows\CurrentVersion\Lxss |
    ForEach-Object { '{0} -> {1}' -f $_.GetValue('DistributionName'), $_.GetValue('BasePath') }

Get-ChildItem D:\WSL\Ubuntu |
    Select-Object Name, @{n='GB';e={[math]::Round($_.Length/1GB,2)}}
The registry line should show your distro pointing at the folder you chose, and the folder should contain ext4.vhdx. That file is the whole distro, and it is now growing on D: instead of C:.
Other Install Options Worth Knowing
wsl --help lists a few more options under --install that sit well next to --location:
--name <Name>sets the name the distro is registered under, the one you see inwsl -l -v.--no-launchinstalls the distro without opening it straight away.--web-downloaddownloads the distro from the internet instead of the Microsoft Store.
The Distros Already on C:
--location only applies to a new install. It does nothing for a distro that already exists. For those:
- Keep it, but off C:: Move a WSL Distro Off the C: Drive covers
wsl --manage --move. - Keep it where it is, but smaller: Compact a WSL or Docker Desktop vhdx to Get Disk Space Back.
- Do not need it: How to Uninstall a Linux Distro in WSL. Unregistering deletes the distro and everything in it.
If the new distro should be the one that opens when you type wsl, set it as the default: How to Change Your Default Distro in WSL. And if WSL itself is not installed yet, start with How To Install Windows Subsystem for Linux (WSL).
One thing to leave alone: on a machine with Docker Desktop, like mine, docker-desktop shows up in wsl -l -v as a distro. Docker manages that one itself, so do not try to reinstall it with --location. The compact post above covers Docker’s disk.
Frequently Asked Questions
Does --location move WSL itself to the other drive?
No. It sets where that one distro’s virtual disk is stored. WSL itself stays installed as part of Windows. Every distro you install with the flag can have its own folder, on any drive.
Can I use --location on a distro I already have?
No. It is an install option. An existing distro is moved with wsl --manage <Distro> --move <Location>, or by export and import on older WSL.
How do I know where my existing distros are stored?
Each registered distro has a BasePath value under HKCU:\Software\Microsoft\Windows\CurrentVersion\Lxss. The registry command in this post prints the name and path of every one.
Related
If SQL Server is part of your day job, my current work lives over at sqldba.blog: production DBA scripts, an error library and the SSMS guide.
Leave a Reply